

Installing Docker
The hands-on exercises in this book will require that you have a working Docker host. You can follow the steps in this book, or you can execute the script located in this book's GitHub repository, in the chapter1 directory, called install-docker.sh.
Today, you can install Docker on just about every hardware platform out there. Each version of Docker acts and looks the same on each platform, making development and using Docker easy for people who need to develop cross-platform applications. By making the functions and commands the same between different platforms, developers do not need to learn a different container runtime to run images.
The following is a table of Docker's available platforms. As you can see, there are installations for multiple operating systems, as well as multiple CPU architectures:
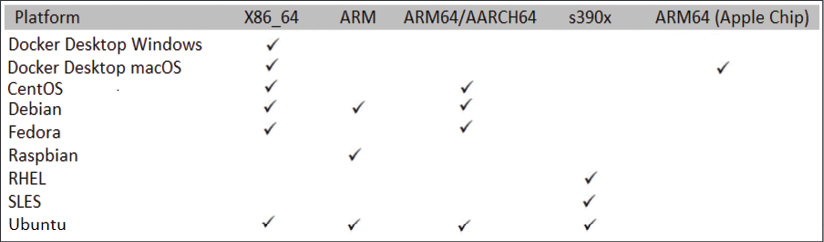
Figure 1.2: Available Docker platforms
Images that are created using one architecture cannot run on a different architecture. This means that you cannot create an image based on x86 hardware and expect that same image to run on your Raspberry Pi running an ARM processor. It's also important to note that while you can run a Linux container on a Windows machine, you cannot run a Windows container on a Linux machine.
The installation procedures that are used to install Docker vary between platforms. Luckily, Docker has documented many of the installation procedures on their website: https://docs.docker.com/install/.
In this chapter, we will install Docker on an Ubuntu 18.04 system. If you do not have an Ubuntu machine to install on, you can still read about the installation steps, as each step will be explained and does not require that you have a running system to understand the process. If you have a different Linux installation, you can use the installation procedures outlined on Docker's site at https://docs.docker.com/. Steps are provided for CentOS, Debian, Fedora, and Ubuntu, and there are generic steps for other Linux distributions.
Preparing to install Docker
Before we start the installation, we need to consider what storage driver to use. The storage driver is what provides the union filesystem, which manages the layers of the container and how the writeable layer of the container is accessed.
In most installations, you won't need to change the default storage driver since a default option will be selected. If you are running a Linux kernel that is at least version 4.0 or above, your Docker installation will use the overlay2 storage driver; earlier kernels will install the AUFS storage driver.
For reference, along with the overlay2 and AUFS drivers, Docker supports the btrfs storage driver. However, these are rarely used in new systems and are only mentioned here as a reference.
If you would like to learn about each storage driver, take a look at the following Docker web page, which details each driver and its use cases: https://docs.docker.com/storage/storagedriver/select-storage-driver/.
Now that you understand the storage driver requirements, the next step is to select an installation method. You can install Docker using one of three methods:
- Add the Docker repositories to your host system
- Install the package manually
- Use a supplied installation script from Docker
The first option is considered the best option since it allows for easy installation and making updates to the Docker engine. The second option is useful for enterprises that do not have internet access to servers, also known as air-gapped servers. The third option is used to install edge and testing versions of Docker and is not suggested for production use.
Since the preferred method is to add Docker's repository to our host, we will use that option and explain the process we should use to add the repository and install Docker.
Installing Docker on Ubuntu
Now that we have finished preparing everything, let's install Docker. (If you ran the install script from the book repo, you do not need to execute any of the installation steps)
- The first step is to update the package index by executing
apt-get update:sudo apt-get update - Next, we need to add any packages that may be missing on the host system to allow HTTPS apt access:
sudo apt-get install -y apt-transport-https ca-certificates curl gnupg lsb-release - To pull packages from Docker's repository, we need to add their keys. You can add keys by using the following command, which will download the
gpgkey and add it to your system:curl -fsSL https://download.docker.com/linux/ubuntu/gpg | sudo gpg --dearmor -o /usr/share/keyrings/docker-archive-keyring.gpgNow, add Docker's repository to your host system:
echo "deb [arch=amd64 signed-by=/usr/share/keyrings/docker-archive-keyring.gpg] https://download.docker.com/linux/ubuntu $(lsb_release -cs) stable" | sudo tee /etc/apt/sources.list.d/docker.list > /dev/nullWith all the prerequisites completed, you can install Docker on your server:
sudo apt-get update && sudo apt-get install -y docker-ce docker-ce-cli containerd.io - Docker is now installed on your host, but like most new services, Docker is not currently running and has not been configured to start with the system. To start Docker and enable it on startup, use the following command:
sudo systemctl enable docker && systemctl start docker
Now that we have Docker installed, let's get some configuration out of the way. First, we'll grant permissions to Docker.
Granting Docker permissions
In a default installation, Docker requires root access, so you will need to run all Docker commands as root. Rather than using sudo with every Docker command, you can add your user account to a new group on the server that provides Docker access without requiring sudo for every command.
If you are logged on as a standard user and try to run a Docker command, you will receive an error:
Got permission denied while trying to connect to the Docker daemon socket at unix:///var/run/docker.sock: Get http://%2Fvar%2Frun%2Fdocker.sock/v1.40/images/json: dial unix /var/run/docker.sock: connect: permission denied
To allow your user, or any other user you may want to add, to execute Docker commands, you need to add the users to a new group called docker that was created during the installation of Docker. The following is an example command you can use to add the currently logged-on user to the group:
sudo usermod -aG docker $USER
To add the new members to your account, you can either log off and log back into the Docker host, or activate the group changes using the newgrp command:
newgrp docker
Finally, you can test that it works by running the standard hello-world image (note that we do not require sudo to run the Docker command):
docker run hello-world
You should see the output shown below, which verifies that your user has access to Docker:
Unable to find image 'hello-world:latest' locally
latest: Pulling from library/hello-world
2db29710123e: Pull complete
Digest: sha256:37a0b92b08d4919615c3ee023f7ddb068d12b8387475d64c622ac30f45c29c51
Status: Downloaded newer image for hello-world:latest

Hello from Docker!
This message shows that your installation appears to be working correctly.
To generate this message, Docker took the following steps:
- The Docker client contacted the Docker daemon
- The Docker daemon pulled the hello-world image from Docker Hub (amd64)
- The Docker daemon created a new container from that image that runs the executable that produces the output you are currently reading
- The Docker daemon streamed that output to the Docker client, which sent it to your terminal
To try something more ambitious, you can run an Ubuntu container with:
$ docker run -it ubuntu bash
Share images, automate workflows, and more with a free Docker ID: https://hub.docker.com/
For more examples and ideas, visit https://docs.docker.com/get-started/
Now that we've granted Docker permission to run without sudo, we can start unlocking the commands at our disposal by learning how to use the Docker CLI.