
Creating Active Directory Domain Services
This section will cover some planning aspects and information about the components that will be created as part of a deployment. We will also cover deploying DCs on-premises and deploying Azure as Infrastructure as a Service (IaaS) resources and other considerations.
Planning for availability and performance
Before diving straight into deploying, let’s cover some planning steps.
The availability of the AD DS database is provided by the built-in native capability of the multi-master replication model, where the data is replicated across multiple DCs; there is no master-slave.
Deploying at least two DCs is a recommended best practice to provide the necessary services and AD database availability through this native replication capability.
This can be a double-edged sword in that it has pros and cons; multiple DCs can be made available to process authentication and authorization for access to domain resources, especially in the case of many multiple concurrent requests, such as login storms to a virtual desktop infrastructure, or a line of business (LoB) app or service. However, the downside is that this data replication can cause network congestion when data is transferred across the network. We can address this through sites and links, which help control this replication traffic. With that said, to address most enterprises’ availability and performance needs, you should have at least two DCs per geographical region. Here, each geographical region represents a site that improves performance and reduces replication and auth traffic over a WAN link to remote DCs; instead, this traffic can stay local to the region’s network.
Planning for data protection
In this section, you will learn how to protect your AD DS data store, which holds your database. We will also look at how to restore AD DS.
When we talk about data protection in general terms, the industry focuses on backing up data, which is an important task to discuss. However, the focus should always be on the desired outcome rather than the action – that is, we must focus on restoring data rather than backing it up. We always hear about backup strategies, but I encourage you to consider your restore strategy.
With AD DS, two levels of data protection are provided and, more importantly, data recovery; these are the AD recycle bin and being able to restore from a traditional backup copy of the data (this must have the included system state). Let’s look at each of those methods in more detail.
Recycle bin restore
The recycle bin is the first level of object restore and allows you to quickly and efficiently restore objects that may have been accidentally deleted. It only allows you to restore any deleted objects in the directory. It can’t roll back any changes made to an object by recovering to an earlier time; this can only be achieved with a traditional data backup method.
The recycle bin’s primary benefit is its Recovery Time Objective (RTO) – the time it takes to bring a deleted object back into operation. This can be achieved by requiring no downtime on the server, which would be required from the more traditional restore from the backup data approach.
For simplicity and speed, which are needed in a data recovery crisis, this restore can be performed from within the UI of the server itself. No backup software or hardware components need to be installed, and no license needs to be configured or paid for. However, the feature must be enabled, so it is important to do this before putting any DC into operation.
Once enabled, you will see it referenced as the Deleted Objects container in the AD Administrative Center (ADAC). Objects have a lifetime of 180 days by default, though this can be changed. The original location or alternate location can be set as the restore location.
Backup copy restore
The traditional Windows Server backup method is the next level of object restore; however, it has a much longer RTO due to the temporary offline nature of the traditional restore method when using a backup copy of the data to restore from. The system state must be explicitly included for the backups jobs to restore AD DS using the traditional Windows Server backup method.
The NTDSUtil, replmon, and repadmin command-line tools can also be used in the data protection operations to run validations, restore, seize FSMO roles, and so on.
Windows Server has a safe mode boot for DCs; this is called Directory Services Restore Mode (DSRM), allowing you to restore the directory database. Two types of restoration can be carried out: an authoritative restore and a non-authoritative restore. Let’s briefly look at each.
Authoritative restore
This type of restore replaces objects in the directory with a copy of the objects stored in the backup.
An authoritative restore means you wish to set the restored objects so that they persist in the directory and replace all the other copies of the objects through replication. That is, all the other DC copies will be updated and made consistent with the copy of the database stored in the restored DC.
Non-authoritative restore
This type of restore also replaces objects in the directory with a copy of the objects stored in the backup. However, the objects are not persisted, and the DC requests a pull replication from other DCs to ensure it has the latest copies of the database, including any changes that were made since the backup occurred; the restored objects are not restored to other DCs.
In this section, we looked at AD DS data protection. Now, let’s learn how to deploy AD DS DCs.
Deploying domain controllers
In this first section of this top-level topic, we will collectively look at deploying AD DS DCs in several scenarios, including deploying to on-premises platforms and deploying to the Microsoft Azure public cloud platform using IaaS virtual machines (VMs). However, note that deploying domain controllers for Azure AD DS won’t be covered here; this will be covered in Chapter 2, Implementing and Managing Azure Active Directory Domain Services.
Deploying a DC on Windows Server using Server Manager GUI
A DC is a server with the AD DS role installed on it. This can be installed and configured in many ways, such as via PowerShell, Server Manager, or WAC. As we continue our hybrid journey, we will see that WAC, in many cases, will often be the preferred and most optimal deployment and management tool for many hybrid scenarios.
A critical part of AD DS is DNS; AD DS requires a DNS server. The DNS server role is typically installed on the DC as part of the deployment configuration and will use AD-integrated DNS for a seamless experience.
Regarding availability, to ensure users can still log on, servers and other resources can authenticate to a DC if a DC can’t be reached. A minimum of two should be deployed for each domain in the forest. DCs should be placed as close to where the resources that require authentication are located, and ideally, in each physical location that requires local authentication to take place to reduce authentication traffic that would have to occur over a Wide Area Network (WAN) connection. We covered this in more detail in the Sites and Site links sections.
When using Server Manager to install the AD DS role, the process will start by installing some AD DS components and tools on the server. Once completed, you will be prompted to complete the post-deployment configuration, which will step you through promoting this server to a DC.
The configuration wizard will prompt you with several deployment configuration selections; we will look at these in this section so that you understand these when it comes to the hands-on exercise.
For the deployment configuration, you can select Add a domain controller to an existing domain, Add a new domain to an existing forest, or Add a new forest. If this is a new deployment of AD DS rather than deploying DCs to an existing AD DS instance, then you need to use the third option – add a new forest.
When you implement AD DS and deploy a domain and promote a server to be a DC that won’t be deployed into an existing AD forest, then, by default, a new forest will be created as the top-level container in the topology or hierarchy for the new AD DS instance. The first domain that’s created will be created as the forest root domain:

Figure 1.11 – Deployment operation options
Here, you specify a domain name for the root domain name; all subsequent child domains created within the forest will share the same contiguous DNS namespace. To define a domain with a new DNS namespace within the same forest, you would need to use the Add a new domain to an existing forest option, creating a new domain tree. This is shown in the following diagram:
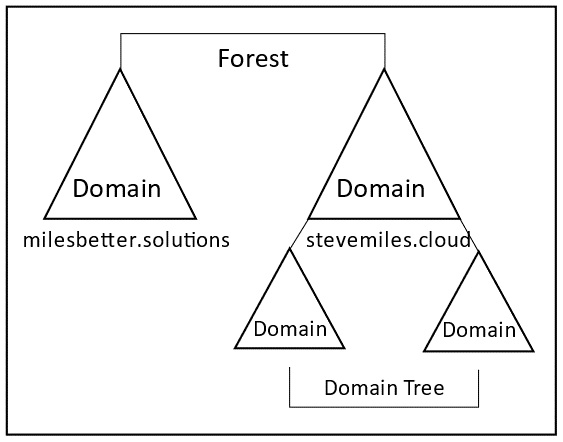
Figure 1.12 – Domain tree
Once the deployment configuration step is complete, you will be presented with the Domain Controller Options screen. From here, you can set the forest’s functional level. Note that this is where you get to set the DC’s capabilities.
Note that at the bottom of this screen, there is a hyperlink for More about domain controller options. This will take you to the Microsoft documentation. If you haven’t done so already, it is recommended that you follow this link and study the information in the documentation before proceeding so that you are aware of all the information we do not have space to cover in this book:
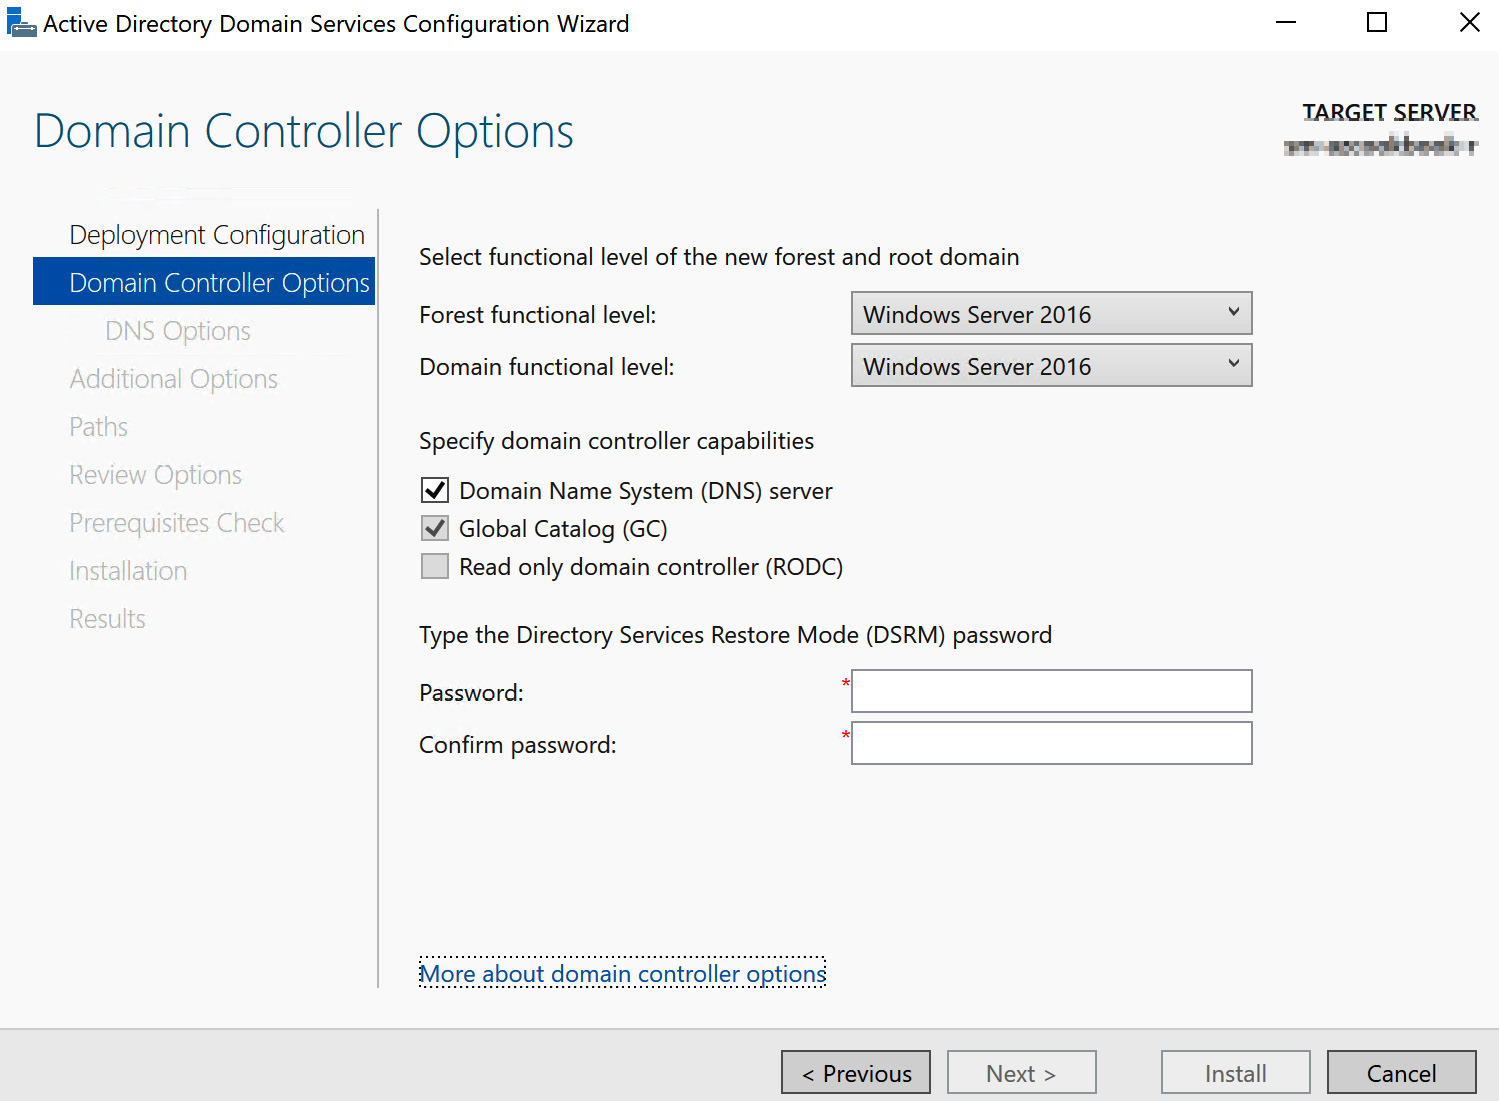
Figure 1.13 – Domain controller options
As shown in the preceding screenshot, you can choose whether the DC should be a DNS server. Note that the Global Catalog (GC) option is automatically assigned as the first DC in a new domain and that the Read-only domain controller (RODC) option is grayed out; again, this is because this is the first DC in the domain. When you choose the Add a domain controller to an existing domain option on the previous Deployment Configuration screen, these options can be selected; we will look at installing an RODC later.
On the following screens, you have the option to create DNS delegation records and verify and change the generated NetBIOS name if necessary.
Under the Paths section of the configuration wizard, you can specify different locations for the AD DS database, log files, and SYSVOL:
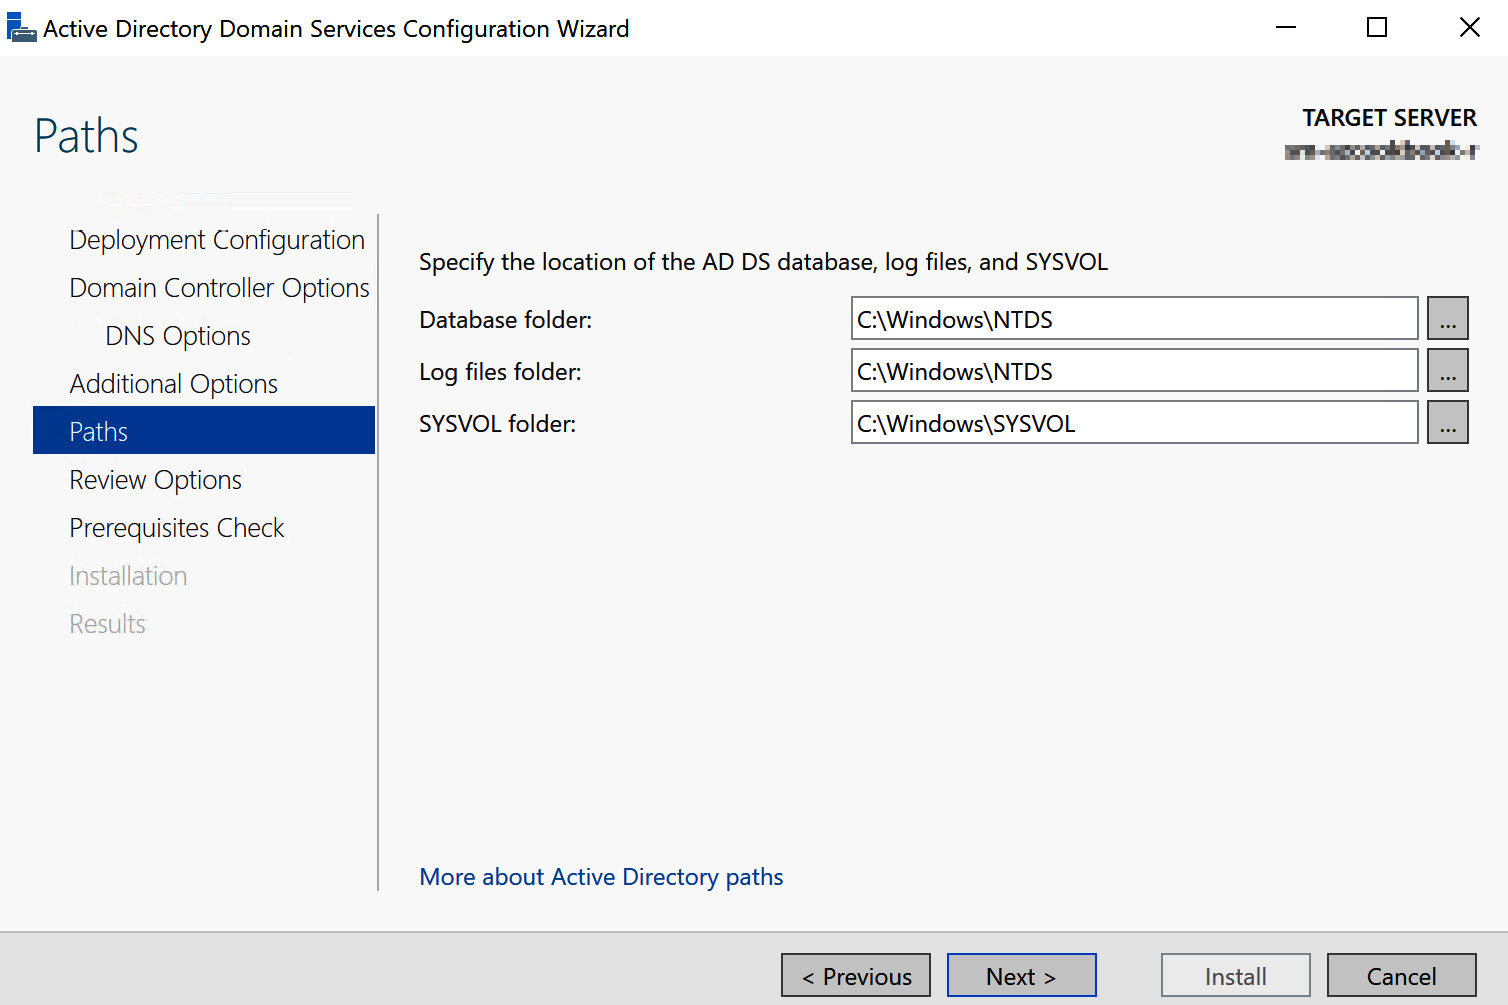
Figure 1.14 – Install paths
You should specify the location that meets your needs; the component’s paths can impact the performance of AD DS. This is more critical when installing AD DS on IaaS VM DCs, which we will look at later in this chapter, due to disk caching.
Deploying a DC on Windows Server Core
There is no GUI on Windows Server Core. So, to install AD DS, you need an alternative method such as Windows PowerShell with the AD module; alternatively, you can use the Remote Server Administration Tools (RSAT), Windows Admin Center, Server Manager, and PowerShell remoting tools from a remote machine that can connect to the server’s core machine.
Deploying a DC from media
This is only for deploying additional DCs to an existing AD DS environment. This deployment approach creates a backup of AD DS and then transfers it to removable media such as a USB drive. You start by deploying AD DS on the server that will be the DC via the Server Manager GUI and select the Install from media option. This is very similar to a non-authoritative recovery – that is, the AD DS database and its objects will only be as current as the date when the backup was taken. So, to get the latest changes to the directory since the backup, pull replication must occur. This will ensure that the new DC is consistent with all the other DCs and has the same copy of the directory objects.
Deploying a DC in Azure as IaaS
As we learned earlier in this chapter, as well as deploying DCs to on-premises platforms, we can also deploy DCs to the Microsoft Azure public cloud platform as IaaS VMs. However, note that deploying AD DS is not covered here and will be covered in Chapter 2, Implementing and Managing Azure Active Directory Domain Services.
When deploying a DC in Azure or the AD DS role in an IaaS VM, there are some considerations you need to be aware of:
- Networks: To add DCs to an existing AD DS environment, you should consider network connectivity. Here, you must have a line of sight to those existing DCs. This will require your networks that have DCs placed on them to be extended into Azure. This is typically done over a VPN or, in some scenarios, ExpressRoute.
- Sites/Subnets: These should be created to reflect the address space(s) defined in your Azure VNet.
- DNS: Azure AD DNS cannot be used for AD DS; you should use the DNS role within Windows Server or Azure private DNS zones.
- VMs: Due to the burstable CPU capability in the B Series VMs, they are an excellent fit to be used for DCs.
- Disks: Since implementing AD DS will install a database on the VM; we should follow some guidance on that scenario – that is, we shouldn’t install on any disks that have caching enabled – especially write caching. To meet this guidance, you should not place the
NTDS.DITandSYSVOLfiles in the default path offered to you during the configuration wizard; instead, you should attach a data disk to the VM (which has to write caching off by default) and change the path to store these files in the data drive.
Deploying an RODC
To deploy an RODC, we can use a pre-staged account to perform the AD DS install tasks. This will ensure that a user does not need to be a member of the domain’s admin group or enterprise admins group.
A new site and subnet should be created to control this traffic replication to the RODCs. The replication schedule can be set on the default site link.
Upgrading the OS of an existing DC
The underlying OS of a DC from Windows Server 2012 R2 to Windows Server 2022 can be upgraded as if it did not have the AD DS role installed. There are no differences, known issues, or limitations placed on it because it performs as a DC.
This section concludes the second of this chapter’s three skills areas: creating AD DS, where we looked at planning and deployment information. In the next section, we will look at the last of this chapter’s three skills areas: managing AD DS.