-
Book Overview & Buying
-
Table Of Contents

-
Feedback & Rating

Mastering Veeam Backup & Replication 10
By :
Mastering Veeam Backup & Replication 10
By:
Overview of this book
Veeam is one of the leading modern data protection solutions, and mastering this technology can help you to protect your virtual environments effectively. This book guides you through implementing modern data protection solutions for your cloud and virtual infrastructure with Veeam. You will even gain in-depth knowledge of advanced concepts such as DataLabs, cloud backup and recovery, Instant VM Recovery, and Veeam ONE.
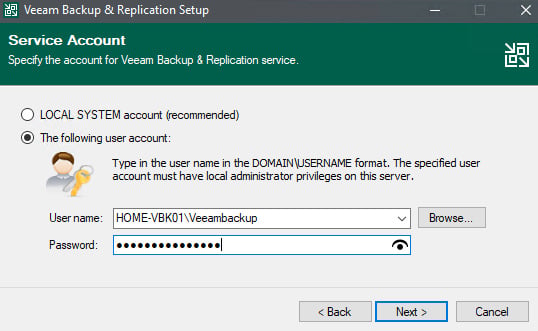
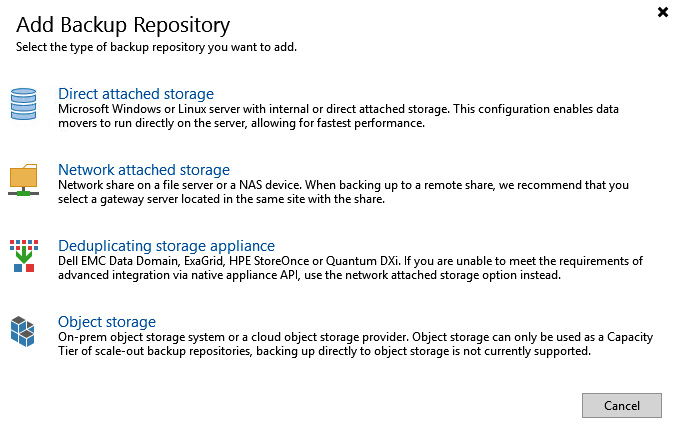
This book starts by taking you through Veeam essentials, including installation, best practices, and optimizations for Veeam Backup & Replication. You'll get to grips with the 3-2-1 rule to safeguard data along with understanding how to set up a backup server, proxies, repositories, and more. Later chapters go on to cover a powerful feature of Veeam 10 – NAS backup. As you progress, you'll learn about scale-out Repositories and best practices for creating them. In the concluding chapters, you'll explore the new proxy option available in both Linux and Windows. Finally, you'll discover advanced topics such as DataLabs, cloud backup and recovery, Instant VM Recovery, and Veeam ONE.
By the end of this book, you will be equipped with the skills you need to implement Veeam Backup & Replication for your environment and disaster recovery.
Table of Contents (15 chapters)
Preface

Section 1: Installation – Best Practices and Optimizations
 Free Chapter
Chapter 1: Installation – Best Practices and Optimization
Chapter 2: The 3-2-1 Rule – Keeping Data Safe
Section 2: Storage – NAS Backup, Linux, SOBR, and OBS
Chapter 3: NAS Backup
Chapter 4: Scale-Out Repository and Object Storage – New Copy Policy
Chapter 5: Windows and Linux – Proxies and Repositories
Chapter 6: Object Storage – Immutability
Section 3: DataLabs, Cloud Backup, and Veeam ONE
Chapter 7: Veeam DataLabs
Chapter 8: Cloud Backup and Recovery Using Veeam Cloud Connect Provider and the Insider Protection Feature
Chapter 9: Instant VM Recovery
Chapter 10:Veeam ONE
Customer Reviews