Book Image

Mastering pfSense - Second Edition

By : David Zientara
Book Image

Mastering pfSense - Second Edition

By: David Zientara

Overview of this book

pfSense has the same reliability and stability as even the most popular commercial firewall offerings on the market – but, like the very best open-source software, it doesn’t limit you. You’re in control – you can exploit and customize pfSense around your security needs. Mastering pfSense - Second Edition, covers features that have long been part of pfSense such as captive portal, VLANs, traffic shaping, VPNs, load balancing, Common Address Redundancy Protocol (CARP), multi-WAN, and routing. It also covers features that have been added with the release of 2.4, such as support for ZFS partitions and OpenVPN 2.4. This book takes into account the fact that, in order to support increased cryptographic loads, pfSense version 2.5 will require a CPU that supports AES-NI. The second edition of this book places more of an emphasis on the practical side of utilizing pfSense than the previous edition, and, as a result, more examples are provided which show in step-by-step fashion how to implement many features.
Table of Contents (15 chapters)

pfSense configuration

If installation was successful, you should see a screen similar to the one shown in the following screenshot:

The console menu in pfSense 2.4.3

Some of the initial configuration must be done at the console, while some aspects of the configuration, such as VLAN and DHCP setup, can be done from either the console or the web GUI.

Configuration takes place in two phases. Some configuration must be done at the console, including interface configuration and interface IP address assignment. Some configuration steps, such as VLAN and DHCP setup, can be done both at the console and within the web GUI. On initial bootup, pfSense will automatically configure the WAN and LAN interfaces, according to the following parameters:

  • Network interfaces will be assigned to device IDs em0, em1, and so on
  • The WAN interface will be assigned to em0, and the LAN interface will be assigned to em1
  • The WAN interface will look to an upstream DHCP server for its IP address, while the LAN interface will initially be assigned an IP address of 192.168.1.1

You can, of course, accept these default assignments and proceed to the web GUI, but chances are you will need to change at least some of these settings. If you need to change interface assignments, select 1 from the menu.

Configuration from the console

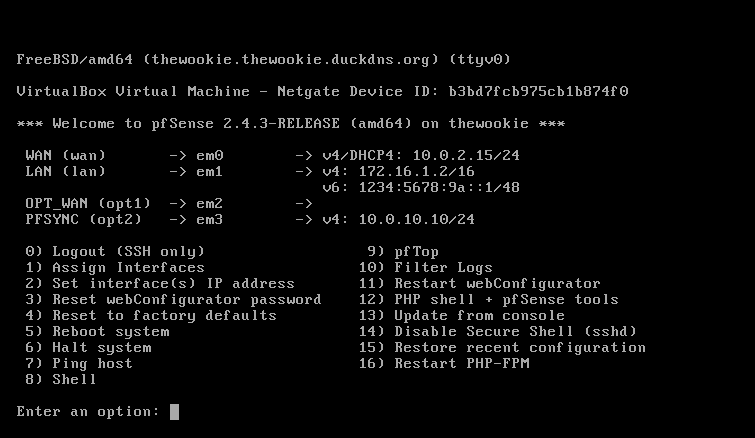
On boot, you should eventually see a menu identical to the one seen on the CD version, with the boot multi or single user options, and other options. After a timeout period, the boot process will continue and you will get an Options menu. If the default interface assignments are unsatisfactory, select 1 from the menu to begin interface assignment. This is where the network cards installed in the system are given their roles as WAN, LAN, and optional interfaces (OPT1, OPT2, and so on).

If you select this option, you will be presented with a list of network interfaces. This list provides four pieces of information:

  • pfSense's device name for the interface (fxp0, em1, and so on)
  • The MAC address of the interface
  • The link state of the interface (up if a link is detected; down otherwise)
  • The manufacturer and model of the interface (Intel PRO 1000, for example)

As you are probably aware, generally speaking, no two network cards have the same MAC address, so each of the interfaces in your system should have a unique MAC address.

  1. To begin the configuration, select 1 and Enter for the Assign Interfaces option.
  2. After that, a prompt will show up for VLAN configuration.
We will cover VLAN configuration in Chapter 4, Using pfSense as a Firewall, and we will cover both configuration from the command line and web GUI VLAN configuration.
  1. If you wish to set up VLANs, see Chapter 3, VLANs. Otherwise, type n and press Enter. Keep in mind that you can always configure VLANs later on.
  2. The interfaces must be configured, and you will be prompted for the WAN interface first.
  1. If you only configure one interface, it will be assigned to the WAN, and you will subsequently be able to log in to pfSense through this port.

This is not what you would normally want, as the WAN port is typically accessible from the other side of the firewall.

  1. When at least one other interface is configured, you will no longer be able to log in to pfSense from the WAN port. Unless you are using VLANs, you will have to set up at least two network interfaces.

In pfSense, network interfaces are assigned rather cryptic device names (for example, fxp0, em1, and so on) and it is not always easy to know which ports correspond to particular device names. One way of solving this problem is to use the automatic interface assignment feature.

  1. To do this, unplug all network cables from the system, and then type a and press Enter to begin auto-detection.
  2. The WAN interface is the first interface to be detected, so plug a cable into the port you intend to be the WAN interface.

The process is repeated with each successive interface.

  1. The LAN interface is configured next, then each of the optional interfaces (OPT1, OPT2).
If auto-detection does not work, or you do not want to use it, you can always choose manual configuration. You can always reassign network interfaces later on, so even if you make a mistake on this step, the mistake can be easily fixed.
  1. Once you have finished configuration, type y at the Do you want to proceed? prompt, or type n and press Enter to re-assign the interfaces.
  2. Option two on the menu is Set interface(s) IP address, and you will likely want to complete this step as well. When you invoke this option, you will be prompted to specify which interface's IP address is to be set.
  1. If you select WAN interface, you will be asked if you want to configure the IP address via DHCP. In most scenarios, this is probably the option you want to choose, especially if pfSense is acting as a firewall. In that case, the WAN interface will receive an IP address from your ISP's DHCP server. For all other interfaces (or if you choose not to use DHCP on the WAN interface), you will be prompted to enter the interface's IPv4 address.
  2. The next prompt will ask you for the subnet bit count. In most cases, you'll want to enter 8 if you are using a Class A private address, 16 for Class B, and 24 for Class C, but if you are using classless subnetting (for example, to divide a Class C network into two separate networks), then you will want to set the bit count accordingly.
  3. You will also be prompted for the IPv4 gateway address (any interface with a gateway set is a WAN, and pfSense supports multiple WANs); if you are not configuring the WAN interface(s), you can just hit Enter here.
  4. Next, you will be prompted to provide the address, subnet bit count, and gateway address for IPv6; if you want your network to fully utilize IPv6 addresses, you should enter them here.

The advantages of IPv6 over IPv4 will be discussed more fully in Chapter 2, Advanced pfSense Configuration.

We have now configured as much as we need to from the console (actually, we have done more than we have to, since we really only have to configure the WAN interface from the console). The remainder of the configuration can be done from the pfSense web GUI.

Configuration from the web GUI

The pfSense web GUI can only be accessed from another PC. If the WAN was the only interface assigned during the initial setup, then you will be able to access pfSense through the WAN IP address. Once one of the local interfaces is configured (typically the LAN interface), pfSense can no longer be accessed through the WAN interface. You will, however, be able to access pfSense from the local side of the firewall (typically through the LAN interface). In either case, you can access the web GUI by connecting another computer to the pfSense system, either directly (with a crossover cable) or indirectly (through a switch), and then typing either the WAN or LAN IP address into the connected computer's web browser.

If you enabled the LAN interface but did not enable DHCP on LAN, or if you are accessing the web GUI on another computer on the LAN network, you must statically set the IP address on that computer to a valid IP address for the LAN network (for example, if the LAN interface IP address is 192.168.1.1 and the LAN network is 192.168.1.0/24, set it to 192.168.1.2 or any number other than 1 for the last octet).
  1. When you initially log in to pfSense, the default username/password combination will be admin/pfsense, respectively.
  2. On your first login, the Setup Wizard will begin automatically.
  3. Click on the Next button to begin configuration.
If you need to run the Setup Wizard after your initial login, select System | Setup Wizard from the top menu.
  1. The first screen provides a link for information about a pfSense Gold Netgate Global Support subscription. You can click on the link to sign up to learn more, or click on the Next button.
  2. On the next screen, you will be prompted to enter the hostname of the router as well as the domain. Hostnames can contain letters, numbers, and hyphens, but must begin with a letter. If you have a domain, you can enter it in the appropriate field.
  3. In the Primary DNS Server and Secondary DNS Server fields, you can enter your DNS servers. If you are using DHCP for your WAN, you can probably leave these fields blank, as they will usually be assigned automatically by your ISP. However, your ISP's DNS servers may not be reliable. There are many third party DNS servers available, including OpenDNS (208.67.220.220 and 208.67.222.222) and Google Public DNS (8.8.8.8 and 8.8.4.4). Uncheck the Override DNS checkbox if you want to use third party DNS servers rather than the DNS servers used by your ISP. Click on Next when finished.
  4. The next screen will prompt you for the Network Time Protocol (NTP) server as well as the local time zone. The NTP server configuration will be covered in greater detail in the next chapter; you can keep the default value for the server hostname for now. For the Timezone field, you should select the zone which matches your location and click on Next.
  5. The next screen of the wizard is the WAN configuration page.

In most scenarios, you won't need to make any further changes to the WAN in comparison to what was done at the console (at least initially; a multi-WAN setup is more involved and will be discussed more fully in Chapter 9, Multiple WANs).

If you need to make changes, however, there are several options on this page.

  1. For Selected Type, you have several options, but the most commonly used options are DHCP (the default type) or Static.

    If your pfSense system is behind another firewall and it is not going to receive an IP address from an upstream DHCP server, then you probably should choose Static. If pfSense is going to be a perimeter firewall, however, then DHCP is likely the correct setting, since your ISP will probably dynamically assign an IP address (this is not always the case, as you may have an IP address statically assigned to you by your ISP, but it is the more likely scenario).
  1. The other choices are Point-to-Point Protocol over Ethernet (PPPoE) and Point-to-Point Tunneling Protocol (PPTP). Your ISP may require that you use one of these options for the WAN interface; if you are not sure, check with them.
  2. If you selected either PPPoE or PPTP, you will have to scroll down to the appropriate part of the page to enter parameters for these connections.
  3. At a minimum, you will likely have to enter the Username and Password for such connections. In addition, PPTP requires that you enter a local IP address and a remote IP address.
  4. The dial-on-demand checkbox for PPPoE and PPTP connections allows you to connect to your ISP only when a user requests data that requires an internet connection. Both PPPoE and PPTP support an Idle timeout setting, which specifies how long the connection will be kept open after transmitting data when this option is invoked. Leaving this field blank disables this function.
PPP (Point-to-Point Protocol) and L2TP (Layer 2 Tunneling Protocol) are also valid choices for the WAN configuration type. However, the Setup Wizard does not allow the user to select either of these. In order to select PPP or L2TP, navigate to Interfaces | WAN from the top menu, and select PPP or L2TP in either the IPv4 Configuration Type or IPv6 Configuration Type drop-down box (or both). Setup is similar to the setup for PPPoE and PPTP – you will have to enter a Username and Password – and in the case of PPP, you will also have to enter your ISP's phone number in the Phone number field.
  1. We can now turn our attention to the General Configuration section. The MAC address field allows you to enter a MAC address that is different from the actual MAC address of the WAN interface.

    This can be useful if your ISP will not recognize an interface with a different MAC address than the device that was previously connected, or if you want to acquire a different IP address (changing the MAC address will cause the upstream DHCP server to assign a different address).
  1. If you use this option, make sure the portion of the address reserved for the Organizationally Unique Identifier (OUI) is a valid OUI – in other words, an OUI assigned to a network card manufacturer. (The OUI portion of the address is the first three bytes of a MAC-48 address and the first five bytes of an EUI-48 address).
  2. The next few fields can usually be left blank. Maximum Transmission Unit (MTU) allows you to change the MTU size if necessary. DHCP hostname allows you to send a hostname to your ISP when making a DHCP request, which is useful if your ISP requires this.
  3. The Block RFC1918 Private Networks checkbox, if checked, will block registered private networks (as defined by RFC 1918) from connecting to the WAN interface. The Block Bogon Networks option blocks traffic from reserved and/or unassigned IP addresses. For the WAN interface, you should check both options unless you have special reasons for not invoking these options. Click the Next button when you are done.
  4. The next screen provides fields in which you can change the LAN IP address and subnet mask, but only if you configured the LAN interface previously.
  5. You can keep the default, or change it to another value within the private address blocks. You may want to choose an address range other than the very common 192.168.1.x in order to avoid a conflict.
  6. Be aware that if you change the LAN IP address value, you will also need to adjust your PC's IP address, or release and renew its DHCP lease when finished with the network interface. You will also have to change the pfSense IP address in your browser to reflect the change.
  7. The final screen of the pfSense Setup Wizard allows you to change the admin password, which you should do now.
  8. Enter the password, enter it again for confirmation in the next edit box, and click on Next.
  1. Later on, you can create another administrator account with a username other than admin and disable the admin account, for additional security, unless you plan on setting up multiple firewalls for high availability, in which case you will need to retain the admin account.
  2. On the following screen, there will be a Reload button; click on Reload. This will reload pfSense with the new changes.
  3. Once you have completed the wizard, you should have network connectivity. Although there are other means of making changes to pfSense's configuration, if you want to repeat the wizard, you can do so by navigating to System | Setup Wizard. Completion of the wizard will take you to the pfSense dashboard.

Configuring additional interfaces

By now, both the WAN and LAN interface configurations should be complete. Although additional interface configurations can be done at the console, it can also be done (and somewhat more conveniently so) in the web GUI.

  1. To add optional interfaces, navigate to the Interfaces | Assignments tab, which will show a list of assigned interfaces, and at the bottom of the table, there will be an Available network ports option.
  2. There will be a corresponding drop-down box with a list of unassigned network ports. These will have device names such as fxp0, em1, and so on.
  3. To assign an unused port, select the port you want to assign from the drop-down box, and click on the + button to the right.
  4. The page will reload, and the new interface will be the last entry in the table. The name of the interface will be OPTx, where x equals the number of optional interfaces.
  5. By clicking on interface name, you can configure the interface.

Nearly all the settings here are similar to the settings that were available on the WAN and LAN configuration pages in the pfSense Setup Wizard.

Some of the options under the General Configuration section, that are not available in the Setup Wizard, are MSS (Maximum Segment Size), and Speed and duplex. Normally, MSS should remain unchanged, although you can change this setting if your internet connection requires it.

  1. If you click on the Advanced button under Speed and duplex, a drop-down box will appear in which you can explicitly set the speed and duplex for the interface. Since virtually all modern network hardware has the capability of automatically selecting the correct speed and duplex, you will probably want to leave this unchanged.
  2. The section at the bottom of the page, Reserved Networks, allows you to enable Block private networks and loopback addresses and Block bogon networks via their respective checkboxes. Although these options are checked by default when configuring the WAN interface, we normally want to allow private networks on internal interfaces, so these options are normally not enabled when configuring non-WAN interfaces.
  3. If you chose an option other than Static for the Configuration Type, then other options will appear.

Since it is unlikely that internal interfaces will be configured as such, further discussion of these options will take place in the next section on WAN configuration.

Additional WAN configuration

Most likely, you won't have to do any additional configuration for the WAN interface; the configuration done in the Setup Wizard will be enough to get you started. If you need to make changes, however, follow these steps:

  1. Navigate to Interfaces | WAN in the main menu.
  2. The most likely scenario is that your ISP will provide an IP address via DHCP, but many providers will provide you with a static IP address if you require one. In such cases, you will need to set your Configuration Type to Static and then enter your WAN IP address and CIDR under either the Static IPv4 Configuration or Static IPv6 Configuration (or possibly both, if you plan to have both an IPv4 and IPv6 address).
  3. You will also need to specify your ISP's gateway, which you can do by clicking on the Add a new gateway button. A dialog box will appear in which you can enter the IP address and a description.
  1. If you have selected DHCP as the configuration type, then there are several options in addition to the ones available in the Setup Wizard. Clicking on the Advanced checkbox in the DHCP client configuration causes several additional options to appear in this section of the page.
    • The first is Protocol Timing, which allows you to control DHCP protocol timings when requesting a lease. You can also choose several presets (FreeBSD, pfSense, Clear, or Saved Cfg) using the radio buttons on the right.
    • There is also a Configuration Override checkbox which, if checked, allows you to specify the absolute path to a DHCP client configuration file in the Configuration Override File edit box. If your ISP supports pfSense, it should be able to provide you with a valid configuration override file.
    • If the Configuration Override checkbox is not checked, there will be three edit boxes in this section under the checkboxes. The first is Hostname; this field is sent as a DHCP hostname and client identifier when requesting a DHCP lease. Alias IPv4 address allows you to enter a fixed IP address for the DHCP client. The Reject Leases from field allows you to specify the IP address or subnet of an upstream DHCP server to be ignored.
    • The next section is Lease Requirements and Requests. Here you can specify send, request, and require options when requesting a DHCP lease. These options are useful if your ISP requires these options. The last section is Option Modifiers, where you can add DHCP option modifiers, which are applied to an obtained DHCP lease.
  2. Starting with pfSense version 2.2.5, there is support for IPv6 with DHCP (DHCP6). If you are running 2.2.5 or above, there will be a section on the page called DHCP6 client configuration.
  3. Similar to the configuration for IPv4 DHCP, there are checkboxes for Advanced Configuration and Configuration Override.
  4. Checking the Advanced checkbox in the heading of this section displays the Advanced DHCP 6 options:
    • If you check the Information Only checkbox on the left, pfSense will send requests for stateless DHCPv6 information.
    • You can specify Send and Request options, just as you can for IPv4.
    • There is also a Script field where you can enter the absolute path to a script that will be invoked on certain conditions.
    • The next options are for the Identity Association Statement checkboxes. The NonTemporary Address Allocation checkbox results in normal, that is, not temporary, IPv6 addresses to be allocated for the interface. The Prefix Delegation checkbox causes a set of IPv6 prefixes to be allocated from the DHCP server.
    • The next set of options, Authentication Statement, allows you to specify authentication parameters to the DHCP server. The Authname parameter allows you to specify a string, which in turn specifies a set of parameters.
    • The remaining parameters are of limited usefulness in configuring a DHCP6 client, because each has only one allowed value, and leaving them blank will result in only the allowed value being used. If you are curious as to what these values are here they are:
  1. Finally, Key info Statement allows you to enter a secret key. The required fields are key id, which identifies the key, and secret, which provides the shared secret. key name and realm are arbitrary strings and may be omitted. expire may be used to specify an expiration time for the key, but if it is omitted, the key will never expire.
    1. If you do not check the configuration override checkbox (in which case you will specify a configuration override file, similar to how this option works with DHCP over IPv4), there will be several more options in this DHCP Client Configuration section . Use IPv4 connectivity as parent interface allows you to request an IPv6 prefix over an IPv4 link.
    2. Request only an IPv6 prefix allows you to request just the prefix, not an address. DHCPv6 Prefix Delegation size allows you to specify the prefix length.
    3. You can check the Send IPv6 prefix hint to indicate the desired prefix length, Debug for debugging, and select Do not wait for an RA (router advertisement) and/or Do not allow PD/Address release, if your ISP requires it.
  2. The last section on the page is identical to the interface configuration page in the Setup Wizard, and contains the Block Private Networks and Block Bogon Networks checkboxes.
For information on how to configure other Configuration Type options such as PPTP and PPPoE, refer to the information about Setup Wizard configuration under the heading Configuration from the web GUI.

General setup options

You can find several configuration options under System | General Setup. Most of these are identical to settings that can be configured in the Setup Wizard (Hostname, Domain, DNS servers, Timezone, and NTP server). There are two additional settings available:

  1. The Language drop-down box allows you to select the web configurator language.
  2. Under the Web Configurator section, there is a Theme drop-down box that allows you to select the theme. The default theme of pfSense is perfectly adequate, but you can select another one here. There are several new theme options available for version 2.4, so if you have not tried these, you may want to do so.

pfSense 2.3 added new options to control the look and feel of the web interface and 2.4 has added some more; these settings are also found in the Web Configurator section of the General Settings page:

  1. The top navigation drop-down box allows you to choose whether the top navigation scrolls with the page, or remains anchored at the top as you scroll.
  2. The Hostname in the Menu option allows you to replace the Help menu title with the system name or fully qualified domain name (FQDN).
  3. The Dashboard Columns option allows you to select the number of columns on the dashboard page (the default is 2).
  4. The next set of options is Associated Panels Show/Hide. These options control the appearance of certain panels on the Dashboard and System Logs page. The options are:
    • Available Widgets: Checking this box causes the Available Widgets panel to appear on the Dashboard. Prior to version 2.3, the Available Widgets panel was always visible on the Dashboard.
    • Log Filter: Checking this box causes the Advanced Log Filter panel to appear on the System Logs page. Advanced Log Filter allows you to filter the system logs by time, process, PID, and message.
    • Manage Log: Checking this box causes the Manage General Log panel to appear on the System Logs page. The Manage General Log panel allows you to control the display of the logs, how big the log file may be, and the formatting of the log file, among other things.
    • Monitoring Settings: Checking this box causes the Settings section to appear on the Status | Monitoring page, which allows custom configuration of the interactive graph on that page.
  5. The Require State Filter checkbox, if checked, causes the state table in Diagnostics | States to only appear if a filter is entered.
  6. The last option on this page, Left Column Labels, allows you to select/toggle the first item in a group by clicking on the left column if checked.
  1. The last three options on the page were added with version 2.4:
    • The Alias Popups checkbox, if checked, will disable showing the details of an alias in alias popups that appear when dragging the mouse over an alias on the Firewall page.
    • The Login page color drop-down box allows you to customize the login page color; the current default color is blue.
    • Finally, the Login hostname checkbox, when checked, will display the hostname on the login page. Having the hostname on the login page can be a helpful reminder if you are managing a large network with several firewalls, but it also potentially gives away what network is being secured.
  2. Click on Save at the bottom of the page to save any changes.
Version 2.4.3 has added Cross-site request forgery (CSRF) protection to the dashboard widgets.