
VMware ESXi can be installed in more than one way. The traditional approach is to use the ESXi CD/DVD-ROM image to perform an interactive installation. In this recipe, we will learn how to install ESXi using the bootable installer image.
Installing ESXi – the interactive method
Getting ready
Before you begin, it is recommended that you refer to the VMware Compatibility Guide to verify whether the server hardware is compatible with VMware ESXi 6.7.
The VMware Compatibility Guide can be found at http://www.vmware.com/resources/compatibility/search.php.
Hardware requirements
Once you have made sure that the server hardware is compatible, the next step is to make sure that the server meets the hardware capacity requirements, which are as follows:
- The physical server should have at least two 64-bit x86 CPU cores.
- AMD No Execute (NX) and Intel Execute Disable (XD) processor functions should be enabled in the server BIOS.
- To be able to run 64-bit operating systems on VMs, you will need to allow the use of hardware virtualization (Intel VT-x or AMD RVI) in the server BIOS.
- A minimum of 4 GB of physical memory for the hypervisor alone, and an additional 4 GB to start hosting VMs.
Software required for the installation
The VMware ESXi 6.7 hypervisor ISO image can be downloaded from VMware's downloads page, at https://my.vmware.com/web/vmware/downloads.
Server vendors provide customized images of ESXi so that it can include the drivers and other components, such as CIM providers. Always contact the vendor to download the OEM ESXi image.
Using the ESXi image
You need a way to present the ISO to the physical machine so that it can boot from it.
Of course, you could burn the ISO to a physical DVD and then insert it into the DVD drive of the physical machine. However, most modern servers will have a method to present the ISO image to the server as a virtual drive via its IPMI interface. If you are an administrator, you may already be aware of terms such as ILO (HP), DRAC (Dell), and KVM manager (Cisco). These are web-based tools that will connect to a Remote Access Card (RAC) on the server and enable remote access to the server's console through the web interface.
How to do it...
The following procedure will guide you through the steps involved in deploying ESXi 6.7 using the interactive installer:
- Mount the ISO to the server via its IPMI interface.
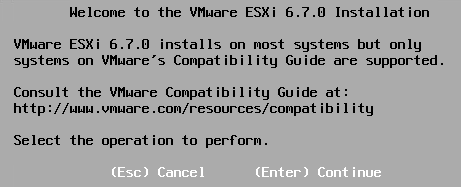
- Boot the server of the ISO. Unlike the older version of the installers, it no longer presents you with the installer boot menu. Instead, it starts loading the installer into the memory and subsequently shows the following Welcome to the VMware ESXi 6.7.0 Installation screen:
- Once you hit Enter to continue, on the next screen, hit F11 to accept the license agreement and continue.
- On the next screen, you will be prompted to choose a storage device to install ESXi on, which could be a local SSD, a local hard disk, or a LUN from remote storage (in a boot from a SAN scenario). Use the keyboard to make a selection and hit Enter to confirm. Alternatively, to make a cautious effort to ensure that you have selected the correct disk, and before you confirm the selection by hitting Enter, hit F1 to fetch more details regarding the storage device that you've selected. Step 5 covers this process:

- An optional step: select the storage device and hit F1. You will now be presented with unique details, such as the CTL path to the device, LUN ID, Target ID (if using iSCSI), and the capacity of the disk, along with other general information. It will also tell you if an existing installation of ESXi is present on the storage device:
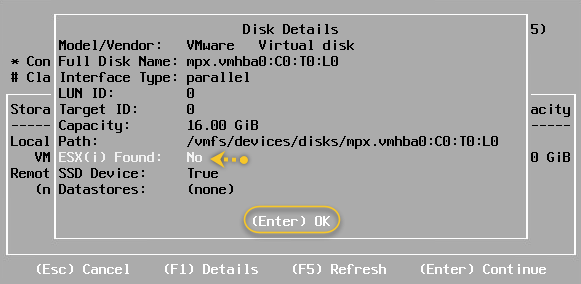
General Disk details
- Once you are done with the verification process, hit Enter. You will be taken back to the Select a Disk to Install or Upgrade screen. Hit Enter to confirm the device selection.
- On the next screen, select a keyboard layout. The US default is preselected. Make a different selection if necessary and hit Enter to continue.
- You will be prompted to set a password for the ESXi root account. Once you type in the password, hit Enter to continue.
At this stage, the installer will scan the server hardware for additional information or prerequisites that it would need to proceed further. If any of the prechecks fail, you will be warned accordingly. For instance, if you do not have Intel VT-x or AMD-V enabled in the BIOS, then it will warn you about that. It can also warn you about unsupported devices that are detected during the scan. Most warnings will not stop you from proceeding further, and will only indicate what will not be configured or supported. Hit Enter to continue.
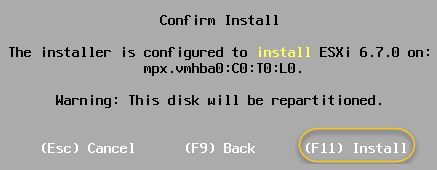
- At the Confirm Install screen, review the storage device name that's displayed. If that is the correct device, hit F11 to start the installation. If you are unsure, use F9 to go back and make the necessary changes:
- The Install ESXi 6.7.0 screen will show the progress of the installation. It could take a few minutes to complete.
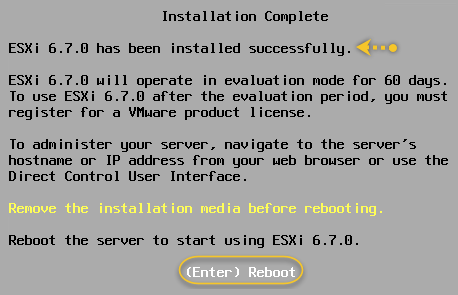
- When the installation completes, you will be advised to remove the installation media (unmount the ISO) before you restart the server. Once done, hit Enter to reboot:
- After a reboot, you will be at the main screen for ESXi 6.7.0.
This completes the process of installing ESXi on a bare-metal server using the ESXi installer ISO.
How it works...
The ESXi installer loads all the necessary modules into the memory, detects hardware resources, and then lets you perform the installation on a storage device that's been specified. Once installed, ESXi runs in a 60-day evaluation mode and needs to be licensed for production use. The first post-installation step is to make the ESXi host available on the network by configuring its management TCP/IP stack. Read the following Configuring the ESXi management network recipe to learn more.