
Connecting Amazon Web Services to Microsoft Defender for Cloud
The final step for connecting an AWS account to Microsoft Defender for Cloud is to create an AWS connector in Microsoft Defender for Cloud.
Getting ready
Open a web browser and navigate to https://portal.azure.com. Open a new browser tab and navigate to https://console.aws.amazon.com/.
How to do it…
To connect AWS to Microsoft Defender for Cloud and create an AWS connector in Microsoft Defender for Cloud , complete the following steps:
- Open Microsoft Defender for Cloud. From the left menu, under the Management section, select Environment settings. Switch back to the classic cloud connectors experience. On the Cloud connectors blade, from the top menu, select Connect AWS account. In the Display name field, enter a name to identify the AWS account connection in Microsoft Defender for Cloud. From the Subscription menu, choose an Azure subscription.
- In the AWS role ARN field, paste the Role ARN value you copied in the Creating an Identity and Access Management (IAM) Amazon Web Services (AWS) role for Microsoft Defender for Cloud recipe. Click Next: Azure Arc configuration.
- Alternatively, if you do not have a Role ARN string ready, in AWS Console, in the top-left corner, click Services and, under the Security, Identity, and Compliance section, select IAM.
- From the left menu, click Roles and click on the name of an AWS role you created to connect to Microsoft Defender for Cloud. Copy the Role ARN value.
- Switch back to the Azure portal browser tab. In the AWS role ARN field, paste the Role ARN value. Click Next: Azure Arc configuration.
- On the Connect AWS account – ❷ Azure Arc configuration page, choose or create a new Resource group, and then choose a Region.
- In the Authentication section, click on the Create a Service Principal in Azure Active directory with Azure Connected Machine Onboarding role with a few clicks link:
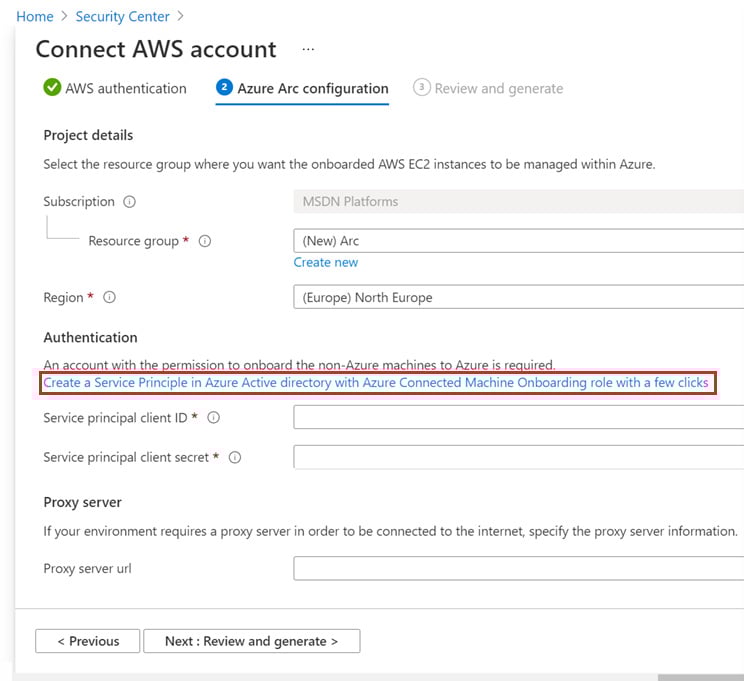
Figure 2.25 – Connect AWS account – ❷ The Azure Arc configuration page
- Copy the script and open Cloud Shell. Paste and execute the script in Azure PowerShell. The script will return a GUID, or an Application (client) ID value, and a Password value.
- Paste the Application (client) ID value into the Service principal client ID field. Paste the Password value into the Service principal client secret field. Then, click Next: Review and generate.
- On the Connect AWS account – ❸ Review and generate page, review the configuration details and click Create.
- In Microsoft Defender for Cloud, on the Cloud Connectors page, you should see the newly added AWS connector. Its Status should be Valid if it connected successfully:
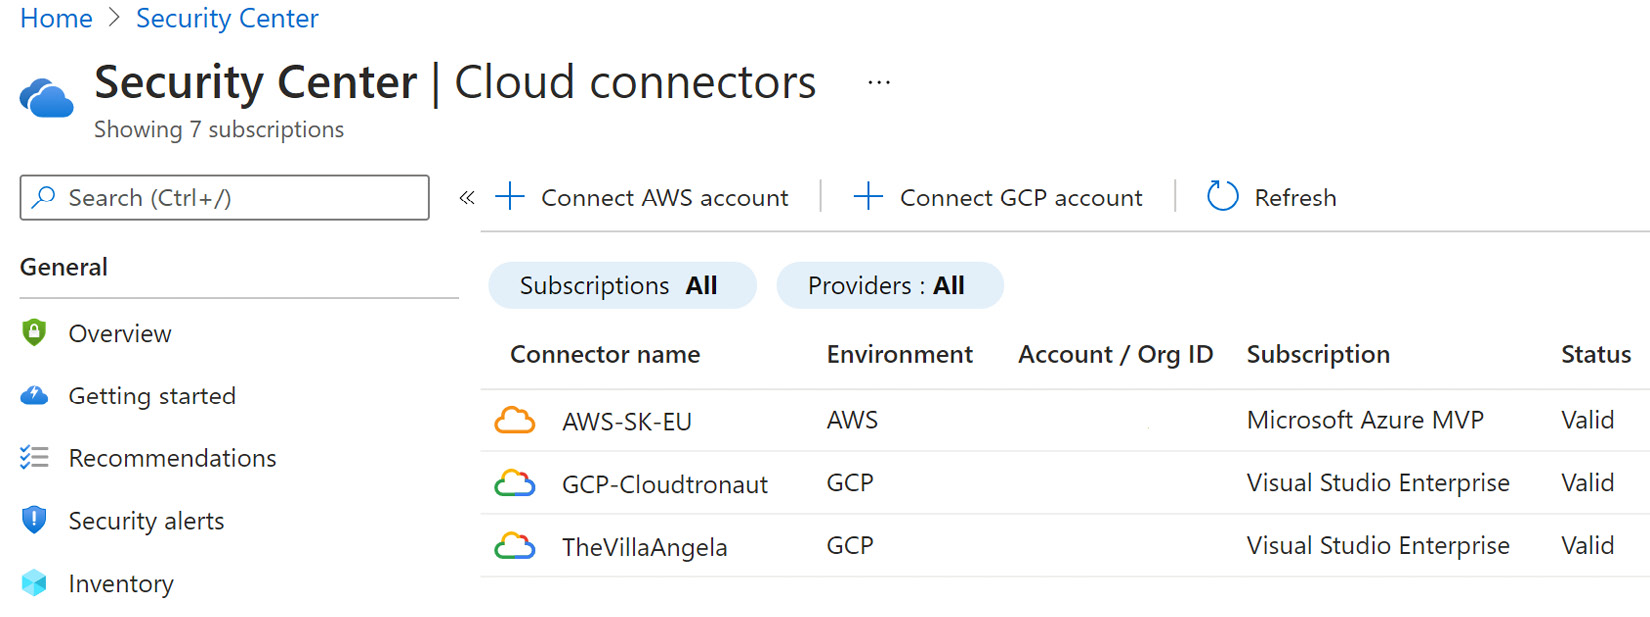
Figure 2.26 – Microsoft Defender for Cloud – Cloud Connectors
- After a few minutes, in Microsoft Defender for Cloud, the Regulatory Compliance section will display the AWS compliance controls, while the AWS resources and recommendations will be visible in the Inventory and Recommendations sections:
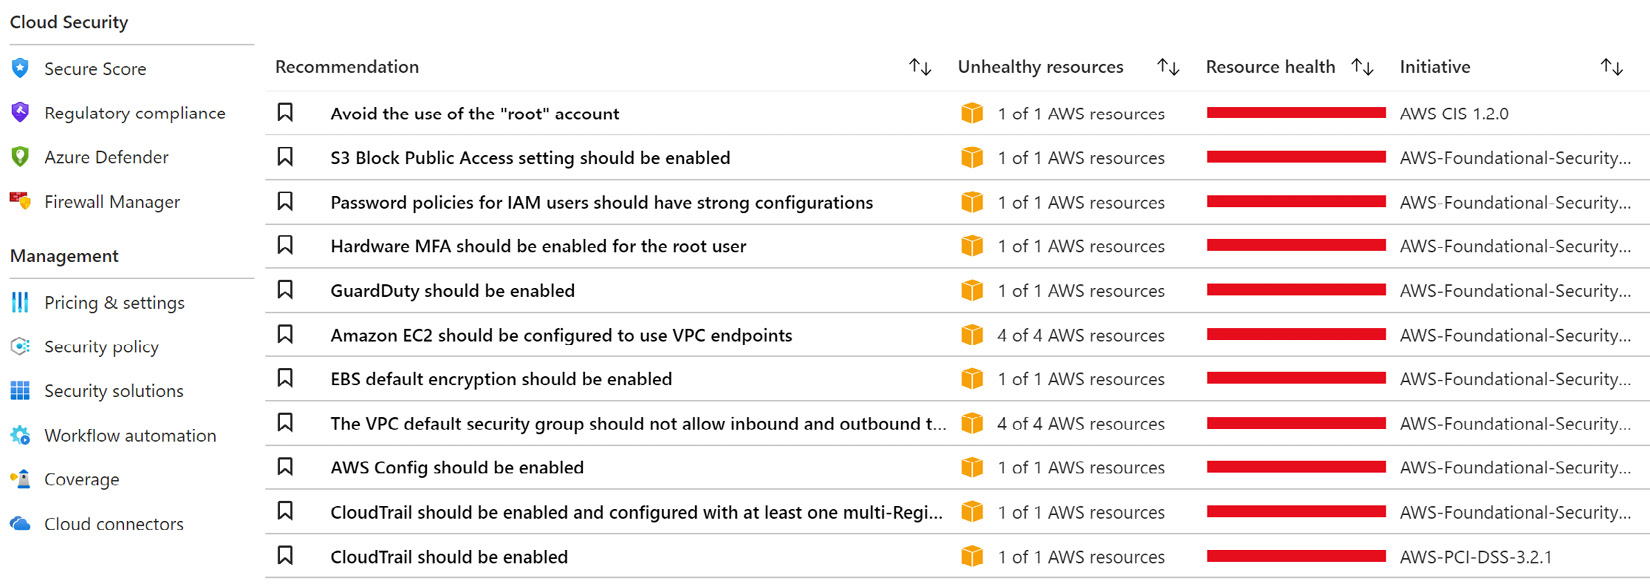
Figure 2.27 – Microsoft Defender for Cloud – AWS Recommendations
How it works…
The final step in connecting an AWS account to Microsoft Defender for Cloud is to create an AWS connector in Microsoft Defender for Cloud. You need to associate an AWS role with an Azure subscription and create a service principal that will be used to authenticate access to Azure. Once you connect your AWS account to Microsoft Defender for Cloud, you can use Security Center's capabilities to protect AWS account assets in Microsoft Defender for Cloud.
There's more…
If you close Cloud Shell and do not know the Service principal client ID and Service principal client secret values anymore, or you want to change the current secret value of the application, complete the following steps:
- In the Azure portal, open Azure Active Directory. From the left menu, under the Manage section, select App registrations.
- On the App registrations blade, click the All applications tab. In the Search field, type
Arcto filter the application entries. In the Application (client) ID column, identify the string to use as a Service principal client ID value. - Click on the application name, then select Certificates & secrets.
- Under Client secrets, click on the recycle bin icon to delete a Secret and click + New client secret.
- Enter a Description and choose an expiration time. Then, click Add.
- Under Client secrets, copy the string representing the Value property of the secret. This will be used as a Service principal client secret value.