
Putting it all together
Now that we've seen the AWS IAM dashboard, familiarized ourselves with the terminology used with the service, and examined the relationship between principals, entities, identities, roles, groups, and policies, let's create some AWS IAM resource objects using the AWS Management Console. In order to complete this exercise, you will need to sign up for an AWS account at https://aws.amazon.com.
Signing in with the root user
If you have signed up with a new account, the first and only option you have to sign in to the AWS Management Console is with the Root user. The Root user is the owner of the AWS account, and similar to a root user in a Linux system, it is a super administrator with full access to all the services and resources available. Just as one would when configuring a server, we should only use the Root user for as long as it takes to set up a different administrative account to use:
- From the AWS IAM dashboard, expand Access management on the left and click on Users. From this screen, you can see every non-root user in your account, including important security information such as group membership information, access key age, password age, last activity, and whether or not that account has multifactor authentication enabled:

Figure 1.9 – AWS IAM user administration console
- As this is a new environment, our user list is empty. We create a new user by clicking Add user:

Figure 1.10 – User configuration and access type
- Let's name the new account
redbeardidentityand give it both programmatic access and AWS Management Console access. This means the account will be issued two sets of credentials, a password for console access, and the access key ID and secret key ID for use with the AWS command-line interface: - Since we will be using this account, we can select the option to populate our own password and uncheck the box that requires a new password on first login. If we were provisioning an account for another administrator, we would leave the ''password reset on first logon'' requirement in place to ensure that the other administrator was the only person who knew their password. Click on the Next: Permissions button:

Figure 1.11 – Permissions options
On the next screen (Figure 1.11), we see several options for granting permissions for the new account. Let's examine the options available to us. If this were a shared account with several different administrators performing different job functions, we could set up a group for each one of those job functions and attach policies to the group. Then by adding the new user accounts to the appropriate group, those users inherit the policies from the group. Alternatively, we could just copy the permissions from an existing user. This is a non-starter for our use case as we are currently creating the very first non-root user account in the environment and have no other account from which to copy permissions. Finally, we can create and attach a policy directly to the user. Since the wizard is selling groups as a ''best-practice way to manage users' permissions,'' we'll do that. This is also where we can optionally set a permissions boundary for this user. Since this user is an administrator, we don't need to set such a boundary:

Figure 1.12 – Create group and attach policy
- Clicking Create group takes us to the group creation screen where we can name the group and attach AWS-created policies to it. We also have the option to create our own custom policy for the group, but as the goal for this group is to grant full administrative privileges to the environment, and AWS already has a policy that grants those entitlements, we'll spare ourselves the administrative overhead.
- We give our administrator's group a name that will help ourselves and others recognize its purpose and click Create group:

Figure 1.13 – Create group and attach policies
The group is created, and we are returned to the user creation screen. The form now shows the new user as a member of the
FullAdministratorgroup. Click on the Next: Tags button. On the next screen, we can optionally create some tags to associate with this user. Tags are customizable attributes in the form of key-value pairs that you can define on nearly every resource object type in AWS, and you can use tags for reporting, searching, and perhaps most importantly, authorization policy. - Tags are powerful tools for governance, so we will define some
costcenterandjobcodetags and populate them with values that we may be able to use to define some session policies later. As we type, the console opens new rows for other tags. Type something like what is shown in Figure 1.14 and click on the Next: Review button:
Figure 1.14 – Attaching tags to the new IAM user
- After that, we can review all of our selections and create the user. Simply click on the Create user button and the operation is finished:

Figure 1.15 – Review and create the new user
The AWS IAM dashboard has been updated to reflect the new user and group creation, and the Users and Groups control panels now give us options to administrate the new IAM resource objects:

Figure 1.16 – Updated IAM dashboard
If we check the list of users, we see the new IAM user we've created, complete with an at-a-glance view of the group membership, the age of its credentials, its last activity, and whether it has multifactor authentication enabled:

Figure 1.17 – Updated IAM user administration console
- Now we can sign in using the non-root account. Note the Sign-in URL for IAM users in this account in Figure 1.16. It is an account-specific sign-in link for IAM users to use when signing into this particular AWS account so we will not need to memorize and enter the account number each time we sign in through https://aws.amazon.com:
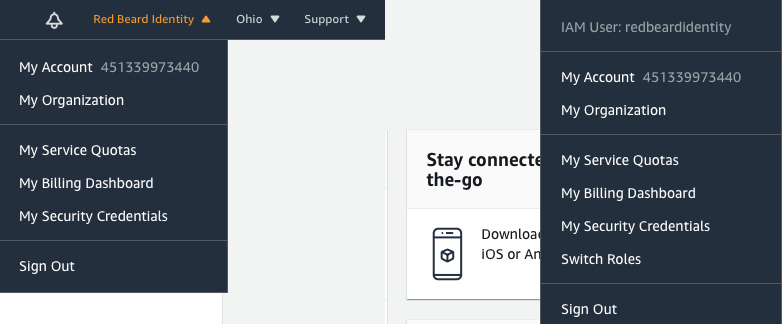
Figure 1.18 – Root user on the left, IAM user on the right
Once signed in under the redbeardidentity IAM user account, and despite it having full administrator permissions to the AWS account just like the root account, we can see that it is an IAM user account based on the differences in the account information displayed in the menu bar.
Now that we've created our first AWS IAM user, let's recall once again why we bothered to do so in the first place. IAM is the discipline of managing the life cycle of digital accounts that correspond to and are under the control of a person and ensuring that only the correct resources are accessed by the correct actor at the correct time and under the correct context. Understanding how identity life cycle events and processes interact to achieve a specific business or technological outcome helps us understand how to achieve those same outcomes within the cloud. AWS IAM is the service that an AWS account uses to authenticate and authorize users and applications that use the account's services and handles the IAM use cases for AWS services.
AWS IAM controls IAM resource objects, including the entities that users, applications, or federated users use to authenticate themselves to the service. IAM users, roles, and groups are identity objects used to identity or group IAM resource objects for the application of authorization policy. AWS IAM assesses requests to take actions on AWS objects using the request context, which is a combination of details about the request, in conjunction with authorization policy objects that apply to the user, role, group, or resource that the principal is trying to manipulate. Each AWS account gets a root user, which is the superuser for the account. Best practice recommends that you use an appropriately scoped IAM user when accessing your AWS account, and not the root account.