

Chaining and branching activities within a pipeline
In this recipe, we shall build a pipeline that will extract the data from the CSV files in Azure Blob Storage, load this data into the Azure SQL table, and record a log message with the status of this job. The status message will depend on whether the extract and load succeeded or failed.
Getting ready
We shall be using all the Azure services that are mentioned in the Technical requirements section at the beginning of the chapter. We shall be using the PipelineLog table and the InsertLogRecord stored procedure. If you have not created the table and the stored procedure in your Azure SQL database yet, please do so.
How to do it…
- In this recipe, we shall reuse portions of the pipeline from the Using parameters and built-in functions recipe. If you completed that recipe, just create a clone of it and save it as
pl_orchestration_recipe_4. If you did not, go through steps 1-10 and create a parameterized pipeline. - Observe that each activity by default has a little green square on the right. This denotes a successful outcome of the activity. However, sometimes activities fail. We want to add an action on the failure of the Copy from Blob to Azure SQL activity. To denote failure, click on the Add output button inside the activity and select Failure:

Figure 2.24 – Possible activity outcomes
- From the Activities pane on the left, drag two Stored Procedure activities onto the canvas. Connect one of them to the green square of the Copy From Blob to Azure SQL activity and another one to the red square.
- First, configure the Stored Procedure activity that is connected to the green square in the following way:
(a) In the General tab, rename it
On Success.(b) In the Settings tab, specify AzureSQLTables as the linked service and [dbo].[InsertPipelineLog] as the Stored Procedure name. Click on Test Connection to verify that you can connect to the Azure SQL database.
(c) Click on the Import Parameters button and fill in the values in the following way:
PipelineID:
@pipeline().PipelineRunID:
@pipeline().RunIdStatus:
SuccessUpdatedAt:
@utcnow()Note
You can also use the Add dynamic content functionality to fill in the values. For each field, put your cursor into the field and then click on the little blue Add dynamic content link that appears underneath the field. You will see a blade that gives you a selection of system variables, functions, and activity outputs to choose from.
- Now, select the stored procedure that is connected to the red square in the Copy Data activity. Configure it in a similar way to the previous step, but give it the name
On Failure, and for the Status parameter, enterFailure:
Figure 2.25 – A full pipeline with On Success and On Failure branches
- It is time to test the pipeline. Run it in Debug mode and verify that, when your pipeline succeeds, you have a corresponding entry in the PipelineLog table.
- Now, in order to see the branching in action, let's imitate the failure of our pipeline. Edit your Copy From Blob To Azure SQL activity: in the Sink tab below the canvas, put any string into the tableName textbox.
- Run your pipeline in debug mode. You will see that now the Copy From Blob To Azure SQL activity failed, and the On Failure stored procedure was invoked. Verify that the PipelineLog table in the Azure SQL database has a new record:

Figure 2.26 – Entries in PipelineLog after successful and failed pipeline runs
- Publish your changes to save them.
There's more…
ADF offers another option for branching out on a condition during pipeline execution: the If Condition activity. This activity is another example of a compound activity (like the ForEach activity in the previous recipe): it contains two activity subgroups and a condition. Only one of the activity subgroups is executed, based on whether the condition is true or false.
The use case for the If Condition activity is different than the approach we illustrated in this recipe. While the recipe branches out on the outcome (success or failure) of the previous activity, you design the condition in the If Condition activity to branch out on the inputs from the previous activity. For example, let's suppose that we want to retrieve metadata about a file, and perform one stored procedure if the file is a CSV and another stored procedure if the file is of a different type. Here is how we would configure an If Condition activity to accomplish this:
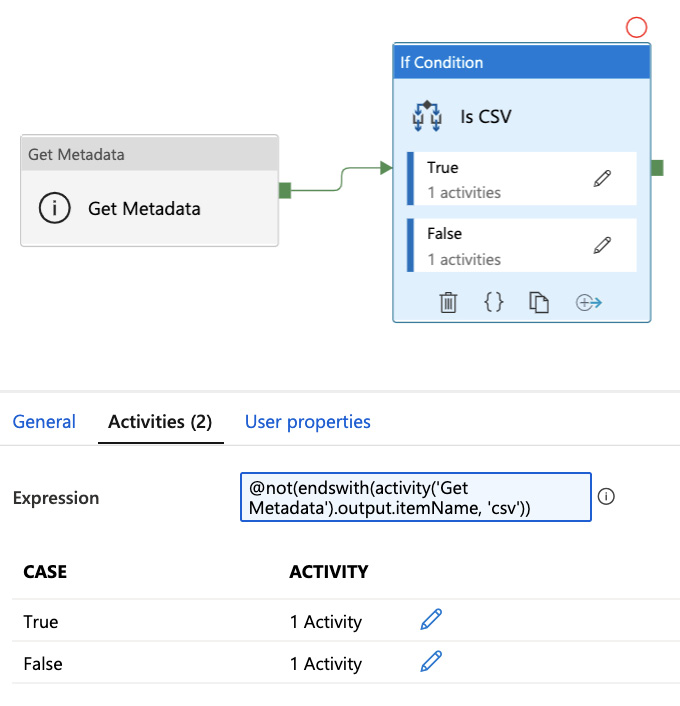
Figure 2.27 – Configuring the If Condition activity