To read data from an Excel file, you will need to use a different reader function from pandas. Generally, working with Excel files can be a challenge since the file can contain formatted multi-line headers, merged header cells, and images. They may also contain multiple worksheets with custom names (labels). Therefore, it is vital that you always inspect the Excel file first. The most common scenario is reading from an Excel file that contains data partitioned into multiple sheets, which is the focus of this recipe.
In this recipe, you will be using the pandas.read_excel() function and examining the various parameters available to ensure the data is read properly as a DataFrame with a DatetimeIndex for time series analysis. In addition, you will explore different options to read Excel files with multiple sheets.
Getting ready
To use pandas.read_excel(), you will need to install an additional library for reading and writing Excel files. In the read_excel() function, you will use the engine parameter to specify which library (engine) to use for processing an Excel file. Depending on the Excel file extension you are working with (for example, .xls or .xlsx), you may need to specify a different engine that may require installing an additional library.
The supported libraries (engines) for reading and writing Excel include xlrd, openpyxl, odf, and pyxlsb. When working with Excel files, the two most common libraries are usually xlrd and openpyxl.
The xlrd library only supports .xls files. So, if you are working with an older Excel format, such as .xls, then xlrd will do just fine. For newer Excel formats, such as .xlsx, we will need a different engine, and in this case, openpyxl would be the recommendation to go with.
To install openpyxl using conda, run the following command in the terminal:
>>> conda install openpyxl
To install using pip, run the following command:
>>> pip install openpyxl
We will be using the sales_trx_data.xlsx file, which you can download from the book's GitHub repository. See the Technical requirements section of this chapter. The file contains sales data split by year into two sheets (2017 and 2018), respectively.
How to do it…
You will ingest the Excel file (.xlsx) using pandas and openpyxl, and leverage some of the available parameters in read_excel():
- Import the libraries for this recipe:
import pandas as pd
from pathlib import Path
filepath = \
Path('../../datasets/Ch2/sales_trx_data.xlsx')
- Read the Excel (
.xlxs) file using the read_excel()function. By default, pandas will only read from the first sheet. This is specified under the sheet_name parameter, which is set to 0 as the default value. Before passing a new argument, you can use pandas.ExcelFile first to inspect the file and determine the number of sheets available. The ExcelFile class will provide additional methods and properties, such as sheet_name, which returns a list of sheet names:excelfile = pd.ExcelFile(filepath)
excelfile.sheet_names
>> ['2017', '2018']
If you have multiple sheets, you can specify which sheets you want to ingest by passing a list to the sheet_name parameter in read_excel. The list can either be positional arguments, such as first, second, and fifth sheets with [0, 1, 4], sheet names with ["Sheet1", "Sheet2", "Sheet5"], or a combination of both, such as first sheet, second sheet, and a sheet named "Revenue" [0, 1, "Revenue"].
In the following code, you will use sheet positions to read both the first and second sheets (0 and 1 indexes). This will return a Python dictionary object with two DataFrames. Notet hat the returned dictionary (key-value pair) has numeric keys (0 and 1) representing the first and second sheets (positional index), respectively:
ts = pd.read_excel(filepath,
                   engine='openpyxl',
                   index_col=1,
                   sheet_name=[0,1],
                   parse_dates=True)
ts.keys()
>> dict_keys([0, 1])
- Alternatively, you can pass a list of sheet names. Notice that the returned dictionary keys are now strings and represent the sheet names as shown in the following code:
ts = pd.read_excel(filepath,
engine='openpyxl',
index_col=1,
sheet_name=['2017','2018'],
parse_dates=True)
ts.keys()
>> dict_keys(['2017', '2018'])
- If you want to read from all the available sheets, you will pass
None instead. The keys for the dictionary, in this case, will represent sheet names:ts = pd.read_excel(filepath,
engine='openpyxl',
index_col=1,
sheet_name=None,
parse_dates=True)
ts.keys()
>> dict_keys(['2017', '2018'])
The two DataFrames within the dictionary are identical (homogeneous-typed) in terms of their schema (column names and data types). You can inspect each DataFrame with ts['2017'].info() and ts['2018'].info().
They both have a DatetimeIndex object, which you specified in the index_col parameter. The 2017 DataFrame consists of 36,764 rows and the 2018 DataFrame consists of 37,360. In this scenario, you want to stack (combine) the two (think UNION in SQL) into a single DataFrame that contains all 74,124 rows and a DatetimeIndex that spans from 2017-01-01 to 2018-12-31.
To combine the two DataFrames along the index axis (stacked one on top of the other), you will use the pandas.concat() function. The default behavior of the concat() function is to concatenate along the index axis (axis=0). In the following code, you will explicitly specify which DataFrames to concatenate:
ts_combined = pd.concat([ts['2017'],ts['2018']])
ts_combined.info()
>> <class 'pandas.core.frame.DataFrame'>
DatetimeIndex: 74124 entries, 2017-01-01 to 2018-12-31
Data columns (total 4 columns):
 #   Column              Non-Null Count  Dtype
---  ------              --------------  -----
 0   Line_Item_ID        74124 non-null  int64
 1   Credit_Card_Number  74124 non-null  int64
 2   Quantity            74124 non-null  int64
 3   Menu_Item           74124 non-null  object
dtypes: int64(3), object(1)
memory usage: 2.8+ MB
- When you have multiple DataFrames returned (think multiple sheets), you can use the
concat() function on the returned dictionary. In other words, you can combine the concat() and read_excel() functions in one statement. In this case, you will end up with a MultiIndex DataFrame where the first level is the sheet name (or number) and the second level is the DatetimeIndex. For example, using the ts dictionary, you will get a two-level index: MultiIndex([('2017', '2017-01-01'), ..., ('2018', '2018-12-31')], names=[None, 'Date'], length=74124).
To reduce the number of levels, you can use the droplevel(level=0) method to drop the first level after pandas .concat() shown as follows:
ts_combined = pd.concat(ts).droplevel(level=0)
- If you are only reading one sheet, the behavior is slightly different. By default,
sheet_name is set to 0, which means it reads the first sheet. You can modify this and pass a different value (single value), either the sheet name (string) or sheet position (integer). When passing a single value, the returned object will be a pandas DataFrame and not a dictionary:ts = pd.read_excel(filepath,
index_col=1,
sheet_name='2018',
parse_dates=True)
type(ts)
>> pandas.core.frame.DataFrame
Do note though that if you pass a single value inside two brackets ([1]), then pandas will interpret this differently and the returned object will be a dictionary that contains one DataFrame.
Lastly, note that you did not need to specify the engine in the last example. The read_csv function will determine which engine to use based on the file extension. So, for example, suppose the library for that engine is not installed. In that case, it will throw an ImportError message, indicating that the library (dependency) is missing.
How it works…
The pandas.read_excel() function has many common parameters with the pandas.read_csv() function that you used earlier. The read_excel function can either return a DataFrame object or a dictionary of DataFrames. The dependency here is whether you are passing a single value (scalar) or a list to sheet_name.
In the sales_trx_data.xlsx file, both sheets had the same schema (homogeneous- typed). The sales data was partitioned (split) by year, where each sheet contained sales for a particular year. In this case, concatenating the two DataFrames was a natural choice. The pandas.concat() function is like the DataFrame.append() function, in which the second DataFrame was added (appended) to the end of the first DataFrame. This should be similar in behavior to the UNION clause for those coming from a SQL background.
There's more…
An alternative method to reading an Excel file is with the pandas.ExcelFile() class, which returns a pandas ExcelFile object. Earlier in this recipe, you used ExcelFile() to inspect the number of sheets in the Excel file through the sheet_name property.
The ExcelFile class has several useful methods, including the parse() method to parse the Excel file into a DataFrame, similar to the pandas.read_excel() function.
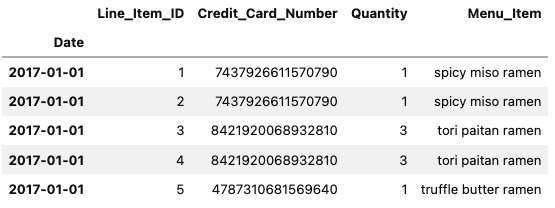
In the following example, you will use the ExcelFile class to parse the first sheet, assign the first column as an index, and print the first five rows:
excelfile = pd.ExcelFile(filepath)
excelfile.parse(sheet_name='2017',
                index_col=1,
                parse_dates=True).head()
You should see similar results for the first five rows of the DataFrame:
Figure 2.3 – The first five rows of the DataFrame using JupyterLab
From Figure 2.3, it should become clear that ExcelFile.parse() is equivalent to pandas.read_excel().
See also
For more information on pandas.read_excel() and pandas.ExcelFile(), please refer to the official documentation:


 Free Chapter

