Data wrangling is a comprehensive term that encompasses the various stages of data preprocessing before machine learning can begin. Data loading, data cleaning, data analysis, and data manipulation are all included within the sphere of data wrangling.
This first chapter presents data wrangling in detail. The examples are meant to cover standard data wrangling challenges that can be swiftly handled by pandas, Python's special library for handling data analytics. Although no experience with pandas is required, basic knowledge of pandas will be beneficial. All code is explained so that readers new to pandas may follow along.
Dataset 1 – Bike rentals
The bike rentals dataset is our first dataset. The data source is the UCI Machine Learning Repository (https://archive.ics.uci.edu/ml/index.php), a world-famous data warehouse that is free to the public. Our bike rentals dataset has been adjusted from the original dataset (https://archive.ics.uci.edu/ml/datasets/bike+sharing+dataset) by sprinkling in null values so that you can gain practice in correcting them.
Accessing the data
The first step in data wrangling is to access the data. This may be achieved with the following steps:
Download the data. All files for this book have been stored on GitHub. You may download all files to your local computer by pressing the Clone button. Here is a visual:
Figure 1.1 – Accessing data
After downloading the data, move it to a convenient location, such as a Data folder on your desktop.
Open a Jupyter Notebook. You will find the link to download Jupyter Notebooks in the preface. Click on Anaconda, and then click on Jupyter Notebooks. Alternatively, type jupyter notebook in the terminal. After the web browser opens, you should see a list of folders and files. Go to the same folder as the bike rentals dataset and select New: Notebook: Python 3. Here is a visual guide:
Figure 1.2 – Visual guide to accessing the Jupyter Notebook
Tip
If you are having difficulties opening a Jupyter Notebook, see Jupyter's official trouble-shooting guide: https://jupyter-notebook.readthedocs.io/en/stable/troubleshooting.html.
Enter the following code in the first cell of your Jupyter Notebook:
import pandas as pd
Press Shift + Enter to run the cell. Now you may access the pandas library when you write pd.
Load the data using pd.read_csv. Loading data requires a read method. The read method stores the data as a DataFrame, a pandas object for viewing, analyzing, and manipulating data. When loading the data, place the filename in quotation marks, and then run the cell:
df_bikes = pd.read_csv('bike_rentals.csv')If your data file is in a different location than your Jupyter Notebook, you must provide a file directory, such as Downloads/bike_rental.csv.
Now the data has been properly stored in a DataFrame called df_bikes.
Tip
Tab completion: When coding in Jupyter Notebooks, after typing a few characters, press the Tab button. For CSV files, you should see the filename appear. Highlight the name with your cursor and press Enter. If the filename is the only available option, you may press Enter. Tab completion will make your coding experience faster and more reliable.
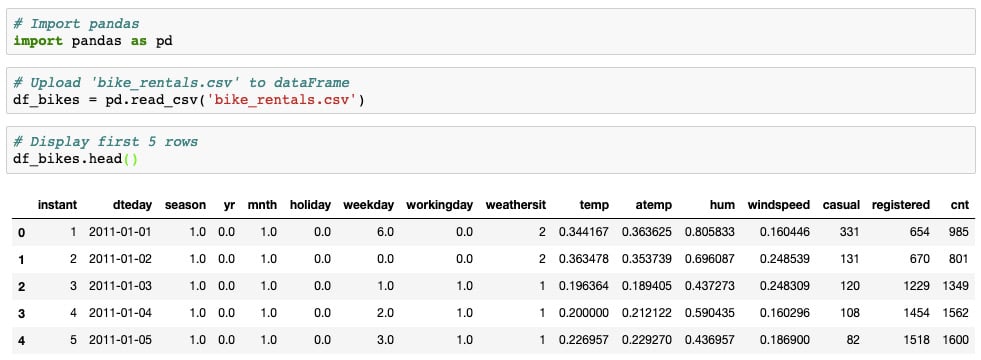
Display the data using .head(). The final step is to view the data to ensure that it has loaded correctly. .head() is a DataFrame method that displays the first five rows of the DataFrame. You may place any positive integer in parentheses to view any number of rows. Enter the following code and press Shift + Enter:
df_bikes.head()
Here is a screenshot of the first few lines along with the expected output:
Figure 1.3 –The bike_rental.csv output
Now that we have access to the data, let's take a look at three methods to understand the data.
Understanding the data
Now that the data has been loaded, it's time to make sense of the data. Understanding the data is essential to making informed decisions down the road. Here are three great methods for making sense of the data.
.head()
You have already seen .head(), a widely used method to interpret column names and numbers. As the preceding output reveals, dteday is a date, while instant is an ordered index.
.describe()
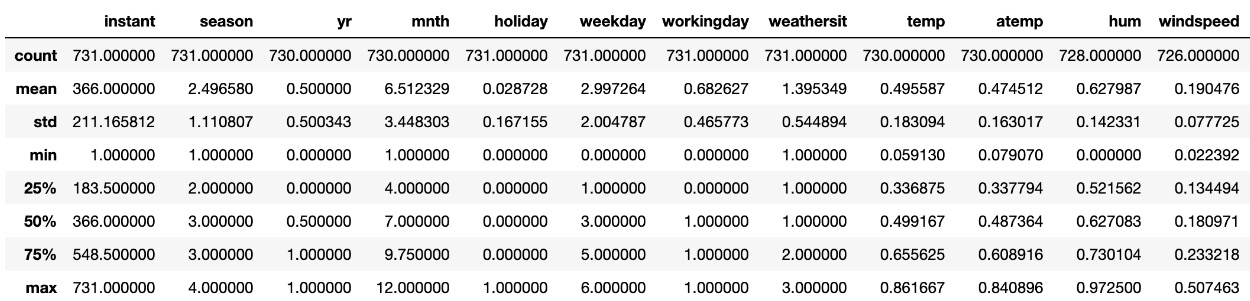
Numerical statistics may be viewed by using .describe() as follows:
df_bikes.describe()
Here is the expected output:
Figure 1.4 – The .describe() output
You may need to scroll to the right to see all of the columns.
Comparing the mean and median (50%) gives an indication of skewness. As you can see, mean and median are close to one another, so the data is roughly symmetrical. The max and min values of each column, along with the quartiles and standard deviation (std), are also presented.
.info()
Another great method is .info(), which displays general information about the columns and rows:
df_bikes.info()
Here is the expected output:
<class 'pandas.core.frame.DataFrame'>
RangeIndex: 731 entries, 0 to 730
Data columns (total 16 columns):
 #   Column      Non-Null Count  Dtype
---  ------      --------------  -----
 0   instant     731 non-null    int64
 1   dteday      731 non-null    object
 2   season      731 non-null    float64
 3   yr          730 non-null    float64
 4   mnth        730 non-null    float64
 5   holiday     731 non-null    float64
 6   weekday     731 non-null    float64
 7   workingday  731 non-null    float64
 8   weathersit  731 non-null    int64
 9   temp        730 non-null    float64
 10  atemp       730 non-null    float64
 11  hum         728 non-null    float64
 12  windspeed   726 non-null    float64
 13  casual      731 non-null    int64
 14  registered  731 non-null    int64
 15  cnt         731 non-null    int64
dtypes: float64(10), int64(5), object(1)
memory usage: 91.5+ KB
As you can see, .info() gives the number of rows, number of columns, column types, and non-null values. Since the number of non-null values differs between columns, null values must be present.
Correcting null values
If null values are not corrected, unexpected errors may arise down the road. In this subsection, we present a variety of methods that may be used to correct null values. Our examples are designed not only to handle null values but also to highlight the breadth and depth of pandas.
The following methods may be used to correct null values.
Finding the number of null values
The following code displays the total number of null values:
df_bikes.isna().sum().sum()
Here is the outcome:
12
Note that two .sum() methods are required. The first method sums the null values of each column, while the second method sums the column counts.
Displaying null values
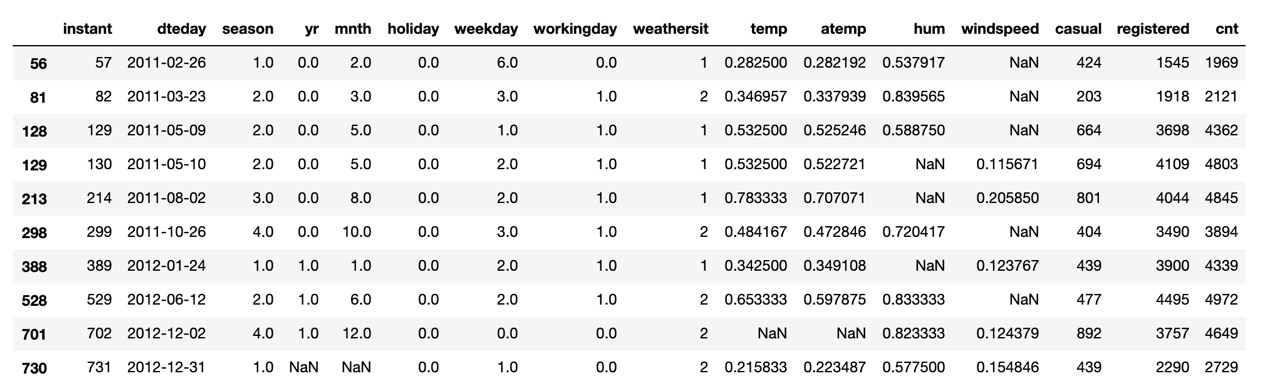
You can display all rows containing null values with the following code:
df_bikes[df_bikes.isna().any(axis=1)]
This code may be broken down as follows: df_bikes[conditional] is a subset of df_bikes that meets the condition in brackets. .df_bikes.isna().any gathers any and all null values while (axis=1) specifies values in the columns. In pandas, rows are axis 0 and columns are axis 1.
Here is the expected output:
Figure 1.5 – Bike Rentals dataset null values
As you can see from the output, there are null values in the windspeed, humidity, and temperature columns along with the last row.
Tip
If this is your first time working with pandas, it may take time to get used to the notation. Check out Packt's Hands-On Data Analysis with Pandas for a great introduction: https://subscription.packtpub.com/book/data/9781789615326.
Correcting null values
Correcting null values depends on the column and dataset. Let's go over some strategies.
Replacing with the median/mean
One common strategy is to replace null values with the median or mean. The idea here is to replace null values with the average column value.
For the 'windspeed' column, the null values may be replaced with the median value as follows:
df_bikes['windspeed'].fillna((df_bikes['windspeed'].median()), inplace=True)
df_bikes['windspeed'].fillna means that the null values of the 'windspeed' column will be filled. df_bikes['windspeed'].median() is the median of the 'windspeed' column. Finally, inplace=True ensures that the changes are permanent.
Tip
The median is often a better choice than the mean. The median guarantees that half the data is greater than the given value and half the data is lower. The mean, by contrast, is vulnerable to outliers.
In the previous cell, df_bikes[df_bikes.isna().any(axis=1)] revealed rows 56 and 81 with null values for windspeed. These rows may be displayed using .iloc, short for index location:
df_bikes.iloc[[56, 81]]
Here is the expected output:
Figure 1.6 – Rows 56 and 81
As expected, the null values have been replaced with the windspeed median.
Tip
It's common for users to make mistakes with single or double brackets when using pandas. .iloc uses single brackets for one index as follows: df_bikes.iloc[56]. Now, df_bikes also accepts a list inside brackets to allow multiple indices. Multiple indices require double brackets as follows: df_bikes.iloc[[56, 81]]. Please see https://pandas.pydata.org/pandas-docs/stable/reference/api/pandas.DataFrame.iloc.html for further documentation.
Groupby with the median/mean
It's possible to get more nuanced when correcting null values by using a groupby.
A groupby organizes rows by shared values. Since there are four shared seasons spread out among the rows, a groupby of seasons results in a total of four rows, one for each season. But each season comes from many different rows with different values. We need a way to combine, or aggregate, the values. Choices for the aggregate include .sum(), .count(), .mean(), and .median(). We use .median().
Grouping df_bikes by season with the .median() aggregate is achieved as follows:
df_bikes.groupby(['season']).median()
Here is the expected output:
Figure 1.7 – The output of grouping df_bikes by season
As you can see, the column values are the medians.
To correct the null values in the hum column, short for humidity, we can take the median humidity by season.
The code for correcting null values in the hum column is df_bikes['hum'] = df_bikes['hum'].fillna().
The code that goes inside fillna is the desired values. The values obtained from groupby require the transform method as follows:
df_bikes.groupby('season')['hum'].transform('median')
Here is the combined code in one long step:
df_bikes['hum'] = df_bikes['hum'].fillna(df_bikes.groupby('season')['hum'].transform('median'))
You may verify the transformation by checking df_bikes.iloc[[129, 213, 388]].
Obtaining the median/mean from specific rows
In some cases, it may be advantageous to replace null values with data from specific rows.
When correcting temperature, aside from consulting historical records, taking the mean temperature of the day before and the day after should give a good estimate.
To find null values of the 'temp' column, enter the following code:
df_bikes[df_bikes['temp'].isna()]
Here is the expected output:
Figure 1.8 – The output of the 'temp' column
As you can see, index 701 contains null values.
To find the mean temperature of the day before and the day after the 701 index, complete the following steps:
Sum the temperatures in rows 700 and 702 and divide by 2. Do this for the 'temp' and 'atemp' columns:
mean_temp = (df_bikes.iloc[700]['temp'] + df_bikes.iloc[702]['temp'])/2
mean_atemp = (df_bikes.iloc[700]['atemp'] + df_bikes.iloc[702]['atemp'])/2
Replace the null values:
df_bikes['temp'].fillna((mean_temp), inplace=True)
df_bikes['atemp'].fillna((mean_atemp), inplace=True)
You may verify on your own that the null values have been filled as expected.
Extrapolate dates
Our final strategy to correct null values involves dates. When real dates are provided, date values may be extrapolated.
df_bikes['dteday'] is a date column; however, the type of column revealed by df_bikes.info() is an object, commonly represented as a string. Date objects such as years and months must be extrapolated from datetime types. df_bikes['dteday'] may be converted to a 'datetime' type using the to_datetime method, as follows:
df_bikes['dteday'] = pd.to_datetime(df_bikes['dteday'],infer_datetime_format=True)
infer_datetime_format=True allows pandas to decide the kind of datetime object to store, a safe option in most cases.
To extrapolate individual columns, first import the datetime library:
import datetime as dt
We can now extrapolate dates for the null values using some different approaches. A standard approach is convert the 'mnth' column to the correct months extrapolated from the 'dteday' column. This has the advantage of correcting any additional errors that may have surfaced in conversions, assuming of course that the 'dteday' column is correct.
The code is as follows:
ddf_bikes['mnth'] = df_bikes['dteday'].dt.month
It's important to verify the changes. Since the null date values were in the last row, we can use .tail(), a DataFrame method similar to .head(), that shows the last five rows:
df_bikes.tail()
Here is the expected output:
Figure 1.9 – The output of the extrapolated date values
As you can see, the month values are all correct, but the year value needs to be changed.
The years of the last five rows in the 'dteday' column are all 2012, but the corresponding year provided by the 'yr' column is 1.0. Why?
The data is normalized, meaning it's converted to values between 0 and 1.
Normalized data is often more efficient because machine learning weights do not have to adjust for different ranges.
You can use the .loc method to fill in the correct value. The .loc method is used to locate entries by row and column as follows:
df_bikes.loc[730, 'yr'] = 1.0
Now that you have practiced correcting null values and have gained significant experience with pandas, it's time to address non-numerical columns.
Deleting non-numerical columns
For machine learning, all data columns should be numerical. According to df.info(), the only column that is not numerical is df_bikes['dteday']. Furthermore, it's redundant since all date information exists in other columns.
The column may be deleted as follows:
df_bikes = df_bikes.drop('dteday', axis=1)
Now that we have all numerical columns and no null values, we are ready for machine learning.


 Free Chapter