
Welcome to the Blender Cycles: Lighting and Rendering Cookbook. Before we start, I would like to talk about the new Blender rendering engine.
Cycles is a brand new unbiased rendering engine based on the path tracing algorithm that Blender has provided to users. It is still under heavy development but is growing really fast and is already capable of creating astonishing images.
Path tracing is an algorithm that computes how light travels in an environment in a very accurate way. For this reason, it is also a pretty heavy rendering algorithm. The good news is that Cycles can rely on modern video card power to make rendering times shorter.
Cycles also has a Global Illumination (GI) system. GI is a system that is used to simulate the bouncing of light different different surfaces. Earlier, to achieve similar effects with Blender internal renderer, it was necessary to manually fake it. Now, Cycles will do this for us. GI changes a lot in the way we can set up lighting for our scenes, as now each object's color influences and is influenced by other objects around it and in general everything will behave in a way closer to reality.
Another new key feature is the accompanying node-based shader system. It is a really powerful tool that will allow us to create a great variety of shaders, from the simplest to really advanced ones.
One could already be used to working with nodes, since the Blender Internal engine can also use nodes to set up shaders, not to mention the Blender compositing system, which is also based on nodes.
Anyway, the first approach with this system can be a bit hard sometimes. This is why I believe that a brief introduction, where we can see the concepts behind the usage of nodes, will be very useful to fully master the recipes that we are going to see in this book.
Just as a cook must know the ingredients at his/her disposal in order to cook tasty food, we too have to know which tools we can use to achieve the renders we want. When we cook our recipes later in the book, we will cover everything with the attention it deserves. If some passage is not perfectly clear, you can always come back to this introduction in order to understand how the tools that we will use will work.
So, let's see these concepts together!
Using nodes mainly means one thing: mixing different elements such as shaders, images, colors, and values. What makes nodes so powerful is that we can balance the mix of these elements as we like. We can use a simple value, images, colors, or even complex mathematical operations to decide how much of either value we want to see in our final material. The good thing is that we can repeat this process as many times as we want. However, we cannot mix things randomly. Nodes are powerful, but we need to follow a certain logic in order to make them work properly. To better understand the philosophy behind nodes, I have given an example that I hope will help.
Let's think of a node this way: nodes are like food processors. I am talking about blenders, mixers, and machines to make tomato sauce; ovens and stoves to make pasta, and so on. To use a food processor, you put in some ingredients and it does its work. Then, you take what the food processor has produced and use it in a different food processor until you get the final meal ready. Of course, you cannot put tomatoes directly in the oven to make a pizza. You have to first put them in the tomato sauce machine and only when you have the sauce, can you put it on the pizza.
Well, nodes work exactly the same way. Each node is like a different food processor specialized for doing different things. We will put in some information to the left as inputs and the node will give us an output to the right. When we think that our meal is ready, we will put the result of the nodes' work inside the output node and get our final material.
As I am sure you are eager to start, let's jump straight into Blender! Blender Internal is still the default engine in Blender, so we will first need to select Cycles from the render menu. Now open up a node editor in a separate window and with the default cube selected, select the Use Nodes checkbox by clicking on it in the materials menu.
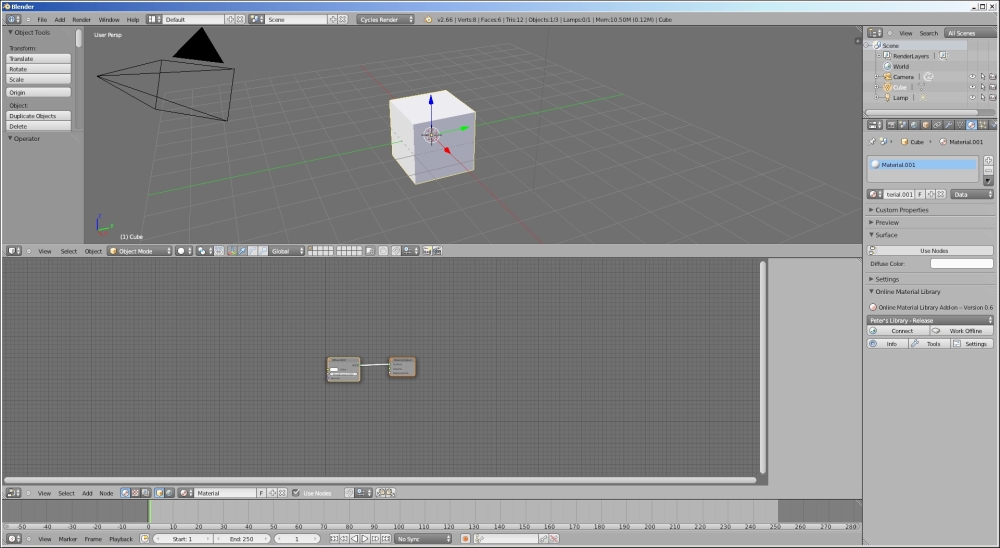
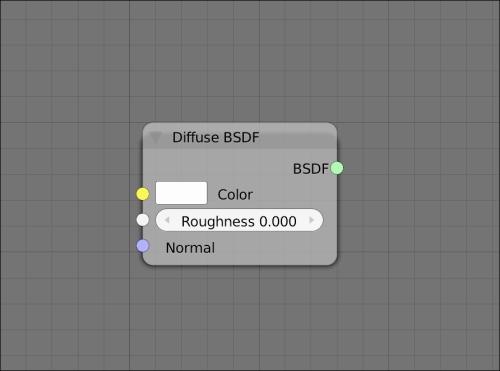
Here you have them... nodes! What you see there is a diffuse node and an output node. The output node is quite important as it will always be the last node of a material but is also quite self-explanatory. So, now let's focus on the Diffuse BSDF node for a moment. As you can see, we have some small colorful circles on the left-hand side (inputs) and some on the right-hand side (outputs). You may also notice that these inputs and outputs have different colors. Just as with the food example, we can't just plug any node anywhere. We need to adhere to certain rules. Colors will help us distinguish between the various ingredients in order to mix them in the correct way. Here we have the following types of inputs:
Color (the yellow circle)
Roughness (the grey circle)
Normal (the blue circle)
On the right-hand side, we have the output values. In this case, there's only one: a shader (the green circle). We are using the Diffuse BSDF node as an example, but each node has a different combination of inputs and outputs. In Cycles, you will find only these four aforementioned kinds of nodes.
As a general rule, we should always connect nodes by following their colors. Green with green, yellow with yellow, and so on. We will see, however, that it is possible to convert some of these values from where it comes from in order to use them inside an input of a different kind.
Now let's see what kind of ingredients we can find inside each color group:
The yellow circle: Here, we have the color information. This means RGB inputs (plain color) or images from files (textures). Cycles' procedural textures can also generate color information.
The gray circle: These are numeric values. However, black and white images can also be used as numeric values, black being 0 and white being 1. The same thing is true for alpha values. Keep in mind that in many situations 1 will be the maximum and 0 the minimum value. This means that, for example, if we want to mix two shaders, the mixing factor will lie in the range of 0 to 1. At these extremes, only one of the two shaders will actually be visible. Of course, numbers inbetween are endless.
The blue circle: Under this group, we can find vector information. Vectors mainly are information about the position and orientation of points and surfaces in space. So, for instance, we can use this vector info for normal maps or bump maps in order to tell Cycles what the surface of a certain object must look like.
The green circle: This is the shader group and contains the information about how surfaces react to light.
As we will see in our recipes, these groups are not completely separate from each other, but there are many ways to convert the information in order to use them for our needs.
Now, let's have a look at the concept of the sequence that a material node tree should usually follow. In the rest of this chapter, we have to picture a node setup. Let's analyze it to better understand what's going on.
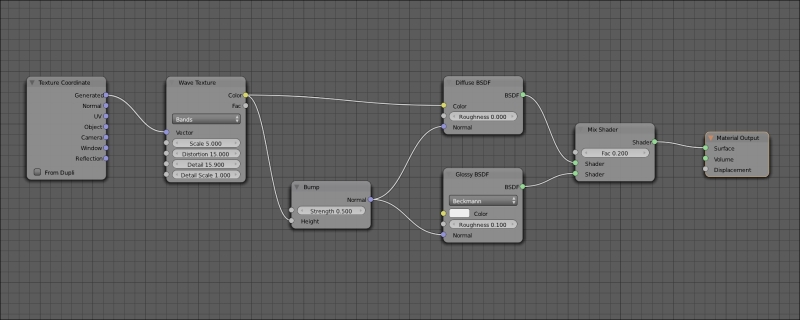
We always start from the left-hand side. The first node you see in the following screenshot is a Texture Coordinate node, and it is needed to tell Cycles what kind of texture coordinates we want to use for the textures of the material we are creating. This node belongs to the input nodes group. These kinds of nodes (inputs), as the name says, are used to generate some kind of input (values, colors, and so on); so, they only have output sockets. They are used to provide information about the object on which we want to apply the material we are creating.
Proceeding to the right, we can see that there is a Wave Texture node. This is a procedural texture built in into Cycles. It receives the information about the vector from the Texture Coordinate node. Looking at the node, we can see that there are several empty sockets on the left-hand side. We can change the values manually, but each of these sockets can also receive information from other nodes just as we are doing for the Vector socket.
From the right-hand side of the node, you can see that we are plugging the Wave Texture node's Color output into the Color input of a diffuse shader and a Bump node. The Bump node will convert the color information of the Color output of the Wave Texture node into vector information, which is used to give a bump effect to the surface of our object.
Moving further to the right, we find two shaders. As we saw earlier, the Diffuse BSDF node takes the Color input from Wave Texture, while the glossy shader has a plain white color. Note that more input sockets are left empty so that we can manually change the values instead of using other nodes as input information.
These two shaders are then mixed using a Mix Shader node with a factor of 0.2. This means that the output of this mix node will take 80 percent of the information from the upper input socket (in this case, the diffuse) and 20 percent from the lower one (the glossy).
Lastly, the result is plugged into a Material Output node. As said before, this is always the last node of a material.
Looking at the node setup, we can see that each output has the same color as the input into which it is plugged, with the exception of the Bump node. This node takes the values from the color information (the node automatically converts any color information into a black and white format) and converts it into vector information.
This simple material setup is helpful in understanding a correct sequence of nodes:
As said before, Cycles is a pretty heavy render engine and needs the appropriate hardware to work correctly. Moreover, it gives us the possibility to use the power of modern graphic cards to speed up render time. Not every card will work with Cycles, so I thought it'd be worth it to say a couple of words about this topic.
Cycles can render on both CPU and GPU, even if at the moment it cannot use them at the same time. That being said, GPU render is faster than CPU (at least for the same amount of money spent on these two items), but the first one presents some limitations.
First of all, GPU rendering with Cycles works only with CUDA at the moment. CUDA is a proprietary technology of NVIDIA. This means that at the current state of its development, GPU rendering with Cycles only works with cards equipped with an NVIDIA chip, such as GeForce, Quadro, or Tesla cards. A similar technology that will allow Cycles to take advantage of video cards is OpenCL. This is an open source technology, which is supported also by AMD (and others, but AMD is the main NVIDIA competitor) cards, but unfortunately at the time of writing, developers have still not managed to implement these libraries in a usable way mainly due to the fact that OpenCL is still under heavy development.
So, to summarize, it is good to repeat it once again. At the time of writing these lines if you want to use a GPU to render in Cycles you need an NVIDIA card, and it looks like things are not going to change any time soon.
Now, what video card should we buy to get the best out of Cycles? I guess you are not new to computer graphics, so you may already have guessed the answer. The more you are willing to pay, the better the performance you will get. There are, however, some important points to keep in mind.
First of all, Cycles will load up all the information needed to render the scenes onto the video card memory. When the VRAM (video RAM) is full, your render will fail. This should make you understand the first important point—Performance is really important, but if you cannot render a scene at all, it is quite useless.
The second important point is that developing features for the GPU is much more difficult than developing them for the CPU. As I am writing these lines for example, new Cycles features such as strand rendering and SSS are available only for the CPU.
The third important point is that new Cycles releases often brought two things, among others, until now—Faster CPU rendering and slower GPU rendering. At the moment, GPU rendering still has the best performance/price ratio, but it's important to keep in mind the preceding three points while choosing the right hardware.
Choosing the CPU for Cycles is pretty straightforward. Any CPU will work fine, and the faster the CPU, the faster the render time will be. Keep in mind that there are fairly big differences between operating systems here as well. Both Linux and OS X are much faster than Windows while rendering on the CPU. The only way to get similar performances in Windows is by using a MinGW (Minimalist GNU for Windows) or the Visual Basic 2012 build of Blender. These are Blender versions built using a different compiler from the default one used, and they provide similar render times to Linux and OS X while using the CPU. The problem is that the stability of this version is not guaranteed.
Speaking of video cards, performances among operating systems is quite similar. Here is a brief list of some of the best video cards to use with Cycles in the order of performance. I will not list professional video cards such as Quadro or Tesla as they would require a more in-depth analysis. In my humble opinion, most Cycles users will not benefit from their usage:
GTX TITAN 6 GB
GTX 590 3GB
GTX 690 4GB
GTX 580 1.5/3 GB
GTX 680 2/4 GB
GTX 670 2/4 GB
GTX 570 1.2/2.5 GB
GTX 660 Ti 1.5/3 GB
GTX 560 Ti 1/2 GB
As you can see, apart from TITAN, the fastest single chip video card is still a 580 GTX. Despite the fact that the 6xx is newer, the rendering performance remains the same, or in some cases even got worse than the older 5xx. However, the 6xx comes with a higher amount of memory on board, which is an advantage on its side.
It is important to notice that the GTX x90 models are double chip versions of the x80 cards. They are faster, but the real amount of memory is half of how much is written. This is because the total amount has to be divided between the two chips, so Cycles will only be able to use half of the memory.
Some less powerful video cards than the ones listed here will usually still be faster than many CPUs, so in case you don't want to change the whole computer, it can still be a good deal to buy a cheap video card if you have an old CPU. Anyway, I advise you to always check benchmarks for the specific CPU or video card you are looking for. Keep in mind however, that a new high-end CPU (such as the Intel i7-4770K) under Linux will perform almost as fast as any lower-level card, other than the ones listed before.
Before moving on to the first chapter of this book, I would like to provide you with a useful link where Blender users upload their performance results with Cycles:
http://blenderartists.org/forum/showthread.php?239480-2.61-Cycles-render-benchmark
In the first post you will find a link to the benchmark used, another one where you can upload your results, and a last link that will open up a page with a result summary.