Book Image

Unreal Engine 4.x Scripting with C++ Cookbook - Second Edition

By : John P. Doran, William Sherif, Stephen Whittle
Book Image

Unreal Engine 4.x Scripting with C++ Cookbook - Second Edition

By: John P. Doran, William Sherif, Stephen Whittle

Overview of this book

Unreal Engine 4 (UE4) is a popular and award-winning game engine that powers some of the most popular games. A truly powerful tool for game development, there has never been a better time to use it for both commercial and independent projects. With more than 100 recipes, this book shows how to unleash the power of C++ while developing games with Unreal Engine. This book takes you on a journey to jumpstart your C++ and UE4 development skills. You will start off by setting up UE4 for C++ development and learn how to work with Visual Studio, a popular code editor. You will learn how to create C++ classes and structs the Unreal way. This will be followed by exploring memory management, smart pointers, and debugging your code. You will then learn how to make your own Actors and Components through code and how to handle input and collision events. You will also get exposure to many elements of game development including creating user interfaces, artificial intelligence, and writing code with networked play in mind. You will also learn how to add on to the Unreal Editor itself. With a range of task-oriented recipes, this book provides actionable information about writing code for games with UE4 using C++. By the end of the book, you will be empowered to become a top-notch developer with UE4 using C++ as your scripting language!
Table of Contents (16 chapters)

Creating and building your first C++ project in Visual Studio

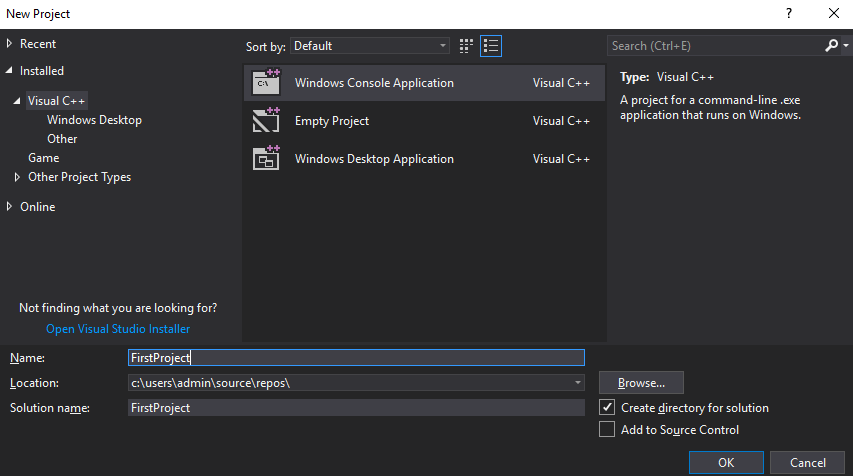
In order to compile and run code from Visual Studio, it must be done from within a project.

Getting ready

In this recipe, we will identify how to create an actual executable running program from Visual Studio. We will do so by creating a project in Visual Studio to host, organize, and compile the code.

How to do it...

In Visual Studio, each group of code is contained within something called a Project. A project is a buildable conglomerate of code and assets that produce either an executable (.exe runnable) or a library (.lib or .dll). A group of projects can be collected into something called a Solution. Let's start by constructing a Visual Studio solution and a project for a console application, followed by constructing a UE4 sample project and solution:

  1. Open Visual Studio and go to File | New | Project....
  2. You will see a dialog, as follows:
  1. Select Visual C++ in the pane on the left-hand side. In the middle pane, hit Windows Console Application. Name your project in the lower box, and then hit OK:

Once the application wizard completes, you will have created your first project. Both a solution and a project will be created.

  1. To see these, you need Solution Explorer. To ensure that Solution Explorer is showing, go to View | Solution Explorer (or press Ctrl + Alt + L). Solution Explorer is a window that usually appears docked on the right-hand side of the main editor window, as shown in the following screenshot:
Solution Explorer location
It is possible to arrange your layout however you like inside Visual Studio. If you ever want to go back to the default layout, you can go to Window | Reset Window Layout.

The Solution Explorer also displays all the files that are part of the project. This default solution already contains a few files, and we can add and remove new files in this section from here. As your project grows, more and more files are going to be added to your project. In the Source Files folder, you'll also notice a file created called FirstProject.cpp, which will look as follows:

// FirstProject.cpp : This file contains the 'main' function. Program execution begins and ends there.
//

#include "pch.h"
#include <iostream>

int main()
{
std::cout << "Hello World!\n";
}

// Run program: Ctrl + F5 or Debug > Start Without Debugging menu
// Debug program: F5 or Debug > Start Debugging menu

// Tips for Getting Started:
// 1. Use the Solution Explorer window to add/manage files
// 2. Use the Team Explorer window to connect to source control
// 3. Use the Output window to see build output and other messages
// 4. Use the Error List window to view errors
// 5. Go to Project > Add New Item to create new code files, or Project > Add Existing Item to add existing code files to the project
// 6. In the future, to open this project again, go to File > Open > Project and select the .sln file
  1. Press Ctrl + Shift + B to build the project, then Ctrl + F5 to run the project.
  1. Your executable will be created, and you will see a small black window with the results of your program's run:

How it works...

Building an executable involves translating your C++ code from text language into a binary file. Running the file runs your game program, which is just the code text that occurs in the main() function between { and }.

There's more...

Build configurations are styles of build that we will discuss here. There are at least two important build configurations you should know about: Debug and Release. The Build configuration that's currently selected is at the top of the editor, just below the toolbar in the default position:

Location of the currently selected Build Configuration

Depending on which configuration you select, different compiler options are used. A Debug configuration typically includes extensive debug information in the build, as well as the ability to turn off optimizations to speed up compilation. Release builds are often optimized (either for size or for speed) and take a bit longer to build; they result in smaller or faster executables. Stepping through a file's behavior by moving through with the debugger line by line is often better in the Debug mode than the Release mode.