

Now, we are making our character jump by using Physics.Raycast in Unity. We can also use the OnCollisionEnter, OnCollisionExit, or OnCollisionStay functions to check the collision detection between our character and the floor, but in this case we will use Raycast
because it's more flexible to adjust.
However, because the Raycast is only a line with no thickness, there is a chance that if we have a very thin platform, the Raycast can miss it. And it will cause the problem that we might not be able to jump. So, we should make sure that the platform should have the thickness of least 0.1 units.
Continuing from the last step, let's get on with it as follows:
Let's open our
CharacterController_2D.jsfile and add this code to it; first our parameters:private var b_isJumping : boolean; private var f_height : float; private var f_lastY : float; public var jumpSprite : JumpSpriteManager; public var layerMask : LayerMask; //to check for the raycast
Then, we go to the
public function Start ()function and add the following code inside this function://Get mesh from the character MeshFilter mesh = GetComponent(MeshFilter).sharedMesh; //Get hight from the top of our character to the bottom of our box collider f_height = mesh.bounds.size.y* transform.localScale.y; //Set up the last y-axis position of our character f_lastY = transform.position.y; b_isJumping = false;
Next, we go to the
public function Update ()function and add some code as follows (the highlighted part is our new code)://If our character isn't jumping if (!b_isJumping) { if (Input.GetButton("Horizontal")) { //Walking in_direction = Input.GetAxis("Horizontal") < 0 ? -1 : 1; rigidbody.velocity = new Vector3((in_direction*f_speed), rigidbody.velocity.y, 0); loopSprites[0].resetFrame(); loopSprites[1].updateAnimation(in_direction, renderer.material); } else { loopSprites[1].resetFrame(); loopSprites[0].updateAnimation(in_direction, renderer.material); } if (Input.GetButton("Jump")) { //Jump b_isJumping = true; //Then make it Jump loopSprites[0].resetFrame(); loopSprites[1].resetFrame(); rigidbody.velocity = new Vector3(rigidbody.velocity.x, -Physics.gravity.y, 0); } } else { //update animation while it Jump jumpSprite.updateJumpAnimation(in_direction, rigidbody.velocity.y, renderer.material); }
So, we basically add the statement to check if our character is jumping or not.
Next, we add the highlighted code in the
LateUpdate()function, in which we already had our camera update position:public function LateUpdate() : void { //Checking Jumping by using Raycast var hit : RaycastHit; var v3_hit : Vector3 = transform.TransformDirection (-Vector3.up) * (f_height * 0.5); var v3_right : Vector3 = new Vector3(transform.position.x + (collider.bounds.size.x*0.45), transform.position.y, transform.position.z); var v3_left : Vector3 = new Vector3(transform.position.x - (collider.bounds.size.x*0.45), transform.position.y, transform.position.z); if (Physics.Raycast (transform.position, v3_hit, hit, 2.5, layerMask.value)) { b_isJumping = false; } else if (Physics.Raycast (v3_right, v3_hit, hit, 2.5, layerMask.value)) { if (b_isJumping) { b_isJumping = false; } } else if (Physics.Raycast (v3_left, v3_hit, hit, 2.5, layerMask.value)) { if (b_isJumping) { b_isJumping = false; } } else { if (!b_isJumping) { if (Mathf.Floor(transform.position.y) == f_lastY) { b_isJumping = false; } else { b_isJumping = true; } } } f_lastY = Mathf.Floor(transform.position.y); //Update Main Camera mainCamera.transform.position = new Vector3(transform.position.x, transform.position.y, mainCamera.transform.position.z); }This is a very nice function that will allow us to debug our game, the result of which we won't see in the real game. Let's add the following block of code:
public function OnDrawGizmos() : void {
  mesh = GetComponent(MeshFilter).sharedMesh;
  f_height = mesh.bounds.size.y* transform.localScale.y;
  var v3_right : Vector3 = new Vector3(transform.position.x + (collider.bounds.size.x*0.45), transform.position.y, transform.position.z);
  var v3_left : Vector3 = new Vector3(transform.position.x - (collider.bounds.size.x*0.45), transform.position.y, transform.position.z);
  Gizmos.color = Color.red;
  Gizmos.DrawRay(transform.position, transform.TransformDirection (-Vector3.up) * (f_height * 0.5));
  Gizmos.DrawRay(v3_right, transform.TransformDirection (-Vector3.up) * (f_height * 0.5));
  Gizmos.DrawRay(v3_left, transform.TransformDirection (-Vector3.up) * (f_height * 0.5));
}
Finally , we add another
SpriteManagerclass, which is a little different from our first sprite class. ThisSpriteManageris for our jumping animation. Since our jumping animation is quite unique and not a loop animation, we need another sprite class to control it. Let's add this code underneath ourSpriteManagerclass and call itJumpSpriteManager:class JumpSpriteManager { public var t_jumpStartTexture : Texture2D; //Alternative Jump Texture play after t_jumpReadyTextures public var t_jumpAirTexture : Texture2D; //Alternative Jump Texture play when the player in the air at the top position of projectile public var t_jumpDownTexture : Texture2D; //Alternative Jump Texture play when the player fall to the ground public function updateJumpAnimation (_direction : int, _velocityY : float, _material : Material) : void { //Checking for the player position in the air if ((_velocityY>= -2.0) && (_velocityY<= 2.0)) { //Top of the projectile _material.mainTexture =t_jumpAirTexture; } else if (_velocityY> 2.0) { //Start Jump _material.mainTexture = t_jumpStartTexture; } else { //Fall _material.mainTexture = t_jumpDownTexture; } _material.mainTextureScale = new Vector2 (_direction * 1, 1); _material.mainTextureOffset = new Vector2 (_direction * 1, 1); } }Now we are done with coding, go back to Unity, go to
Hierarchy, and click on ourPlayer, then go to the Inspector view. Now, we will see a new parameter Jump Sprite; click on it to get the parameters, then set the following:T_jump Start Texture: J_Frame1
T_jump Air Texture: J_Frame2
T_jump Down Texture: J_Frame3
Layer Mask: Level
We have now finished this step. Let's click plays the game and Space on the keyboard. Now, you will see your Player Jumping.
First, we attached the jumping ability to our character. b_isJumping is for checking if the character is already jumping in the air or not. f_height is the height from top to bottom of our character, which we will use to calculate physics later. f_lastY is the last position of our character in the Y-axis. jumpSprite is the SpriteJumpManager class, which will be a bit different from our SpriteManager class because our jumpsprite is not loop animation, so we need to create a new class to control this.
Then, in the start function we had a code that sets up and gets the information that we need as soon as our character is created. The mesh = GetComponent(MeshFilter).sharedMesh; line will basically get the mesh information from the GameObject that our CharacterController_2D script attached, which is our Player. Next, we get the height of this mesh by its size multiplied by the local scale of this object. Then, we set up f_lastY to the object's current position and set the b_isJumping parameter to false.
Next, if it is jumping, it will update the jumping Sprite animation. If it isn't jumping, it will go to our old code to check for walking or staying. We also added a new Input.GetButton("Jump"), which will check if the player pressed jump; in that case it will reset all the loop sprites and change the Y-velocity to negative gravity. This will basically make our character jump after the player presses the jump button.
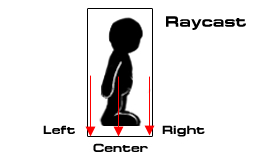
We also added a Physics.Raycast to make our character move better and bug free. Then, we used the OnDrawGizmos() function to see and check if our ray from Physics.Raycast is from the right position or not. We can also use this to test or debug our game without taking the code out because it won't be shown on the real game. As we can see from the following figure, the red arrows represent where the raycast is, but we don't actually see them in the game:
The Physics.Raycast is used to check if our character is on the floor or not. If it isn't, it will tell the game that now our character isn't on the floor, making its state equal to the jumping state (or we can say that it is in the air). By using this checking statement, we will be able to play a jumping animation when our character is falling down, but the player doesn't press the jump button.
We also draw three rays:
We draw the ray from the middle of our character to the bottom.
We draw the ray at the very right bound of the object to the bottom; we won't draw the ray at exactly the right bound position because we don't want it to hit the edge thickness of the floor.
Then, we do the same thing as with the right bound to the left bound.
Next, we check to make sure that the ray didn't hit anything and our character isn't jumping. We check the last Y-position for our character—whether it is equal to the current Y-position or not. If it is, it means the character is on the floor, so we set b_isJumping = false. If it doesn't, the character will fall down and we set b_isJumping = true. Finally, we update our character's last position on the Y-axis.
Next, we want the OnDrawGizmos() function to show our Physics Raycast in our editor scene which will give us a nice visual to see our Ray pointing to the right direction. In this function, we will use Gizmos, which is the class that basically allows us to draw the visual debugging or set-up aids in the scene view. We can get more information on how to use Gizmos from the following website:
http://unity3d.com/support/documentation/ScriptReference/Gizmos.html
Lastly, we create another Sprite class to manage our jumping texture to show the jumping animation by checking its velocity in the Y-axis. In the JumpSpriteManager, we almost have everything similar to our SpriteManager. Since we don't need a loop animation in this Jumping Sprite, but we still need to change the texture. First, we will change the main texture to t_jumpAirTextures, which will show the sprite while the character is at the top in the air. So, we check the velocity in the Y-axis, to see if it is between -2 to 2. Next, we check if the velocityY is greater than 2. This means that the player has just started jumping, but anything other than that means our character has fallen. Finally, we update our character's Tiling and Offset.
There is something else we must look at in this chapter—the Physics.Raycast.
Why do we need to shift a little bit from the collider edge by multiple 0.45 instead of 0.5?
var hit : RaycastHit;
  var v3_hit : Vector3 = transform.TransformDirection (Vector3.forward) * (f_height * 0.5);
var v3_right : Vector3 = new Vector3(transform.position.x + (collider.bounds.size.x*0.45), transform.position.y, transform.position.z);
From the line of code if (Physics.Raycast (v3_right, v3_hit, hit, 2.5)), we will see that the Raycast is drawing from the middle of our character on the right bound downward by 2.5 units. Now we can take a look at the Gizmos that we drew in the editor:
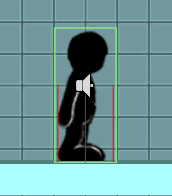
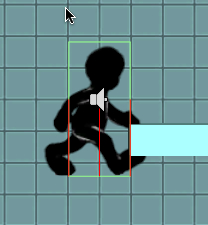
As we can see in the preceding figure, our gizmo (the red line) is basically shifting from the boundary of the box collider (green box) a little bit. This will only check at the bottom of our character because our box collider covers the line. On the other hand, if we draw the Raycast at the edge of the box collider, it will cause the problem that our character will be able to walk on air while the edge of the floor hits the Raycast, as shown in the previous figure.
One last thing for the Gizmos: if we want to see our gizmos in the game scene, we can click on the Gizmos tab on the top-right corner of the game scene:
