

Keyframes are the bookends of animation. They are specified values we set at particular frames in a timeline and the differences between their values result in animation. Setting keyframing is the most basic method for generating movement and changing your scene from static to dynamic. If you can set keyframes, you can make the 3D objects you design jump, shake, dance, spin, slide, explode, and just about any other verb in the dictionary. This recipe will demonstrate how to set keyframes to get things moving in your scene.
Start by using the skills you learned to position our Viewer so we can see the rope on the back brick wall clearly. We are going to animate it swinging back and forth. Select the Rope object in the Object Manager and our rope will be highlighted inside the Viewer. Now any transformations we apply with the Move Tool, Rotate Tool, or Scale Tool will occur on our rope.
The main focus of keyframing is done inside the Attribute Manager. Because the manager controls all the properties of our objects, it makes sense to be able to set keyframes inside it to animate the attributes of our object. Select the Coordinates tab for your rope inside the Attribute Manager, which contains the position, scale, and rotation properties of our rope. The property we are going to focus on is the R.B or the bank of our Rope object, which is currently set to 0.
Notice that to the left of each property there is a small circle with a black outline; this is our indicator that tells us if the property is keyframed. To set a keyframe, make sure you are on frame 1 in your Animation Toolbar, then hold down the Ctrl key or the Command key and click on the circle, which should now become a red-filled dot. Congratulations on setting a keyframe. Moving on to the next recipe then.
Just kidding! We need to do more than that to see how keyframes actually work; setting one keyframe will not animate anything. Make sure you switch back off the Enable Axis Modification icon on the left-hand side in the Command Palette if you just finished the last recipe. Now select the Rotate Tool from the Command Palette and grab the blue ring around the rope that corresponds to the rotation of our R.B value. Drag the ring clockwise and hold down the Shift Key so that we rotate in intervals of 5, and stop when you get to 45 degrees. Notice how your keyframe dot has changed from red to yellow, meaning that we have changed the value at which our keyframe was previously set. If we skip to another frame, Cinema 4D will revert back to the previously-set keyframe value, so we need to do the same command to set a new keyframe with our value of 45. Hold Ctrl or Command and click on the dot to change it from yellow to red, meaning our keyframe is set with our new value.

Movement by keyframes comes from the change in values between two or more keyframes, so let's set another one at another point in time. Move to frame 15 in your Animation Toolbar, and instead of using the Rotate Tool, just enter a value of -45 directly in the R.B field in the Attribute Manager. The dot has turned into a yellow circle, meaning the value has been changed but not keyframed. Try setting a keyframe by right-clicking on the yellow circle and selecting Add Keyframe from the Animation menu. Go to the beginning frame of the timeline and click on the Play button in the Animation Toolbar, and watch your rope swing from one side to the other.

Note
It helps to think about the motion you want to achieve and try to translate that into numerical values occurring throughout the timeline. The rope's starting point is like you are holding it up high and waiting to let it go. Upon the release, it would swing and reach its farthest rotation on the initial swing, then it would swing back and forth with a gradually decreasing rotation at similar intervals, which gives it the final look of slowing down and coming to rest.
Now's the time to go crazy and set the rest of our keyframes, one after another. Jump to frame 30 and set the keyframe for R.B to 25, then go to frame 45 and set it to -25, then a value of 5 at frame 60, -5 at frame 75, and finally back to 0 at frame 90. Press the Play button in the Animation Toolbar and watch your animation. Your rope should drop and swing back and forth and come to a complete rest.
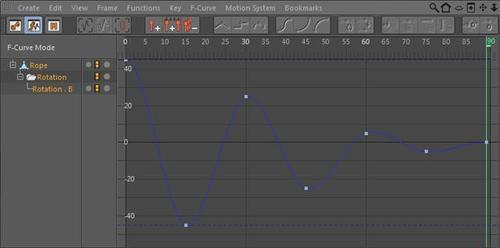
If you would like to see the results of your keyframes visually, go into the Window menu at the top and select the Timeline option. This keeps track of all the keyframed values in your project and allows you to make adjustments to your keyframes as if they were points plotted on a graph. The default view shows your keyframes that you can slide into different moments in time, but we are more interested in the graphical view. Click on the small icon of a curve equation, next to the key in the top right-hand corner, and then select the Rope object on the far left-hand side, or press the spacebar to toggle between the two. You should see a curve that looks somewhat like a sine wave; this is the rotation value we plotted. These curves are called F-Curves , where the F stands for function, and you can use them to adjust the temporal (time) interpolation of the values between keyframes.
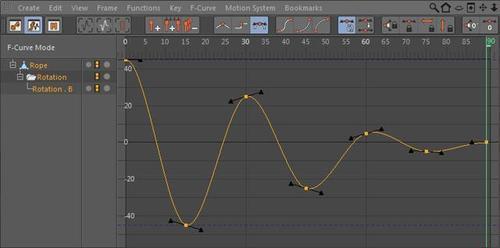
In this window, we can select individual points and slide them around the graph. The Y axis represents the actual rotation value, and the X axis corresponds to the frames in our composition. Click-and-drag your mouse to create a box around all the points on the graph so they are selected and highlighted in orange. Notice how the points have little levers called Bezier handles that can be stretched out or tilted in different angles to adjust the shape of the curve around the point representing the keyframe.
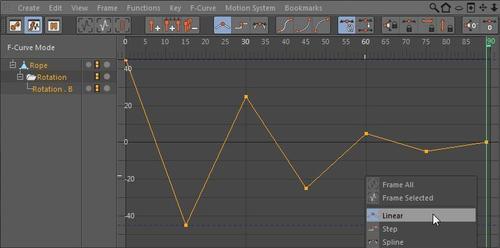
With the points selected, right-click and change the highlighted option from Spline to Linear. Your curve turns into straight lines, making a very sharp and jagged shape on your graph. Go play with your animation and observe what this has done to your rope, it now swings stiffly and sharply, changing direction just like the new shape of your graph would indicate. Hit Ctrl or Command + Z to undo your change to the graph, so that we now have curves again, which represent a more appropriate motion for our rope.
We use the properties inside the Attribute Manager to set keyframes to create animations inside Cinema 4D. The keyframes need to be set at different points in time and have different values in order to cause change and motion in our scene. We can also use the Timeline window to view a visual representation of our keyframes as points on a graph. This window allows us to adjust our points with Bezier handles and also change the way our keyframes ease from one to the next.
You can keyframe any parameter with that small circle next to it. Technically, any object in Cinema 4D can be keyframed in some way. I promise we will make a better animation than this swinging rope if you keep reading my book.
If you end up keyframing a parameter and you hate the way it looks, you can delete all of your keyframes simply by right-clicking on the keyframed dot and selecting Delete Track.
Interpolation is the method in which our animation changes between keyframes. Bezier curves represent the concept of easing into and out of different keyframe values. In the case of our rope, the rope doesn't change directions instantly and switch directions immediately; it slows down and gradually shifts back in the other direction. The linear method made our animation look awful, but in some cases it's the appropriate kind of interpolation for your keyframes. Let's say you have a fighter jet flying through your scene; if the position keyframes are set to Bezier, your plane will appear to gradually speed up in the beginning and slow down at the end of your keyframed animation. In actuality, the plane should be traveling at a constant rate through your scene, so you would want to have a linear interpolation between your keyframes. You have to picture how your object is supposed to move, and imagine how that looks plotted on a graph.
It's early in the book, but I like to include any extra tools I use just for reference. I easily created the rope used in this recipe using Reeper X, a free plugin for Cinema 4D that specializes in creating ropes (http://www.codeworkers.de/garage-plugins-reeperx.html).