
In this recipe we are going to learn how to set the parameters for the final render. We will learn how to make our image noise-free and how to set the parameters in order to optimize our render times as best as we can, without losing quality.
We are getting closer to the conclusion of our first scene in Cycles. It may sound strange but even if we have already set up materials, lighting, and DOF, we still didn't actually render anything yet by pressing the render button. We only looked at the scene through the real-time viewport! So we can see how powerful the Cycles real-time viewport is. But the time for the final render has come, so it's time to talk about render settings.
I thought that a description of each render setting would be better than a mere list of the values I used in this scene. In this way, we can understand better how and why we are doing something like this. Anyway, the following is a screenshot of the render settings used for this render:
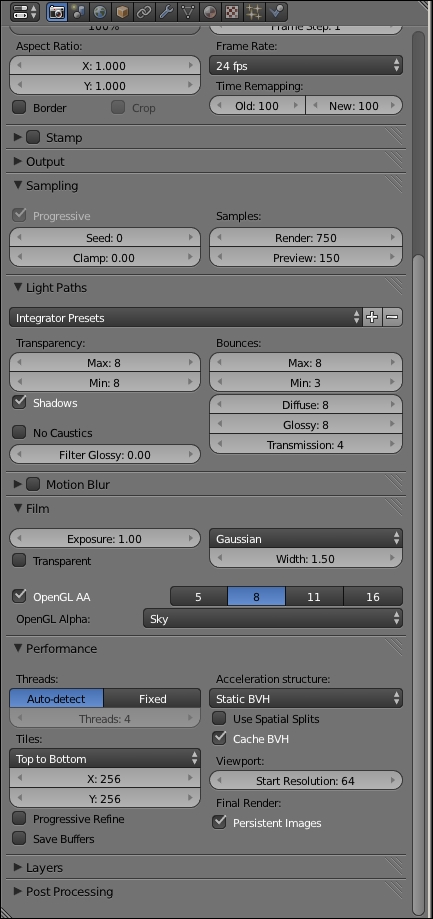
Let's jump to the Render panel. Many of the settings are the same as they were in BI, so we will skip the Dimensions, Stamp, and Output panels. We already saw in the first part of the chapter how to set up the settings concerning the device to use, CPU or GPU.
Let's have a look instead at the Sampling panel. Here lies some really important settings for our render. On the right we can read Samples. Every time a light path in the scene hits a surface, Cycles will compute a new sample for that pixel. The higher the number of samples, the less noise the render will have. The setting of this value will depend on the scene. In general, we will need to keep increasing it till the noise disappears, or at least will be at an acceptable level.
We can see that there is a Render and a Preview value. The first is the number of samples that Cycles will compute for the final render, while the second represents how many samples will be computed in the real-time viewport. Let's set the Render value to 750 for this scene.
Note
The seed value is really important for animation as it will avoid the noise to be static. We will talk again about this in Chapter 7, Car Rendering in Cycles.
The clamp value is a setting that will help us reduce fireflies in our scene. A firefly, also known as burned pixels, is a mistake made by the engine while calculating areas with strong light. They will appear as white pixels with totally crazy RGB values.
There are many ways to avoid fireflies, but the fireflies will still occur from time to time. Clamp will help us reduce them at the cost of the accuracy of the scene. This setting will indeed clamp out the highlights over a certain value to avoid getting burned pixels. Anyway, if set a value too high, clamp can also cut out some highlights that we would like to have in the scene. Leaving this value as 0 will disable clamping, while low values will mean stronger clamping of light and higher value will mean less clamping. Usually it is not good to go below values like 3, as by doing so it may compromise the lighting of the scene. For this particular scene we won't be needing clamp anyway, so we can leave the value to 0.
We will learn in the next part of this chapter about the non-progressive integrator.
Now let's move to the Light Paths panel. Here we will find the settings about the precision of the rendering. As for the samples, it is good that the settings will change depending on the scene. Each setting that you see represent the number of light path bounces that we want to have in the scene. In general, the higher the number of bounces the more precise the render will be, but it will also increase both render time and noise. It is important to find the right balance. The number of bounces needed depends on the level of complexity of the materials in the scene. For instance, a complex glass material could require a high-transparency bounces number in order to render correctly.
We also have the possibility of switching off shadows and/or caustics computation. While it is really hard to find a scene where shadows are not needed, if not in particular situations, we will see especially in Chapter 2, Creating Different Glass Materials in Cycles, that sometimes caustics can generate a lot of noise, and it is a good idea to turn them off, especially because it is possible to fake them.
Finally, the Filter Glossy value can help us reduce noise on glossy surfaces in some situations. Of course nothing comes for free and as for the clamp, filter glossy will decrease the accuracy of the image. For this reason it is better to use it only if strictly necessary.
You will also see at the top of this panel a cascade menu with a couple of presets. You can also add your own presets, but as I said every scene is a story on its own.
In general, it is quite hard to find scenes that will require bounce numbers higher than 16 (and 8 for the min values). This is a quite safe area that will be capable of rendering the majority of scenes without any lack in quality and precision. On the other hand, it could also be too much for other scenes. However, a method that I like to use is to set the Full Global Illumination preset and make a render. Then I will start to lower down each value until I see that there is a little change in the image. It is important to check areas with transparencies, reflections, and caustics, as they are the first to change depending on the settings.
Moving down we have the settings regarding Motion Blur, which we will see in depth in Chapter 7, Car Rendering in Cycles.
In the Film panel, we can find settings regarding the exposure, the Anti-Aliasing algorithm, and the option to make the background transparent. Making the background transparent will preserve any lighting or reflections coming from it. It will just be rendered as an alpha channel.
Another important panel is Performance. Here we can find some settings which, if correctly set up, can speed up our render times. First of all let's talk about tiles. To save up memory and take advantage of multithreading, Cycles will divide the render into smaller tiles. Here it is very important what we use to render. In case of GPU the tile size should be bigger, around 256 x 256. On the other hand, when using a CPU we should make tiles smaller. Depending on the number of cores we have, good values are 32 x 32 or 64 x 64. Anyway, you will have to test it and see which is the best setting for your computer. Keep in mind that this setting can really change render times. We can also decide in what order we want the tiles to be rendered.
The Progressive Refine option will render the image in a single big tile. The render will be slower, but it can be stopped when we believe the noise level is acceptable and we can see the overall look of the image from the beginning.
The Save Buffer option will allow Cycles to write some information on the hard drive instead of the RAM. This will allow us to save some memory and could come in very handy in some big scene especially when using the GPU for the rendering.
On the right side of the panel, we will find options concerning the Acceleration Structure. When Cycles starts the render, a bounding volume hierarchy (BVH) of the scene will be built. Without going too deeply into technical details, BVH can be defined as the geometrical structure of the scene. Even when we will be using GPU to render, this operation will be computed by CPU and there are some different ways BVH can be built.
First of all, we can decide between a static or dynamic BVH build. The first one will require a complete reconstruction of the BVH for each rendering, but the sampling phase of the render will be faster. On the other hand, the dynamic one will allow faster BVH updates at the cost of sampling speed.
The Spatial Split option works in a similar way. When this option is activated, the BVH building will be slower, but the sampling will be faster.
Another interesting option is Cache BVH. This option will allow Cycles to cache the BVH on the RAM so that it will not need to compute it again for the next render. It is important to keep in mind anyway that this will work only if no mesh in the scene is deformed. A good kind of scene to use this option is when the only thing which is animated is the camera.
Tip
A good thing to keep in mind is that Blender has a really good tips pop-up system to help understand the settings. Just hover the cursor over an option or a button and after a while, a pop up with a brief description will pop up.
This is the conclusion of the first chapter. If you encountered any difficulty in following some part of the recipes, you will find a ready version of the scene in the blend folder named keys.blend which is available in the code bundle of this book.