Book Image

Raspberry Pi Zero W Wireless Projects

By : Vasilis Tzivaras
Book Image

Raspberry Pi Zero W Wireless Projects

By: Vasilis Tzivaras

Overview of this book

The Raspberry Pi has always been the go–to, lightweight ARM-based computer. The recent launch of the Pi Zero W has not disappointed its audience with its $10 release. "W" here stands for Wireless, denoting that the Raspberry Pi is solely focused on the recent trends for wireless tools and the relevant use cases. This is where our book—Raspberry Pi Zero W Wireless Projects—comes into its own. Each chapter will help you design and build a few DIY projects using the Raspberry Pi Zero W board. First, you will learn how to create a wireless decentralized chat service (client-client) using the Raspberry Pi's features?. Then you will make a simple two-wheel mobile robot and control it via your Android device over your local Wi-Fi network. Further, you will use the board to design a home bot that can be connected to plenty of devices in your home. The next two projects build a simple web streaming security layer using a web camera and portable speakers that will adjust the playlist according to your mood. You will also build a home server to host files and websites using the board. Towards the end, you will create free Alexa voice recognition software and an FPV Pi Camera, which can be used to monitor a system, watch a movie, spy on something, remotely control a drone, and more. By the end of this book, you will have developed the skills required to build exciting and complex projects with Raspberry Pi Zero W.
Table of Contents (11 chapters)

Home automation

To complete home automation, we will use our Raspberry Pi Zero W board and a DHT11 temperature and humidity sensor. The DHT11 sensor is able to test both temperature and humidity. It is pretty easy to set it up and we will do this using a library. First of all, let's start connecting things together. The DHT11 sensor consists of only three pins, one for the ground, one for the 5V and the last one for the signal. We have to carefully connect them to the appropriate pins in our Raspberry Pi Zero W board. In the following image, you can find the pinout of the board:

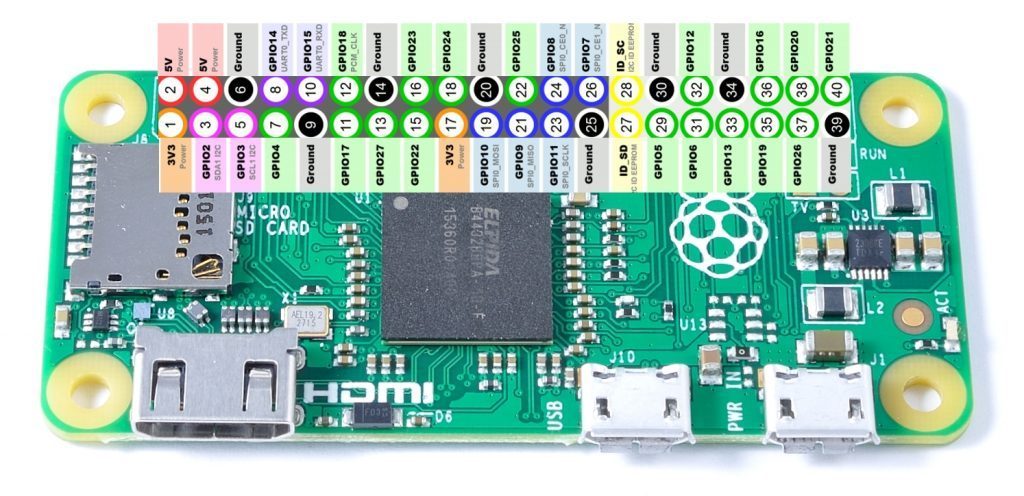
If this project is brand new and not an add-on, all pins should be available; so, connect the ground pin of the sensor to pin 9. Next, connect the 5V pin of the sensor to pin 2, and finally, connect the signal pin of the sensor to pin 7. It is important to be connected to pin 7, since we will later...