
Setting up the development environment of the book
In this section, we will walk you through setting up the foundational development environment for the book. There may be additional configurations that will need to be done for specific chapters, but the setup here will be enough for you to make those additional ones with ease. The two main components that need to be set up here are the Arduino IDE for uploading code to your ESP32 microcontroller and your GitHub environment for source control. Note that ESP-32 is not part of the Arduino family hardware; we are simply using it as it is an editor that supports the development of ESP-32. We will also set up your AWS environment, but we will explore that in Chapter 7, Working with Cloud Computing to Power IoT Solutions where working with your workloads on AWS will be discussed further.
Setting up your Arduino IDE environment
Your Arduino IDE environment is where you will be working with your code and uploading that code onto your ESP32. Note that you are not limited to only using the Arduino IDE environment for doing this, so if you are familiar with other environments, feel free to use them. For the purposes of this book, we will be working with this IDE.
Arduino IDE environment
The Arduino integrated development environment (IDE) is a powerful, user-friendly software platform designed for programming and interacting with Arduino microcontroller boards. The IDE makes it easy for beginners to get started with microcontroller programming while also offering advanced features for experienced developers. In this section, we will guide you through the process of setting it up on your computer, enabling you to bring projects described in this book and beyond to life:
- Download the Arduino IDE environment at https://www.arduino.cc/en/software. Go through the installation process and accept the defaults, ensuring that you know where the program will be installed.
- Open your newly installed Arduino IDE. By default, we will not be able to find ESP32 as a supported board unless we specify it within our preferences. Go to File | Preferences. On the window that is opened, you should see a space for additional boards manager URLs. Enter the URL
https://raw.githubusercontent.com/espressif/arduino-esp32/gh-pages/package_esp32_index.json. Click OK. - Go to Tools | Board | Boards Manager and enter
esp32into the search bar. Click Install on the latest ESP32 version that pops up:
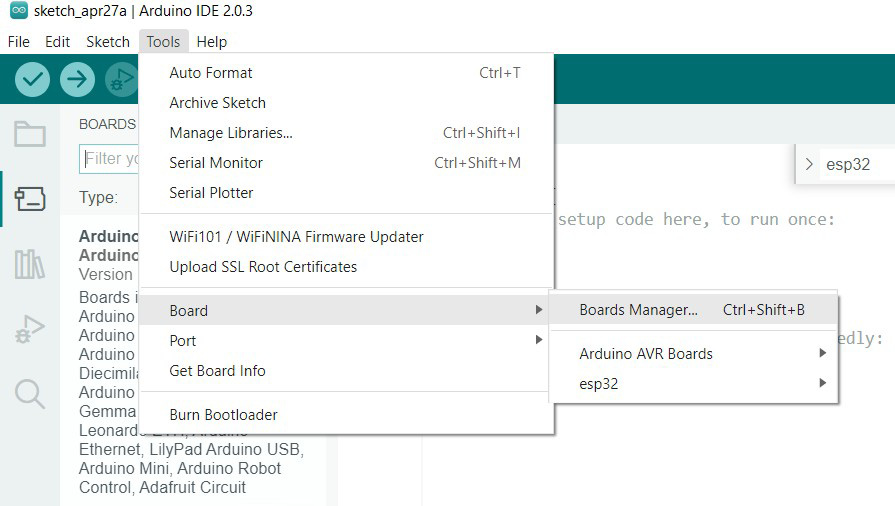
Figure 1.4 – Accessing Boards Manager on the Arduino IDE
- After installation, navigate to Tools | Board | esp32 and select NodeMCU-32S.
- We then need to install the driver for the ESP32. To check which type you are using, navigate to Device Manager on your device by searching it up on the Windows Start menu and expanding the Ports (COM & LPT) dropdown. Take note of the COM port that is being used; we will also need to set our Arduino accordingly to that later. If the same type is used, which will require the CP210x driver, you will be able to download it at https://www.silabs.com/developers/usb-to-uart-bridge-vcp-drivers?tab=downloads.
- On the Arduino IDE, navigate to Tools | Port and select the COM port that is being used.
- Attach your ESP32 to your laptop using a mini USB.
- Click File | New Sketch in the top-left corner of the program.
- You will see the following code in your environment:
void setup() {
  // put your setup code here, to run once:
}
void loop() {
  // put your main code here, to run repeatedly:
}
To see whether your IDE is working correctly, click on Verify, which is the button in the top-left corner of the screen.
- To see whether your device is configured correctly, click on Upload, which is the second button from the left. While the upload is, hold down the Boot button, which is the button in the bottom right.
Check your IDE’s terminal to see whether the code has been uploaded successfully.
With this, your Arduino IDE should be set up and ready to be used. We can now proceed to try it out with our inaugural Hello World exercise.
Red LED Lighting Hello World exercise
To test the functionality of the ESP32 and to give you a taste of working with your new development kit, we are going to create the equivalent of a Hello World exercise—a practical exercise to light up a red LED bulb.
Components you’ll need
For this, you will need the following components:
- An ESP32 microcontroller
- A red LED (or any other color you would like to use)
- An 830-hole breadboard
- Two jumper wires
- A 1k Ohm resistor
As you go along, you can refer to the upcoming assembly diagram to see the placement of the components on the board and get an overall idea of what we are trying to create to follow the instructions more easily.
Setting up the required hardware
Now, we will proceed to set up the hardware accordingly. The following figure shows the breadboard diagram that can be used as a reference while you follow the instructions to wire up the board, breadboard, LED, and resistor:
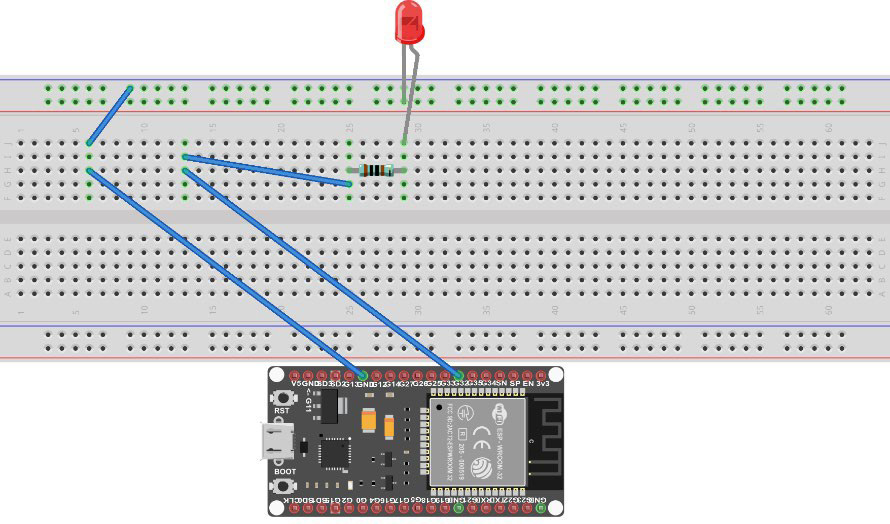
Figure 1.5 – Breadboard diagram for connecting the LED
- The long leg of the LED is the anode and the shorter leg is the cathode. Attach the anode to hole 30j and the cathode to hole 30- on the breadboard.
- We now will attach the ESP32 to the board. Attach the ground pin (GND on the board) as shown in the figure to hole 6h and 3g to hole 13h. You can either do this with a jumper cable or just directly put it down with the corresponding legs of the microcontroller as such.
- Attach the 1k Ohm resistor with one leg on hole 30h and the other on hole 25h.
- Attach a wire from hole 25g to hole 13i.
- Attach a wire from hole 6j to 9-.
Now we have successfully set up the hardware that is needed for this practical exercise. We can now move on to producing the necessary code on our Arduino IDE.
Coding it up on the Arduino IDE
Now, we will upload the code for running the LED experiment to the ESP32. Use the following code for this purpose:
const byte led_gpio = 32;
void setup() {
  pinMode(led_gpio, OUTPUT);
}
void loop() {
  digitalWrite(led_gpio, HIGH);
  delay(1000);
  digitalWrite(led_gpio, LOW);
  delay(1000);
}
In the setup section of the code, the digital pin led_gpio is initialized as an output. Within the loop section of the code, we are simply alternating between turning the light on and off (as indicated by the high and low). Each wait 1,000 milliseconds—equivalent to one second—before switching to the next state, as seen with the delay statement.
And with that, you’ve just created your first IoT program on the ESP32!
Setting up your GitHub repository
GitHub is a code repository platform that is used for version control and collaboration on your code. With it, developers can track changes to code and collaborate on a project, while also setting extra restrictions for changes as part of best practices such as letting developers review each other’s code and merge changes from anywhere. We will be using GitHub throughout this book for you to both use the platform to pull the code that we use throughout our chapters and put in your code.
Setting up your GitHub account
To start, we will create our GitHub account to use to set up our repository:
- Navigate to https://github.com/ and click on the Sign Up button in the top right.
- Enter your email, password, and username as prompted. Check your email for verification and log in to GitHub.
You now have a GitHub account, which is the first step for setting up our version control environment and for making optimum use of the resources of this book that are ready for you to pull onto your local environment.
Setting up your GitHub CLI
When you pull code or create local repositories to push up to GitHub, it is much easier if you use the command-line interface (CLI). The following are the steps that you need to take to install the CLI on your laptop:
- Assuming you are on Windows, you will need to go to https://github.com/cli/cli/releases. Navigate to the latest release (at the time of the writing of the book, it is
2.21.1, but this may change, so navigate accordingly) and download the file that ends withwindows_amd64.msi. - Follow through with the default installation prompt and install the CLI in a location of your choice.
- In the case that it is not done by default, open your Windows Start Menu, go to Control Panel | System | Advanced System Settings | Environmental Variables, and click Edit on the
Pathvariable within the user variables for your account. Click New and add the path of the folder that contains your GitHub installation. - Check whether your CLI has been installed successfully by opening your command prompt and typing
git –version. If the output returns the version, that confirms that Git is already installed. - You will now have to set your GitHub credentials. Configure your username to record changes you make to your local repository with the command as follows:
$ git config –global user.name "{firstname} {lastname}" - Configure an email address that will be associated with each of your history markers:
$ git config –global user.email "{youremail}" - You now need to authorize your device to modify repositories that are owned by your GitHub account. As part of this, we need to register an SSH key. Start by generating an SSH key via the command prompt with the following command:
$ ssh-keygen -t ed25519 -C "{youremailhere} - When prompted, specify the folder to generate the SSH key to; otherwise, let the default be and change the directory into the folder that it is generated in.
- Open the
id_ed25519file that is generated in a text editor of your choice and copy the contents of the file. - In GitHub, in the top-right corner, click your profile photo and click Settings.
- In the
Accesssection, click on the SSH and GPG keys. - Click New SSH Key or Add SSH Key.
- In the
Titlefield, add a label that describes the purpose of your key, such as an identifying name for the device you are linking it with. Select the type of key, which in this case is Authentication Key. Paste the key that you have copied into the Key field and click the SSH key.
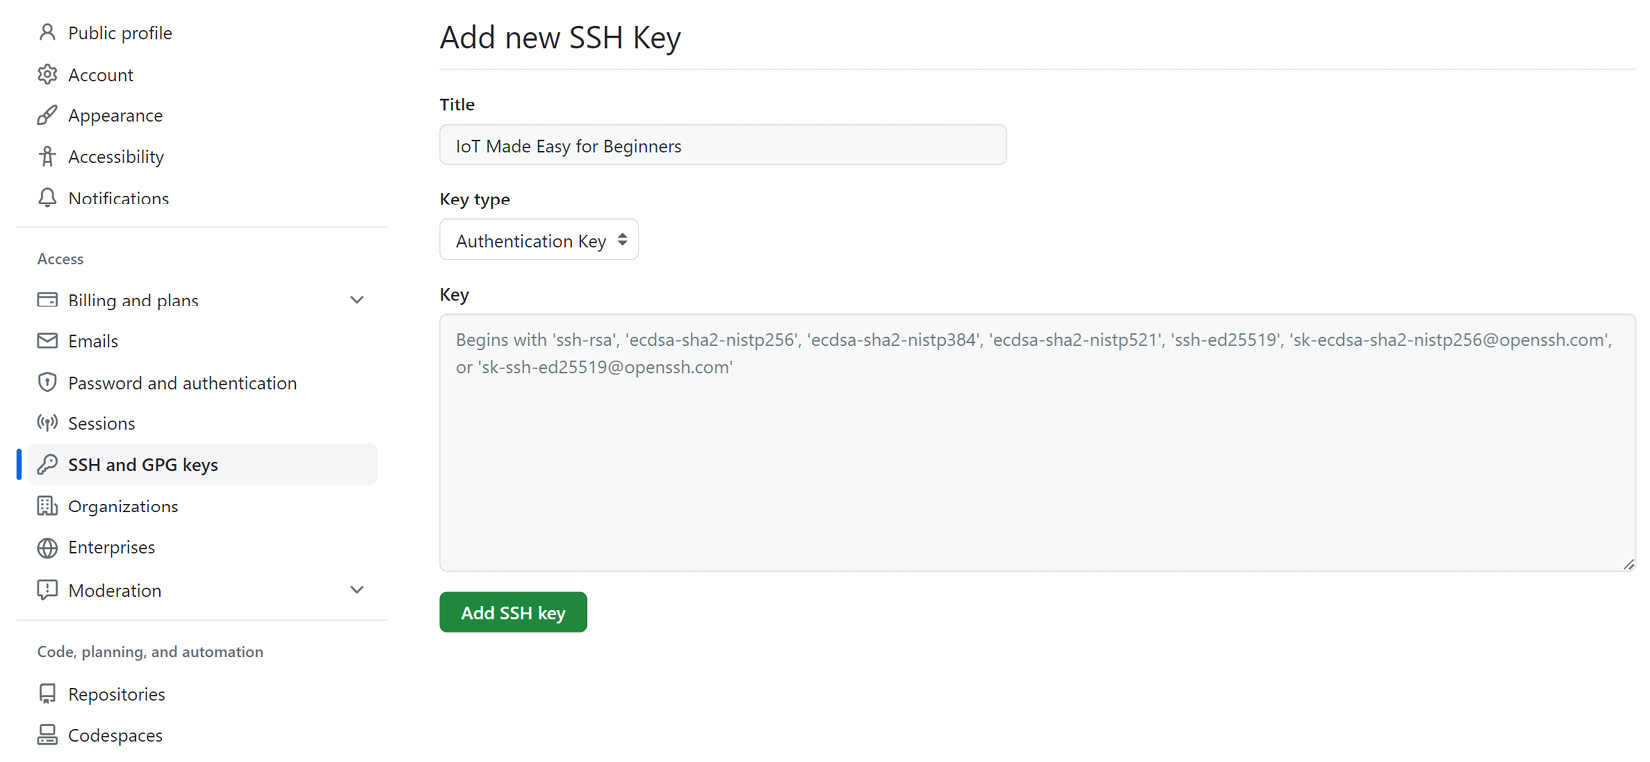
Figure 1.6 – GitHub page to add a new SSH key
You should now have authorized your device to modify repositories on GitHub, so we will now be able to push code from our local development environment onto the GitHub repositories.
Pulling your code from a repository
If your CLI is configured properly, you should be able to pull the code from the repository straight to your local development environment:
- Navigate to the repository from which you would like to pull your code.
- Click on Code and click SSH.
- Copy the SSH line that is noted there. Ensure that your command line is currently open in the folder that you want the repository to be cloned into. Run the following command on it:
$ git clone {SSHLine} - Your repository should now be in the form of a folder; you just need to change the directory into that new folder.
Creating a GitHub repository for your code
Your GitHub repository is where you will be storing, committing, and pushing your code. You will need to create one via GitHub to then push and pull to and from your local development environment:
- On your GitHub home page, click on New repository.
- Type a name for your repository and add a description of it.
- Choose the visibility of your repository. Unless you want to prevent your repository from being accessed publicly, select Private.
- Select Initialize this repository with a README to continually update your repository with a summary.
- Select Create Repository.
You should now be able to push to the repository as part of the next section.
Initializing, committing, staging, and pushing – oh my!
These four steps are a crucial part of any GitHub experience, as you want to store the code and continually update the repository based on the changes you have done to collaborate with others or simply just to track the changes that you have made as part of the version control process.
To understand how these four steps work for your projects, let’s go through them:
- To initialize a folder as a Git development folder, type in the following and a
.gitfolder should be initialized in your folder:$ git init
- You next need to add the files in your local repository to be staged. We use a dot to add all files; otherwise, we specify which file(s) we would like to add:
$ git add .
- We then commit the files that have been staged in the local repository, adding a commit message:
$ git commit -m "{Your commit message here}" - We then specify the URL for the remote repository that we intend to push the code toward:
$ git remote add origin {remoteURL} - We then verify that it was successfully added by running the verify command:
$ git remote -v
- We then push the changes we have already staged to our repository:
$ git push origin main
Note that if the folder is already initialized as a local repository and the remote URL is already set, we will only have to repeat steps 2, 3, and 6 for every consecutive push.
Testing it for your newly created Hello World LED project
Now that we have the skills for GitHub, let’s use it to push your newly created Hello World LED project’s code into GitHub:
- Create a repository on GitHub as per the instructions just given for creating a new repository.
- On your command prompt, navigate to the folder containing your project code. Run
git initto initialize the folder as a repository:$ git init
- Add all files in the folder to be staged:
$ git add .
- Enter a commit message that makes sense for adding this deployment. In this case, it might be something as simple as this:
$ git commit -m "Created Hello World LED IoT Project"
- Navigate to your repository page on GitHub and copy the HTTPS URL on the project. Paste it within the command to add the origin for the project:
git remote add origin https://github.com/renaldig/firstledproject.git
- Push the changes you already have staged to the repository:
$ git push origin main
And with that, you have your first repository good to go! Try to practice making a few changes to your code and repeating the process. See whether you can answer the following questions:
- How can I revert to a previous version of my code?
- What types of branches would I need to create for an industry-based IoT project?
With this, you should now be able to use the Arduino IDE, try out a practical exercise that demonstrates the capabilities of Arduino at a high level, and create and use GitHub in your local environment for version control. In the next section, we will explore how we can choose between IoT hardware, considering the unique set of requirements that projects need.