
Developing with .NET 5.0
.NET applications can be developed with Visual Studio on the Windows platform and Visual Studio for Mac (inheriting from Xamarin Studio) on macOS. Visual Studio Code (an open source project) and Rider (JetBrain's development IDE) provide support for both of these platforms, as well as Unix-based systems. While these environments provide the desired user-friendly development UI, technically speaking, .NET applications can be written with a simple text editor and compiled using the .NET Core command-line toolset.
The only intrinsic runtime in the .NET Core CLI is the .NET Core runtime, which is primarily used for creating console applications with access to the complete base class library.
Without further ado, let's create our first cross-platform application with the CLI tools and see how it behaves on multiple target platforms. In this example, we will develop a simple calculator with basic arithmetic operations support as a console application.
Creating a runtime-agnostic application
When developing our calculator, our main goal is to create an application that we can run on multiple platforms (in other words, Windows and macOS). To begin with, we will create our console application on macOS with .NET Core installed:
$ mkdir calculator && cd $_
$ dotnet --version
5.0.100-preview.7.20366.6
$ dotnet new solution
The template "Solution File" was created successfully.
$ dotnet new console --name "calculator.console" --output "calculator.console"
The template "Console Application" was created successfully.
$ cd calculator.console
Important note
In this example, we have used the console template, but there are many other templates available out of the box, such as a class library, unit test project, ASP.NET Core, and more specific templates, such as Razor Page, MVC ViewStart, ASP.NET Core Web App, and Blazor Server App.
The calculator.console console application should have been created in the folder that you specified.
In order to restore the NuGet packages associated with any project, you can use the dotnet restore command in a command line or terminal window, depending on your operating system.
Important note
Generally, you don't need to use the restore command, as the compilation already does this for you. In the case of template creation, the final step actually restores the NuGet packages.
Next, copy the following implementation into the created program.cs file, replacing the Main method:
static char[] _numberChars = new[] { '0', '1', '2', '3', '4', '5', '6', '7', '8', '9' };
static char[] _opChars = new[] { '+', '-', '*', '/', '=' };
static void Main(string[] args)
{
    var calculator = new Calculator();
    calculator.ResultChanged = (result) =>
    {
        Console.Clear();
        Console.WriteLine($"{Environment.NewLine}{result}");
    };
    // TODO: Get input.
}
Here, we have delegated the calculator logic to a simple calculator state machine implementation:
public class Calculator
{
    private int _state = 0;
    string _firstNumber;
    string _currentNumber = string.Empty;
    char _operation;
    public Action<string> ResultChanged = null;
    public void PushNumber(string value)
    {
        // Removed for brevity
    }
    public void PushOperation(char operation)
    {
        // Removed for brevity
    }
    private int Calculate(int number1, int number2, char
    operation)
    {
        // Removed for brevity
    }
}
The Calculate method is the actual calculator implementation, and this needs to be added to the Calculator class as well:
private int Calculate(int number1, int number2, char operation)
{
    switch(operation)
    {
        case '+':
            return number1 + number2;
        case '-':
            return number1 - number2;
        case 'x':
            return number1 * number2;
        case '/':
            return number1 / number2;
        default:
            throw new NotSupportedException();
    }
}
Finally, we just need to expand our Main method to retrieve the user inputs. You can now replace the placeholder in the Main method for user input with the following:
while (true)
{
    var key = Console.ReadKey().KeyChar;
    if (key == 'e') { break; }
    if (_numberChars.Contains(key))
    { calculator.PushNumber(key.ToString()); }
    if(_opChars.Contains(key))
    { calculator.PushOperation(key); }
}
Now that our application project is ready (after editing the program.cs file), we can build and run the console application and start typing the input as follows:
$ dotnet run
123+1=124
Here, we used the run command to compile and run our application in the current platform (macOS). If you were to navigate to the build folder, you would notice that, instead of an executable, the CLI actually created a Dynamic Link Library (DLL) file. The reason for this is that, since no other compilation option was defined, the application was created as a framework-dependent application. We can try running the application with the dotnet command, which is called the driver:
$ cd bin/Debug/net5.0/
$ ls
     calculator.console.deps.json
     calculator.console.pdb
     calculator.console.runtimeconfig.json
      calculator.console.dll
      calculator.console.runtimeconfig.dev.json
$ dotnet calculator.console.dll
Here, it is important to note that we used the description framework-dependent (in this case, the .NET Core App 5.0 runtime). If we were discussing the .NET Framework prior to .NET Core, this would strictly refer to the Windows platform. In this context, however, it refers to an application that is only dependent on the framework itself while being platform-agnostic. In order to test our application on Windows, we can copy the bin folder to a Windows machine with the target framework installed and try running our application:

Figure 1.2 – Running a .NET Core Application
The application binary on Windows Console gives the exact same result as the macOS terminal given that both systems have the .NET 5.0 runtime installed.
Important note
In order to verify that the required framework is installed on the target machine, you can use the dotnet --info or dotnet --list-runtimes commands, which will list the installed runtimes on the target machine.
In order to test the runtime independence of the created demo.dll file, we can try running it with the Mono runtime. On macOS, you can try the following command to execute our application:
$ cd bin/Debug/net5.0/
$ mono calculator.console.dll
If we were to analyze what really is happening in the context of the clean architecture onion diagram, you would notice that the dotnet runtime would represent the infrastructure of the application, whereas the console with the net core app abstraction provided would make up the application UI. While the infrastructure is provided by the target platform, the UI and the application core are portable across platforms:
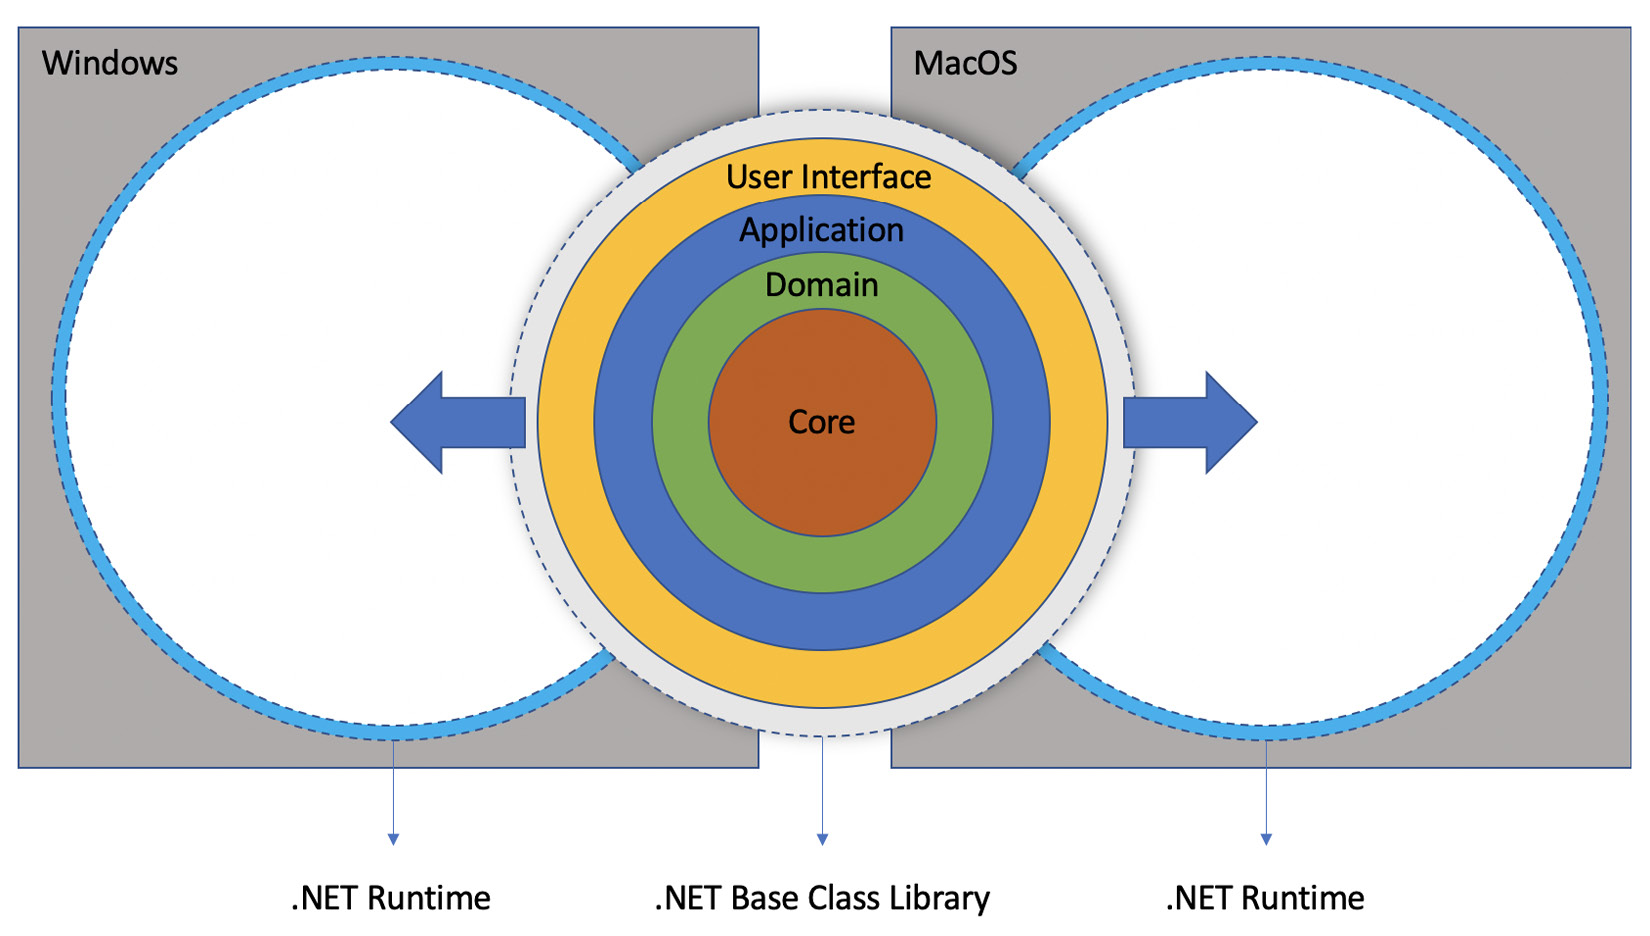
Figure 1.3 – A Platform - Agnostic .NET Application
In this diagram, the two operating systems have the .NET Runtime installed, which provides the implementation for the .NET BCL, allowing the same binary package to be executed on both platforms.
Taking it one step further, let's now try to package the infrastructure input in the application and prepare a platform-dependent package as opposed to a framework-dependent one.
Defining a runtime and self-contained deployment
In the previous example, we created a console application that is operating system-agnostic. However, it had a dependency on the NETCore.App runtime. What if we want to deploy this application to a target system that doesn't have the .NET Core runtime and/or SDK installed?
When the .NET Core applications need to be published, you can include the dependencies from the .NET Core framework and create a so-called self-contained package. However, by going down this path, you would need to define the target platform (operating system and CPU architecture) using a Runtime Identifier (RID) so that the .NET CLI can download the required dependencies and include them in your package.
The runtime can be defined either as part of the project file or as a parameter during publish execution. Instead of a command parameter, let's modify our project file to include the runtime identifier:
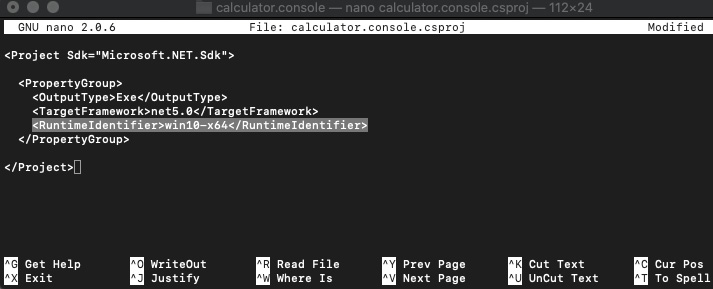
Figure 1.4 – Setting the Runtime Identifier
Here, we have edited the project file to target Windows 10 with the x64 architecture, which would mean that the packaged application would only be targeting this platform.
Now, if we were to publish the application (note that the publishing process is going to take place on macOS), it would create an executable for the defined target platform:
$ nano calculator.console.csproj
$ dotnet publish
Microsoft (R) Build Engine version 16.7.0-preview-20360-03+188921e2f for .NET
Copyright (C) Microsoft Corporation. All rights reserved.
  Determining projects to restore...
  Restored /Users/can/Work/Book/calculator/calculator.console/calculator.console.csproj (in 6.87 sec).
  calculator.console -> /Users/can/Work/Book/calculator/calculator.console/bin/Debug/net5.0/win10-x64/calculator.console.dll
  calculator.console -> /Users/can/Work/Book/calculator/calculator.console/bin/Debug/net5.0/win10-x64/publish/
Here, we have used the terminal editor to modify the project file with the runtime requirements. Once the dotnet publish command execution is finalized, the publish folder will include all the necessary packages from the .NET Core runtime and framework targeting the Windows 10 runtime:
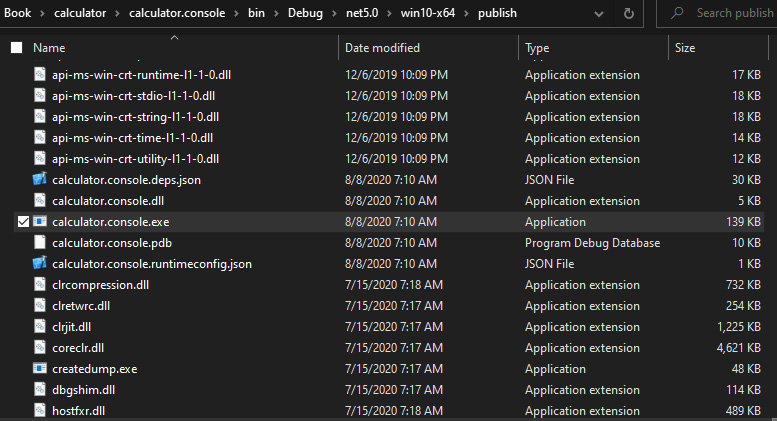
Figure 1.5 – .NET Self-Contained Publish Package
Notice that, once the deployment target platform is defined, an executable file is created and there is no more need for the driver. In fact, the executable's sole purpose here is to act as the access point (host) to the dynamic class library that is created by .NET Core.
In comparison to the previous application package, this package contains the infrastructure content as well as the application core:
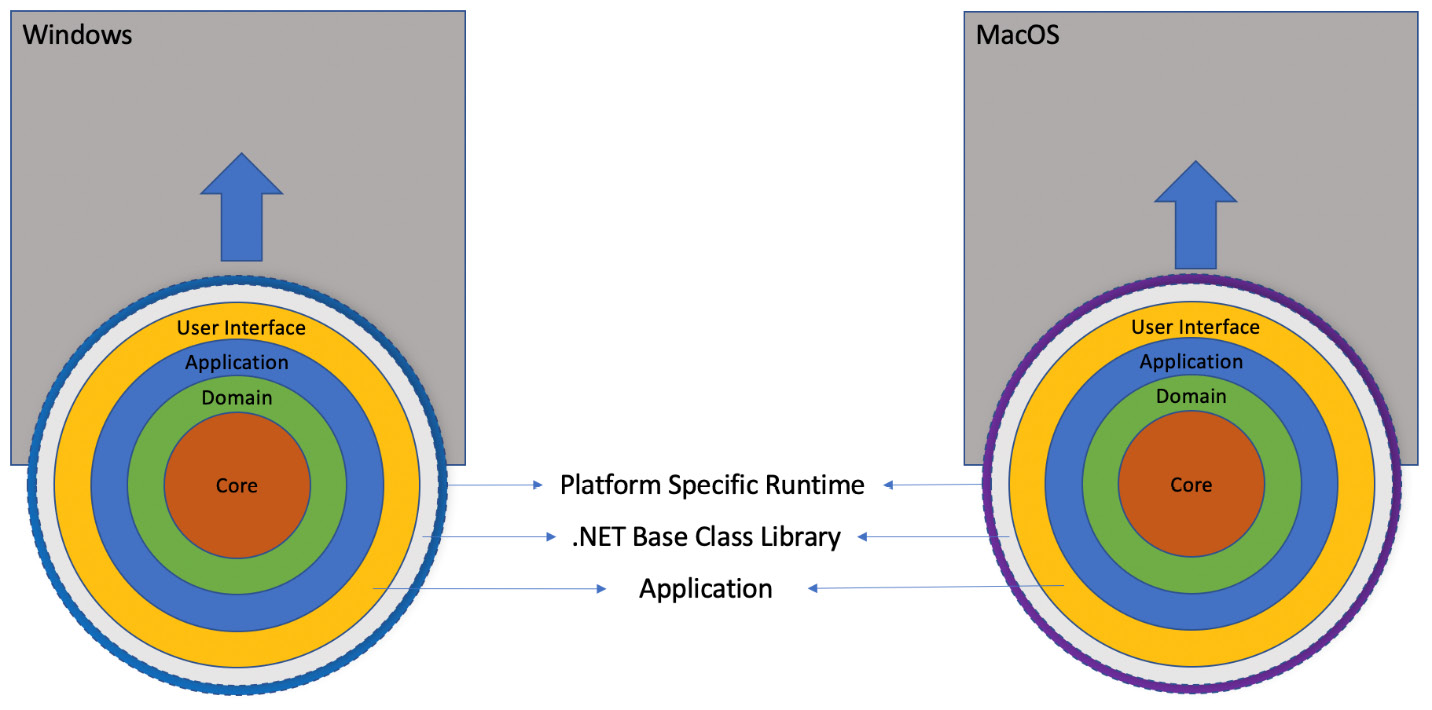
Figure 1.6 – Platform-Specific Deployment
Some of the most notable runtimes include Windows 7 to Windows 10 on three different architectures (x86, x64, and ARM), multiple macOS versions, and various distributions and versions of Linux, including OpenSuse, Fedora, Debian, Ubuntu, RedHat, and Tizen. However, considering our goals of creating a cross-platform application, the target framework definition of a .NET project helps us to package platform-agnostic application binaries with only a dependency on the target runtime, not the platform. Let's now take a closer look at possible target framework options.
Defining a framework
In the previous examples, we have been using .NET 5.0 as the target framework. While, as regards the self-contained deployment for this console application, this has proven to be sufficient, if we were preparing a Xamarin or a UWP application, we may potentially need to use .NET Standard for the core application and a platform-specific target for the infrastructure, such as Xamarin.iOS.
The target platform framework can be changed using the <TargetFrameworks> project property. We would have to use the moniker assigned to the desired framework:
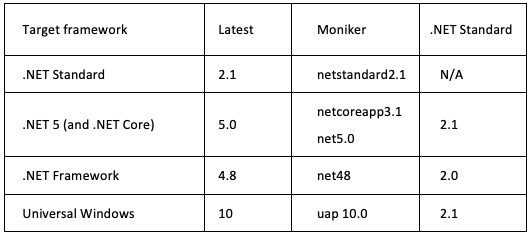
Figure 1.7 – Platform Monikers
In this section, using .NET 5.0, we developed a cross-platform console application that can run on both Windows and macOS platforms. We have looked at both runtime- and framework-dependent versions of the same application. The execution of the same console application on Windows' Command Prompt and the macOS terminal, as well as Linux Bash, is an impressive sight:
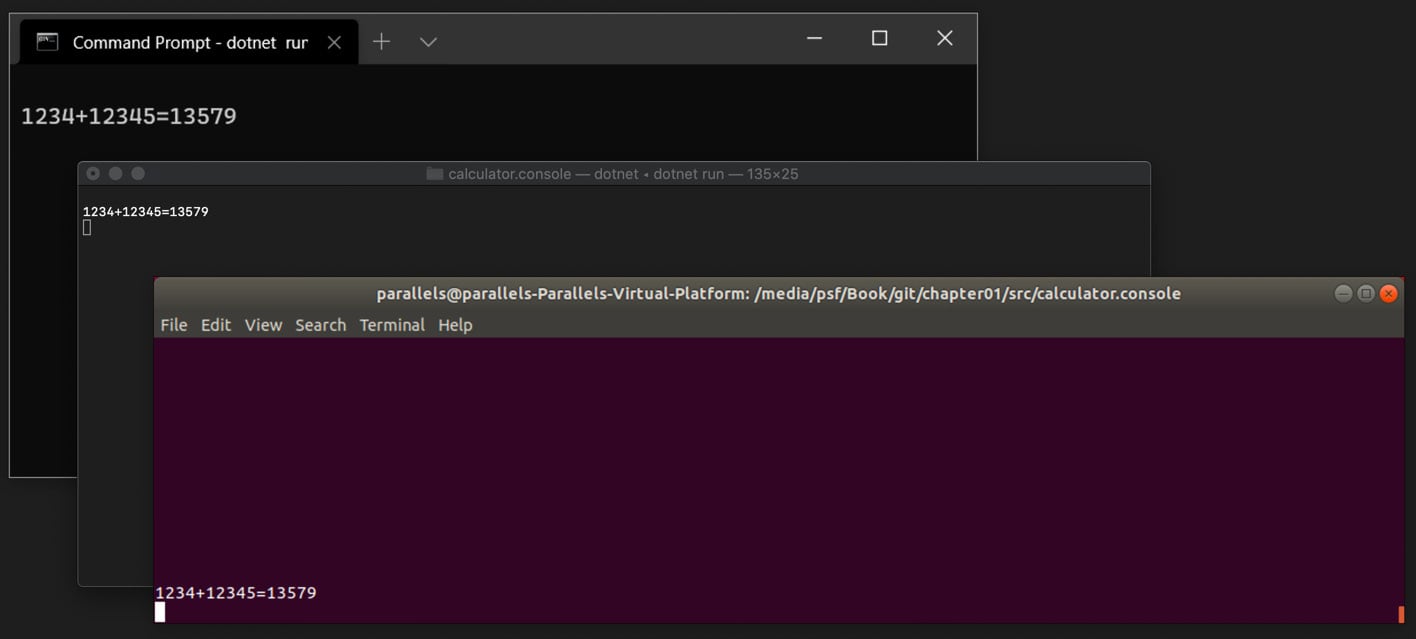
Figure 1.8 – The .NET console calculator on multiple platforms
As you can see in this sample, the same source code and even the same binary is executed on multiple platforms with the same outcome. This portability of .NET applications should demonstrate the flexibility of the .NET ecosystem, which expands beyond desktop and console applications to mobile development with Xamarin.