
Using App.js – the main entry point
As we know, React Native is an open source framework used for building iOS and Android applications. It uses React to describe the UI while accessing the platform's capabilities through the methods we have at our disposal.
Understanding our folder structure is important because we're not supposed to touch some of the files– at least at the beginning of our development. Let's take a look at our newly created project's structure.
Tip
Don't forget that you can use any text editor you want to; I'm only using VSCode because I like the way it looks and it has lots of plugins that I use, but that doesn't mean you can't open up the project with whatever text editor you feel comfortable with. Of course, that'll mean you won't be able to use the code. command as that's only used for VSCode.
First, let's open our Terminal and navigate to our folder. Now, if we write code. once we get to the folder, it will open Visual Studio Code.
Once our text editor has opened, we will see the following output in the project directory:
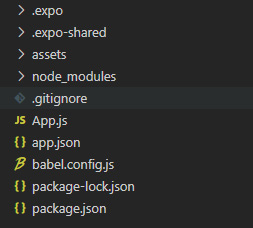
Figure 2.1 – Project directory once you open the text editor
As we can see, there are several folders and files here and they're all meant to help bundle the project once you finish your app. We'll look at each of these folders in the next few sections.
The .expo and .expo-shared folders
We'll start with the folders with a dot in front of them: .expo and .expo-shared. The dot is there to show a hidden file. That's a file you can't see directly while opening the file browser; you can only see it if you specifically choose to see it. Such files are hidden because you don't need to touch them. They're config files that are created when you first use the expo start command.
The assets folder
The next folder is the assets folder. Inside, you'll find several .png images, which are used by Expo for the splash screen – the screen that appears while the app is loading – and icons for the app to use when it's installed on a device.
The node_modules folder
Now, you'll see a folder called node_modules. If you open that folder, you'll be able to see lots and lots of folders. All these folders are packages and dependencies that we're using to make this app work. Everything that you're installing or bringing in from over the internet is going to go straight into this folder. This folder is going to get bigger and bigger, depending on how many external packages you'll be using for your app.
Once we get past these folders, we've got some files with some interesting features.
The files within
First, we can see .gitignore, which helps us save size when uploading on GitHub. If you open the file, you'll see there's already some text written in it. Everything you see in there will be ignored once you upload your project on GitHub. You'll find that .expo is there because those folders are only relevant for the programmer and they're not intended for sharing. You can edit this file by using any filename you don't want to move over to online or you don't intend on changing.
Important Note
GitHub is a platform that acts like an internet hosting company for open source software programs while also providing the programmer with version control using Git. Developers are using Git to track changes in their projects and coordinating with their teammates.
For now, we'll ignore App.js because we'll explain this file at the end of this section. So, let's go directly to the app.json file. This file acts like a config file for your app – basically, everything that's not code-related will be found there. Let's say, for example, we want to change the image of our splash screen. We don't have any way of doing that besides going into this file and editing the splash image's path. From here, you can change almost everything related to your application, such as the icon or its orientation. You'll see yourself going there quite a lot, configuring your app for the final release version.
We don't care about babel.config.js but I'm pretty sure you'd be curious about that one as well. Babel is a JavaScript compiler almost everyone is using to get access to the latest standards of JavaScript. It's not necessary to edit this file but if you want to learn more about compilers, I recommend searching for more information about Babel.
The last two files are package-lock.json and package.json. The first one always gets created when you're using npm to install dependencies in your project. I've already told you that we'll learn about npm in this chapter, but not right now. Right now, I want you to become familiar with all the files in the project directory. By creating your app via the command line, Expo automatically used npm to bring lots of files you'd use in your project over the internet. Those files are stored in the node_modules folder. You can find out more about all the direct dependencies that you're using in package.json.
Now that we've finally got to the end of all the files, we should start talking about App.js. So, let's open that file and take a look at it.
The App.js file
Upon opening the App.js file, you will see the following:
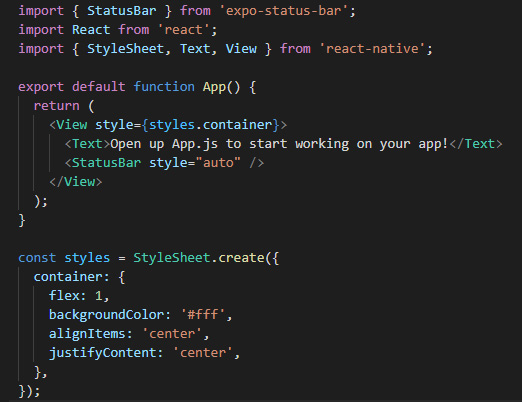
Figure 2.2 – Code in the App.js file
You can immediately see the Open up App.js to start working on your app! text. I'm pretty sure you remember but in the previous chapter, when we tested our app, this was the text that appeared on the center of the screen. This means that by changing the text, we should also see a change in our app.
We won't do that right now as our focus is understanding the files and code, and then changing it to our liking.
I'm pretty sure you connected the dots after seeing this file and realized that this is the entry point of our app. An entry point is the main file that connects all the files and starts the application. Our main function for using Expo is the App() function. Your entire application will be living inside that function.
The reason you saw the centered text when you opened the app was because the text is inside the App() function. Here, we'll start building our app. For that to happen, we must understand what JSX is and how to use it inside our app. I'm assuming you can already read a bit of JavaScript and you understand notions such as functions and objects; we won't be covering this topic in this book. We'll get to grips with JSX in the next section.