
You may want to try ArcGIS for Server but may not have a free machine or may have a Mac OS X machine, which the product does not support yet. Perhaps you do not want to install Server on a production environment until you simulate the entire setup. If either of this is the case, you can use the virtualization track installation. This track will walk you through setting up and cloning virtual machines. We will be using the open source Oracle Virtual Box to set up three Windows Server 2008 R2 virtual machines. Then, you can follow the same installation tips we discussed in the Production Installation Track section.
Go to http://www.virtualbox.org and download the version that matches your operating system. Since I'm using Mac OS, I downloaded Virtual Box for Mac. After the download, install the software using the typical settings.
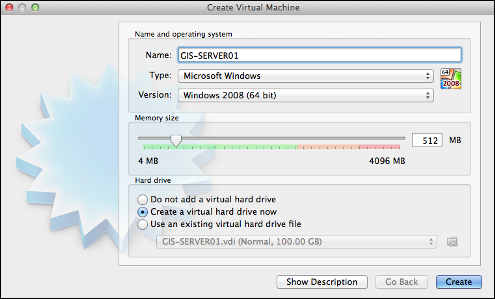
To add a new virtual machine, you need to specify certain configurations, such as the memory and hard drive size. Open Oracle Virtual Box and click on the New button. Click on the Hide Description button. In the Name field, type GIS-SERVER01; this is the virtual machine name and not the computer name, so you have to go later and change the computer name as well. In the Type drop-down list, select Microsoft Windows, and in the Version drop-down list, select Windows 2008 (64 bit). In the Memory size box, select the size of the virtual machine RAM. I will go with the default 512 MB: that will be enough for a virtual machine, but you may increase it if you have enough memory. In the Hard drive box select Create a virtual hard drive now and then click on Create.
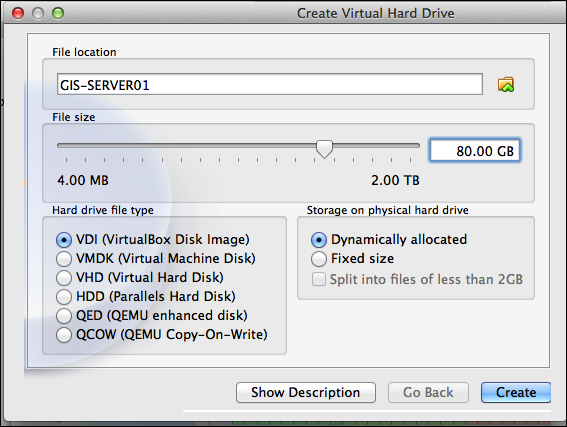
The Create a virtual hard drive now option is where you specify the hard drive information. In the file location box leave it to GIS-SERVER01. Type 80 GB in the File size box, which should be enough for a typical GIS server; select the VDI (Virtual Box Disk Image) type and set the storage to Dynamically allocated, which will allocate the physical hard drive size. Click on Create to create the drive.
Now, we have an empty virtual machine with no operating system. What is left to install is the operating system. If you have a Windows 2008 R2 media disk you can insert it in the DVD drive and run the virtual machine installation normally. If you do not have a media disc and you have an ISO image instead, you can create a virtual CD on your virtual machine. From the Oracle Virtual Box settings, click on Storage, and then right-click on the Controller IDE option and select Add CD/DVD Device. Select Choose from file and select your ISO image. You can now continue installing Windows normally.
After the Windows installation is completed, make sure to change the computer name to GIS-SERVER01.
Now that you have configured your virtual machine successfully, do not install any ArcGIS products yet; keep it as a raw Windows installation so that we can clone it into two machines. Now we will clone GIS-SERVER01 into two other machines (GIS-SERVER02 and WEB SERVER01).
We did most of the work on one machine, where we configured the memory and hard disc size and Windows installation. Instead of repeating these steps, we can simply clone our existing machine into multiple identical machines.
To clone a virtual machine, it should be turned off. Shut down your virtual machine if it is running, and then right-click on the virtual machine icon and select Clone. In the Clone Virtual Machine window, perform the following steps:
Click on the Hide Description button.
Type the name of the new machine—
GIS-SERVER02.Check the Reinitialize the MAC addresses of all network cards checkbox.
Select Full Clone so that we can get an exact copy of
GIS-SERVER01with a new hard drive, and in the Snapshots box, select Everything.Click on Clone.

You can perform the same steps to create the WEB SERVER01 virtual machine. Now you can install ArcGIS for Server as done in the Production Installation Track setup procedures using the virtual machines.