

You have created your ArcGIS Online account; this account gives you limited access to www.ArcGIS.com. You can still do a lot of things with the free account, such as create, share, and utilize maps from your local web server.
In this section, we will create our first ArcGIS Online map. To do that, we will upload our Bestaurants data. I have converted the Bestaurants database to a friendly format supported by ArcGIS Online. It is available in the supporting files that are provided for this Appendix. Before you continue, download the supporting file for this Appendix from the folder labeled 2955OT_AA and copy them on to your local drive. Follow these steps to create your first ArcGIS Online map:
After you log in from the main menu, click on My Content. This is where all your maps can be found. You can use the same place to create and share your maps with the public.
From the folders section on the left, click on the folder under your name. Mine is EdmondDantes (Home).
Click on Create Map to create your first online map. If you are prompted with a dialog box, click on Yes Open the Map. This is illustrated in the following screenshot:

You will be directed to a new page; they will provide you with a map of the world data. We are interested in Belize; so, we have to zoom in there. In the top-right search box, enter
Belizeand hit Enter, this will zoom in to the Belize country.Next, we will add our Bestaurants data. From the Add menu, click on Add Layer from File and then browse the data, which you can find at
2955OT_AA\Shapefiles\Bestaurants.zip, and then click on Import Layer. This is illustrated in the following screenshot: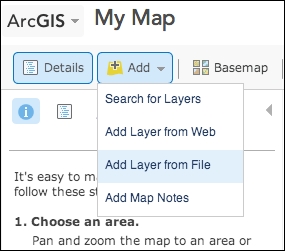
Note that our data has been added to the map and marked as red dots. That is because ArcGIS online doesn't know what icons we want to use for our data. Don't worry, we can change this. Also, you can find some basic tools in the viewer provided by ArcGIS Online, such as the identify and measure tools. Take a few moments to test these built-in tools.
Now, we will label our restaurants so that they are named on the map. From the Contents panel, click on the small arrow next to the Bestaurants layer and select Create Labels. Make sure that the Name field is selected. Now, click on OK.
To change the symbols based on the type of the restaurant, click on the small arrow next to the Bestaurants layer and select Change Symbols.
In the Change Symbols panel, select Unique Symbols from the drop-down list, then select the field you want to base your symbols on. This will be our Type field.
Use the Options menu to Change All Symbols to a diamond and click on Apply. You should see a map similar to the following screenshot:

We are ready to save our map. Click on the Save button and name it Bestaurants, enter a tag line, a summary, and click on Save Map. This map is now private, so only you can see it, but we still need to share it with the public so that everyone can view it, and so that we can use it from the JavaScript API.
From the ArcGIS menu, go back to My Content and click on your folder. You should now see the Bestaurants map created, and ready to be shared.
Check the Bestaurants map, then click on Share and check Everyone (public). Click on OK to finish as illustrated in the following screenshot:
