
Chapter 2. Objects in Python
So, we now have a design in hand and are ready to turn that design into a working program! Of course, it doesn't usually happen this way. We'll be seeing examples and hints for good software design throughout the book, but our focus is object-oriented programming. So, let's have a look at the Python syntax that allows us to create object-oriented software.
After completing this chapter, we will understand:
- How to create classes and instantiate objects in Python
- How to add attributes and behaviors to Python objects
- How to organize classes into packages and modules
- How to suggest people don't clobber our data
Creating Python classes
We don't have to write much Python code to realize that Python is a very "clean" language. When we want to do something, we just do it, without having to go through a lot of setup. The ubiquitous "hello world" in Python, as you've likely seen, is only one line.
Similarly, the simplest class in Python 3 looks like this:
class MyFirstClass:
passThere's our first object-oriented program! The class definition starts with the class keyword. This is followed by a name (of our choice) identifying the class, and is terminated with a colon.
Note
The class name must follow standard Python variable naming rules (it must start with a letter or underscore, and can only be comprised of letters, underscores, or numbers). In addition, the Python style guide (search the web for "PEP 8") recommends that classes should be named using CamelCase notation (start with a capital letter; any subsequent words should also start with a capital).
The class definition line is followed by the class contents indented. As with other Python constructs, indentation is used to delimit the classes, rather than braces or brackets as many other languages use. Use four spaces for indentation unless you have a compelling reason not to (such as fitting in with somebody else's code that uses tabs for indents). Any decent programming editor can be configured to insert four spaces whenever the Tab key is pressed.
Since our first class doesn't actually do anything, we simply use the pass keyword on the second line to indicate that no further action needs to be taken.
We might think there isn't much we can do with this most basic class, but it does allow us to instantiate objects of that class. We can load the class into the Python 3 interpreter, so we can interactively play with it. To do this, save the class definition mentioned earlier into a file named first_class.py and then run the command python -i first_class.py. The -i argument tells Python to "run the code and then drop to the interactive interpreter". The following interpreter session demonstrates basic interaction with this class:
>>> a = MyFirstClass() >>> b = MyFirstClass() >>> print(a) <__main__.MyFirstClass object at 0xb7b7faec> >>> print(b) <__main__.MyFirstClass object at 0xb7b7fbac> >>>
This code instantiates two objects from the new class, named a and b. Creating an instance of a class is a simple matter of typing the class name followed by a pair of parentheses. It looks much like a normal function call, but Python knows we're "calling" a class and not a function, so it understands that its job is to create a new object. When printed, the two objects tell us which class they are and what memory address they live at. Memory addresses aren't used much in Python code, but here, they demonstrate that there are two distinct objects involved.
Adding attributes
Now, we have a basic class, but it's fairly useless. It doesn't contain any data, and it doesn't do anything. What do we have to do to assign an attribute to a given object?
It turns out that we don't have to do anything special in the class definition. We can set arbitrary attributes on an instantiated object using the dot notation:
class Point:
pass
p1 = Point()
p2 = Point()
p1.x = 5
p1.y = 4
p2.x = 3
p2.y = 6
print(p1.x, p1.y)
print(p2.x, p2.y)If we run this code, the two print statements at the end tell us the new attribute values on the two objects:
5 4 3 6
This code creates an empty Point class with no data or behaviors. Then it creates two instances of that class and assigns each of those instances x and y coordinates to identify a point in two dimensions. All we need to do to assign a value to an attribute on an object is use the <object>.<attribute> = <value> syntax. This is sometimes referred to as
dot notation. The value can be anything: a Python primitive, a built-in data type, or another object. It can even be a function or another class!
Making it do something
Now, having objects with attributes is great, but object-oriented programming is really about the interaction between objects. We're interested in invoking actions that cause things to happen to those attributes. It is time to add behaviors to our classes.
Let's model a couple of actions on our Point class. We can start with a called reset that moves the point to the origin (the origin is the point where x and y are both zero). This is a good introductory action because it doesn't require any parameters:
class Point:
def reset(self):
self.x = 0
self.y = 0
p = Point()
p.reset()
print(p.x, p.y)This print statement shows us the two zeros on the attributes:
0 0
A method in Python is formatted identically to a function. It starts with the keyword def followed by a space and the name of the method. This is followed by a set of parentheses containing the parameter list (we'll discuss that self parameter in just a moment), and terminated with a colon. The next line is indented to contain the statements inside the method. These statements can be arbitrary Python code operating on the object itself and any parameters passed in as the method sees fit.
Talking to yourself
The one difference between methods and normal functions is that all methods have one required argument. This argument is conventionally named self; I've never seen a programmer use any other name for this variable (convention is a very powerful thing). There's nothing stopping you, however, from calling it this or even Martha.
The
self argument to a method is simply a reference to the object that the method is being invoked on. We can access attributes and methods of that object as if it were any another object. This is exactly what we do inside the reset method when we set the x and y attributes of the self object.
Notice that when we call the p.reset() method, we do not have to pass the self argument into it. Python automatically takes care of this for us. It knows we're calling a method on the p object, so it automatically passes that object to the method.
However, the method really is just a function that happens to be on a class. Instead of calling the method on the object, we can invoke the function on the class, explicitly passing our object as the self argument:
p = Point() Point.reset(p) print(p.x, p.y)
The output is the same as the previous example because internally, the exact same process has occurred.
What happens if we forget to include the self argument in our class definition? Python will bail with an error message:
>>> class Point: ... def reset(): ... pass ... >>> p = Point() >>> p.reset() Traceback (most recent call last): File "<stdin>", line 1, in <module> TypeError: reset() takes no arguments (1 given)
The error message is not as clear as it could be ("You silly fool, you forgot the self argument" would be more informative). Just remember that when you see an error message that indicates missing arguments, the first thing to check is whether you forgot self in the method definition.
More arguments
So, how do we pass multiple arguments to a method? Let's add a new method that allows us to move a point to an arbitrary position, not just to the origin. We can also include one that accepts another Point object as input and returns the distance between them:
import math
class Point:
def move(self, x, y):
self.x = x
self.y = y
def reset(self):
self.move(0, 0)
def calculate_distance(self, other_point):
return math.sqrt(
(self.x - other_point.x)**2 +
(self.y - other_point.y)**2)
# how to use it:
point1 = Point()
point2 = Point()
point1.reset()
point2.move(5,0)
print(point2.calculate_distance(point1))
assert (point2.calculate_distance(point1) ==
point1.calculate_distance(point2))
point1.move(3,4)
print(point1.calculate_distance(point2))
print(point1.calculate_distance(point1))The print statements at the end give us the following output:
5.0 4.472135955 0.0
A lot has happened here. The class now has three methods. The move method accepts two arguments, x and y, and sets the values on the self object, much like the old reset method from the previous example. The old reset method now calls move, since a reset is just a move to a specific known location.
The calculate_distance method uses the not-too-complex Pythagorean theorem to calculate the distance between two points. I hope you understand the math (** means squared, and math.sqrt calculates a square root), but it's not a requirement for our current focus, learning how to write methods.
The sample code at the end of the preceding example shows how to call a method with arguments: simply include the arguments inside the parentheses, and use the same dot notation to access the method. I just picked some random positions to test the methods. The test code calls each method and prints the results on the console. The assert function is a simple test tool; the program will bail if the statement after assert is False (or zero, empty, or None). In this case, we use it to ensure that the distance is the same regardless of which point called the other point's calculate_distance method.
Initializing the object
If we don't explicitly set the x and y positions on our Point object, either using move or by accessing them directly, we have a broken point with no real position. What will happen when we try to access it?
Well, let's just try it and see. "Try it and see" is an extremely useful tool for Python study. Open up your interactive interpreter and type away. The following interactive session shows what happens if we try to access a missing attribute. If you saved the previous example as a file or are using the examples distributed with the book, you can load it into the Python interpreter with the command python -i filename.py:
>>> point = Point() >>> point.x = 5 >>> print(point.x) 5 >>> print(point.y) Traceback (most recent call last): File "<stdin>", line 1, in <module> AttributeError: 'Point' object has no attribute 'y'
Well, at least it threw a useful exception. We'll cover exceptions in detail in Chapter 4, Expecting the Unexpected. You've probably seen them before (especially the ubiquitous SyntaxError, which means you typed something incorrectly!). At this point, simply be aware that it means something went wrong.
The output is useful for debugging. In the interactive interpreter, it tells us the error occurred at line 1, which is only partially true (in an interactive session, only one line is executed at a time). If we were running a script in a file, it would tell us the exact line number, making it easy to find the offending code. In addition, it tells us the error is an AttributeError, and gives a helpful message telling us what that error means.
We can catch and recover from this error, but in this case, it feels like we should have specified some sort of default value. Perhaps every new object should be reset() by default, or maybe it would be nice if we could force the user to tell us what those positions should be when they create the object.
Most object-oriented programming languages have the concept of a constructor, a special method that creates and initializes the object when it is created. Python is a little different; it has a constructor and an initializer. The constructor function is rarely used unless you're doing something exotic. So, we'll start our discussion with the initialization method.
The Python initialization method is the same as any other method, except it has a special name, __init__. The leading and trailing double underscores mean this is a special method that the Python interpreter will treat as a special case.
Note
Never name a function of your own with leading and trailing double underscores. It may mean nothing to Python, but there's always the possibility that the designers of Python will add a function that has a special purpose with that name in the future, and when they do, your code will break.
Let's start with an initialization function on our Point class that requires the user to supply x and y coordinates when the Point object is instantiated:
class Point:
def __init__(self, x, y):
self.move(x, y)
def move(self, x, y):
self.x = x
self.y = y
def reset(self):
self.move(0, 0)
# Constructing a Point
point = Point(3, 5)
print(point.x, point.y)Now, our point can never go without a y coordinate! If we try to construct a point without including the proper initialization parameters, it will fail with a not enough arguments error similar to the one we received earlier when we forgot the self argument.
What if we don't want to make those two arguments required? Well, then we can use the same syntax Python functions use to provide default arguments. The keyword argument syntax appends an equals sign after each variable name. If the calling object does not provide this argument, then the default argument is used instead. The variables will still be available to the function, but they will have the values specified in the argument list. Here's an example:
class Point:
def __init__(self, x=0, y=0):
self.move(x, y)Most of the time, we put our initialization statements in an __init__ function. But as mentioned earlier, Python has a constructor in addition to its initialization function. You may never need to use the other Python constructor, but it helps to know it exists, so we'll cover it briefly.
The constructor function is called __new__ as opposed to __init__, and accepts exactly one argument; the class that is being constructed (it is called before the object is constructed, so there is no self argument). It also has to return the newly created object. This has interesting possibilities when it comes to the complicated art of metaprogramming, but is not very useful in day-to-day programming. In practice, you will rarely, if ever, need to use __new__ and __init__ will be sufficient.
Explaining yourself
Python is an extremely easy-to-read programming language; some might say it is self-documenting. However, when doing object-oriented programming, it is important to write API documentation that clearly summarizes what each object and method does. Keeping documentation up-to-date is difficult; the best way to do it is to write it right into our code.
Python supports this through the use of docstrings. Each class, function, or method header can have a standard Python string as the first line following the definition (the line that ends in a colon). This line should be indented the same as the following code.
Docstrings are simply Python strings enclosed with apostrophe (') or quote (") characters. Often, docstrings are quite long and span multiple lines (the style guide suggests that the line length should not exceed 80 characters), which can be formatted as multi-line strings, enclosed in matching triple apostrophe (''') or triple quote (""") characters.
A docstring should clearly and concisely summarize the purpose of the class or method it is describing. It should explain any parameters whose usage is not immediately obvious, and is also a good place to include short examples of how to use the API. Any caveats or problems an unsuspecting user of the API should be aware of should also be noted.
To illustrate the use of docstrings, we will end this section with our completely documented Point class:
import math
class Point:
'Represents a point in two-dimensional geometric coordinates'
def __init__(self, x=0, y=0):
'''Initialize the position of a new point. The x and y coordinates can be specified. If they are not, the
point defaults to the origin.'''
self.move(x, y)
def move(self, x, y):
"Move the point to a new location in 2D space."
self.x = x
self.y = y
def reset(self):
'Reset the point back to the geometric origin: 0, 0'
self.move(0, 0)
def calculate_distance(self, other_point):
"""Calculate the distance from this point to a second
point passed as a parameter.
This function uses the Pythagorean Theorem to calculate the distance between the two points. The distance is
returned as a float."""
return math.sqrt(
(self.x - other_point.x)**2 +
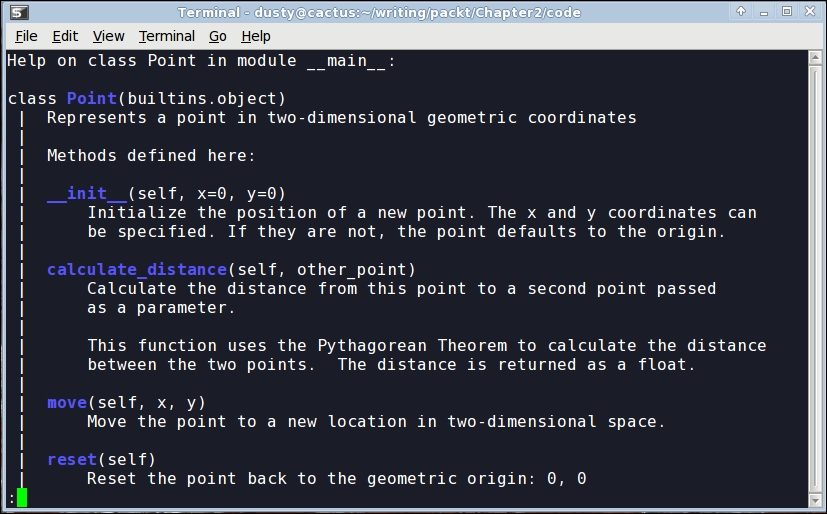
(self.y - other_point.y)**2)Try typing or loading (remember, it's python -i filename.py) this file into the interactive interpreter. Then, enter help(Point)<enter> at the Python prompt. You should see nicely formatted documentation for the class, as shown in the following screenshot:
Modules and packages
Now, we know how to create classes and instantiate objects, but how do we organize them? For small programs, we can just put all our classes into one file and add a little script at the end of the file to start them interacting. However, as our projects grow, it can become difficult to find the one class that needs to be edited among the many classes we've defined. This is where modules come in. Modules are simply Python files, nothing more. The single file in our small program is a module. Two Python files are two modules. If we have two files in the same folder, we can load a class from one module for use in the other module.
For example, if we are building an e-commerce system, we will likely be storing a lot of data in a database. We can put all the classes and functions related to database access into a separate file (we'll call it something sensible: database.py). Then, our other modules (for example, customer models, product information, and inventory) can import classes from that module in order to access the database.
The import statement is used for importing modules or specific classes or functions from modules. We've already seen an example of this in our Point class in the previous section. We used the import statement to get Python's built-in math module and use its sqrt function in our distance calculation.
Here's a concrete example. Assume we have a module called database.py that contains a class called Database, and a second module called products.py that is responsible for product-related queries. At this point, we don't need to think too much about the contents of these files. What we know is that products.py needs to instantiate the Database class from database.py so that it can execute queries on the product table in the database.
There are several variations on the import statement syntax that can be used to access the class:
import database db = database.Database() # Do queries on db
This version imports the database module into the products namespace (the list of names currently accessible in a module or function), so any class or function in the database module can be accessed using the database.<something> notation. Alternatively, we can import just the one class we need using the from...import syntax:
from database import Database db = Database() # Do queries on db
If, for some reason, products already has a class called Database, and we don't want the two names to be confused, we can rename the class when used inside the products module:
from database import Database as DB db = DB() # Do queries on db
We can also import multiple items in one statement. If our database module also contains a Query class, we can import both classes using:
from database import Database, Query
Some sources say that we can import all classes and functions from the database module using this syntax:
from database import *
Don't do this. Every experienced Python programmer will tell you that you should never use this syntax. They'll use obscure justifications such as "it clutters up the namespace", which doesn't make much sense to beginners. One way to learn why to avoid this syntax is to use it and try to understand your code two years later. But we can save some time and two years of poorly written code with a quick explanation now!
When we explicitly import the database class at the top of our file using from database import Database, we can easily see where the Database class comes from. We might use db = Database() 400 lines later in the file, and we can quickly look at the imports to see where that Database class came from. Then, if we need clarification as to how to use the Database class, we can visit the original file (or import the module in the interactive interpreter and use the help(database.Database) command). However, if we use the from database import * syntax, it takes a lot longer to find where that class is located. Code maintenance becomes a nightmare.
In addition, most editors are able to provide extra functionality, such as reliable code completion, the ability to jump to the definition of a class, or inline documentation, if normal imports are used. The import * syntax usually completely destroys their ability to do this reliably.
Finally, using the import * syntax can bring unexpected objects into our local namespace. Sure, it will import all the classes and functions defined in the module being imported from, but it will also import any classes or modules that were themselves imported into that file!
Every name used in a module should come from a well-specified place, whether it is defined in that module, or explicitly imported from another module. There should be no magic variables that seem to come out of thin air. We should always be able to immediately identify where the names in our current namespace originated. I promise that if you use this evil syntax, you will one day have extremely frustrating moments of "where on earth can this class be coming from?".
Organizing the modules
As a project grows into a collection of more and more modules, we may find that we want to add another level of abstraction, some kind of nested hierarchy on our modules' levels. However, we can't put modules inside modules; one file can hold only one file after all, and modules are nothing more than Python files.
Files, however, can go in folders and so can modules. A
package is a collection of modules in a folder. The name of the package is the name of the folder. All we need to do to tell Python that a folder is a package is place a (normally empty) file in the folder named __init__.py. If we forget this file, we won't be able to import modules from that folder.
Let's put our modules inside an ecommerce package in our working folder, which will also contain a main.py file to start the program. Let's additionally add another package in the ecommerce package for various payment options. The folder hierarchy will look like this:
parent_directory/
main.py
ecommerce/
__init__.py
database.py
products.py
payments/
__init__.py
square.py
stripe.pyWhen importing modules or classes between packages, we have to be cautious about the syntax. In Python 3, there are two ways of importing modules: absolute imports and relative imports.
Absolute imports
Absolute imports specify the complete path to the module, function, or path we want to import. If we need access to the Product class inside the products module, we could use any of these syntaxes to do an absolute import:
import ecommerce.products product = ecommerce.products.Product()
or
from ecommerce.products import Product product = Product()
or
from ecommerce import products product = products.Product()
The import statements use the period operator to separate packages or modules.
These statements will work from any module. We could instantiate a Product class using this syntax in main.py, in the database module, or in either of the two payment modules. Indeed, assuming the packages are available to Python, it will be able to import them. For example, the packages can also be installed to the Python site packages folder, or the PYTHONPATH environment variable could be customized to dynamically tell Python what folders to search for packages and modules it is going to import.
So, with these choices, which syntax do we choose? It depends on your personal taste and the application at hand. If there are dozens of classes and functions inside the products module that I want to use, I generally import the module name using the from ecommerce import products syntax, and then access the individual classes using products.Product. If I only need one or two classes from the products module, I can import them directly using the from ecommerce.proucts import Product syntax. I don't personally use the first syntax very often unless I have some kind of name conflict (for example, I need to access two completely different modules called products and I need to separate them). Do whatever you think makes your code look more elegant.
Relative imports
When working with related modules in a package, it seems kind of silly to specify the full path; we know what our parent module is named. This is where relative imports come in. Relative imports are basically a way of saying find a class, function, or module as it is positioned relative to the current module. For example, if we are working in the products module and we want to import the Database class from the database module next to it, we could use a relative import:
from .database import Database
The period in front of database says "use the database module inside the current package". In this case, the current package is the package containing the products.py file we are currently editing, that is, the ecommerce package.
If we were editing the paypal module inside the ecommerce.payments package, we would want to say "use the database package inside the parent package" instead. This is easily done with two periods, as shown here:
from ..database import Database
We can use more periods to go further up the hierarchy. Of course, we can also go down one side and back up the other. We don't have a deep enough example hierarchy to illustrate this properly, but the following would be a valid import if we had an ecommerce.contact package containing an email module and wanted to import the send_mail function into our paypal module:
from ..contact.email import send_mail
This import uses two periods to say, the parent of the payments package, and then uses the normal package.module syntax to go back up into the contact package.
Finally, we can import code directly from packages, as opposed to just modules inside packages. In this example, we have an ecommerce package containing two modules named database.py and products.py. The database module contains a db variable that is accessed from a lot of places. Wouldn't it be convenient if this could be imported as import ecommerce.db instead of import ecommerce.database.db?
Remember the __init__.py file that defines a directory as a package? This file can contain any variable or class declarations we like, and they will be available as part of the package. In our example, if the ecommerce/__init__.py file contained this line:
from .database import db
We can then access the db attribute from main.py or any other file using this import:
from ecommerce import db
It might help to think of the __init__.py file as if it was an ecommerce.py file if that file were a module instead of a package. This can also be useful if you put all your code in a single module and later decide to break it up into a package of modules. The __init__.py file for the new package can still be the main point of contact for other modules talking to it, but the code can be internally organized into several different modules or subpackages.
I recommend not putting all your code in an __init__.py file, though. Programmers do not expect actual logic to happen in this file, and much like with from x import *, it can trip them up if they are looking for the declaration of a particular piece of code and can't find it until they check __init__.py.
Organizing module contents
Inside any one module, we can specify variables, classes, or functions. They can be a handy way to store the global state without namespace conflicts. For example, we have been importing the Database class into various modules and then instantiating it, but it might make more sense to have only one database object globally available from the database module. The database module might look like this:
class Database:
# the database implementation
pass
database = Database()Then we can use any of the import methods we've discussed to access the database object, for example:
from ecommerce.database import database
A problem with the preceding class is that the database object is created immediately when the module is first imported, which is usually when the program starts up. This isn't always ideal since connecting to a database can take a while, slowing down startup, or the database connection information may not yet be available. We could delay creating the database until it is actually needed by calling an initialize_database function to create the module-level variable:
class Database:
# the database implementation
pass
database = None
def initialize_database():
global database
database = Database()The global keyword tells Python that the database variable inside initialize_database is the module level one we just defined. If we had not specified the variable as global, Python would have created a new local variable that would be discarded when the method exits, leaving the module-level value unchanged.
As these two examples illustrate, all module-level code is executed immediately at the time it is imported. However, if it is inside a method or function, the function will be created, but its internal code will not be executed until the function is called. This can be a tricky thing for scripts (such as the main script in our e-commerce example) that perform execution. Often, we will write a program that does something useful, and then later find that we want to import a function or class from that module in a different program. However, as soon as we import it, any code at the module level is immediately executed. If we are not careful, we can end up running the first program when we really only meant to access a couple functions inside that module.
To solve this, we should always put our startup code in a function (conventionally, called main) and only execute that function when we know we are running the module as a script, but not when our code is being imported from a different script. But how do we know this?
class UsefulClass:
'''This class might be useful to other modules.'''
pass
def main():
'''creates a useful class and does something with it for our module.'''
useful = UsefulClass()
print(useful)
if __name__ == "__main__":
main()Every module has a __name__ special variable (remember, Python uses double underscores for special variables, such as a class's __init__ method) that specifies the name of the module when it was imported. When the module is executed directly with python module.py, it is never imported, so the __name__ is arbitrarily set to the string "__main__". Make it a policy to wrap all your scripts in an if __name__ == "__main__": test, just in case you write a function you will find useful to be imported by other code someday.
So, methods go in classes, which go in modules, which go in packages. Is that all there is to it?
Actually, no. This is the typical order of things in a Python program, but it's not the only possible layout. Classes can be defined anywhere. They are typically defined at the module level, but they can also be defined inside a function or method, like this:
def format_string(string, formatter=None):
'''Format a string using the formatter object, which
is expected to have a format() method that accepts
a string.'''
class DefaultFormatter:
'''Format a string in title case.'''
def format(self, string):
return str(string).title()
if not formatter:
formatter = DefaultFormatter()
return formatter.format(string)
hello_string = "hello world, how are you today?"
print(" input: " + hello_string)
print("output: " + format_string(hello_string))The output will be as follows:
input: hello world, how are you today? output: Hello World, How Are You Today?
The format_string function accepts a string and optional formatter object, and then applies the formatter to that string. If no formatter is supplied, it creates a formatter of its own as a local class and instantiates it. Since it is created inside the scope of the function, this class cannot be accessed from anywhere outside of that function. Similarly, functions can be defined inside other functions as well; in general, any Python statement can be executed at any time.
These inner classes and functions are occasionally useful for one-off items that don't require or deserve their own scope at the module level, or only make sense inside a single method. However, it is not common to see Python code that frequently uses this technique.
Who can access my data?
Most object-oriented programming languages have a concept of access control. This is related to abstraction. Some attributes and methods on an object are marked private, meaning only that object can access them. Others are marked protected, meaning only that class and any subclasses have access. The rest are public, meaning any other object is allowed to access them.
Python doesn't do this. Python doesn't really believe in enforcing laws that might someday get in your way. Instead, it provides unenforced guidelines and best practices. Technically, all methods and attributes on a class are publicly available. If we want to suggest that a method should not be used publicly, we can put a note in docstrings indicating that the method is meant for internal use only (preferably, with an explanation of how the public-facing API works!).
By convention, we should also prefix an attribute or method with an underscore character, _. Python programmers will interpret this as "this is an internal variable, think three times before accessing it directly". But there is nothing inside the interpreter to stop them from accessing it if they think it is in their best interest to do so. Because if they think so, why should we stop them? We may not have any idea what future uses our classes may be put to.
There's another thing you can do to strongly suggest that outside objects don't access a property or method: prefix it with a double underscore, __. This will perform name mangling on the attribute in question. This basically means that the method can still be called by outside objects if they really want to do it, but it requires extra work and is a strong indicator that you demand that your attribute remains private. For example:
class SecretString:
'''A not-at-all secure way to store a secret string.'''
def __init__(self, plain_string, pass_phrase):
self.__plain_string = plain_string
self.__pass_phrase = pass_phrase
def decrypt(self, pass_phrase):
'''Only show the string if the pass_phrase is correct.'''
if pass_phrase == self.__pass_phrase:
return self.__plain_string
else:
return ''If we load this class and test it in the interactive interpreter, we can see that it hides the plain text string from the outside world:
>>> secret_string = SecretString("ACME: Top Secret", "antwerp") >>> print(secret_string.decrypt("antwerp")) ACME: Top Secret >>> print(secret_string.__plain_text) Traceback (most recent call last): File "<stdin>", line 1, in <module> AttributeError: 'SecretString' object has no attribute '__plain_text'
It looks like it works; nobody can access our plain_text attribute without the passphrase, so it must be safe. Before we get too excited, though, let's see how easy it can be to hack our security:
>>> print(secret_string._SecretString__plain_string) ACME: Top Secret
Oh no! Somebody has hacked our secret string. Good thing we checked! This is Python name mangling at work. When we use a double underscore, the property is prefixed with _<classname>. When methods in the class internally access the variable, they are automatically unmangled. When external classes wish to access it, they have to do the name mangling themselves. So, name mangling does not guarantee privacy, it only strongly recommends it. Most Python programmers will not touch a double underscore variable on another object unless they have an extremely compelling reason to do so.
However, most Python programmers will not touch a single underscore variable without a compelling reason either. Therefore, there are very few good reasons to use a name-mangled variable in Python, and doing so can cause grief. For example, a name-mangled variable may be useful to a subclass, and it would have to do the mangling itself. Let other objects access your hidden information if they want to, just let them know, using a single-underscore prefix or some clear docstrings, that you think this is not a good idea.
Third-party libraries
Python ships with a lovely standard library, which is a collection of packages and modules that are available on every machine that runs Python. However, you'll soon find that it doesn't contain everything you need. When this happens, you have two options:
- Write a supporting package yourself
- Use somebody else's code
We won't be covering the details about turning your packages into libraries, but if you have a problem you need to solve and you don't feel like coding it (the best programmers are extremely lazy and prefer to reuse existing, proven code, rather than write their own), you can probably find the library you want on the Python Package Index (PyPI) at http://pypi.python.org/. Once you've identified a package that you want to install, you can use a tool called pip to install it. However, pip does not come with Python, but Python 3.4 contains a useful tool called ensurepip, which will install it:
python -m ensurepip
This may fail for you on Linux, Mac OS, or other Unix systems, in which case, you'll need to become root to make it work. On most modern Unix systems, this can be done with sudo python -m ensurepip.
Note
If you are using an older version of Python than Python 3.4, you'll need to download and install pip yourself, since ensurepip doesn't exist. You can do this by following the instructions at http://pip.readthedocs.org/.
Once pip is installed and you know the name of the package you want to install, you can install it using syntax such as:
pip install requests
However, if you do this, you'll either be installing the third-party library directly into your system Python directory, or more likely, get an error that you don't have permission to do so. You could force the installation as an administrator, but common consensus in the Python community is that you should only use system installers to install the third-party library to your system Python directory.
Instead, Python 3.4 supplies the venv tool. This utility basically gives you a mini Python installation called a virtual environment in your working directory. When you activate the mini Python, commands related to Python will work on that directory instead of the system directory. So when you run pip or python, it won't touch the system Python at all. Here's how to use it:
cd project_directory python -m venv env source env/bin/activate # on Linux or MacOS env/bin/activate.bat # on Windows
Typically, you'll create a different virtual environment for each Python project you work on. You can store your virtual environments anywhere, but I keep mine in the same directory as the rest of my project files (but ignored in version control), so first we cd into that directory. Then we run the venv utility to create a virtual environment named env. Finally, we use one of the last two lines (depending on the operating system, as indicated in the comments) to activate the environment. We'll need to execute this line each time we want to use that particular virtualenv, and then use the command deactivate when we are done working on this project.
Virtual environments are a terrific way to keep your third-party dependencies separate. It is common to have different projects that depend on different versions of a particular library (for example, an older website might run on Django 1.5, while newer versions run on Django 1.8). Keeping each project in separate virtualenvs makes it easy to work in either version of Django. Further, it prevents conflicts between system-installed packages and pip installed packages if you try to install the same package using different tools.
Case study
To tie it all together, let's build a simple command-line notebook application. This is a fairly simple task, so we won't be experimenting with multiple packages. We will, however, see common usage of classes, functions, methods, and docstrings.
Let's start with a quick analysis: notes are short memos stored in a notebook. Each note should record the day it was written and can have tags added for easy querying. It should be possible to modify notes. We also need to be able to search for notes. All of these things should be done from the command line.
The obvious object is the Note object; less obvious one is a Notebook container object. Tags and dates also seem to be objects, but we can use dates from Python's standard library and a comma-separated string for tags. To avoid complexity, in the prototype, let's not define separate classes for these objects.
Note objects have attributes for memo itself, tags, and creation_date. Each note will also need a unique integer id so that users can select them in a menu interface. Notes could have a method to modify note content and another for tags, or we could just let the notebook access those attributes directly. To make searching easier, we should put a match method on the Note object. This method will accept a string and can tell us if a note matches the string without accessing the attributes directly. This way, if we want to modify the search parameters (to search tags instead of note contents, for example, or to make the search case-insensitive), we only have to do it in one place.
The Notebook object obviously has the list of notes as an attribute. It will also need a search method that returns a list of filtered notes.
But how do we interact with these objects? We've specified a command-line app, which can mean either that we run the program with different options to add or edit commands, or we have some kind of a menu that allows us to pick different things to do to the notebook. We should try to design it such that either interface is supported and future interfaces, such as a GUI toolkit or web-based interface, could be added in the future.
As a design decision, we'll implement the menu interface now, but will keep the command-line options version in mind to ensure we design our Notebook class with extensibility in mind.
If we have two command-line interfaces, each interacting with the Notebook object, then Notebook will need some methods for those interfaces to interact with. We need to be able to add a new note, and modify an existing note by id, in addition to the search method we've already discussed. The interfaces will also need to be able to list all notes, but they can do that by accessing the notes list attribute directly.
We may be missing a few details, but that gives us a really good overview of the code we need to write. We can summarize all this in a simple class diagram:
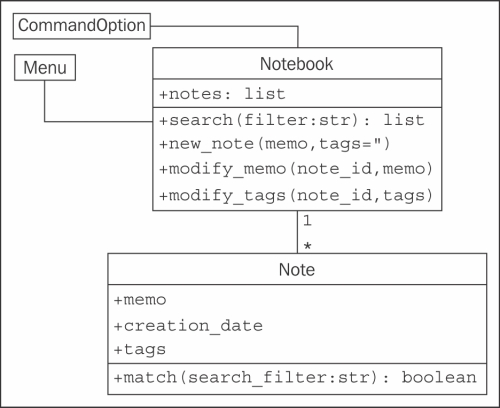
Before writing any code, let's define the folder structure for this project. The menu interface should clearly be in its own module, since it will be an executable script, and we may have other executable scripts accessing the notebook in the future. The Notebook and Note objects can live together in one module. These modules can both exist in the same top-level directory without having to put them in a package. An empty command_option.py module can help remind us in the future that we were planning to add new user interfaces.
parent_directory/
notebook.py
menu.py
command_option.pyNow let's see some code. We start by defining the Note class as it seems simplest. The following example presents Note in its entirety. Docstrings within the example explain how it all fits together.
import datetime
# Store the next available id for all new notes
last_id = 0
class Note:
'''Represent a note in the notebook. Match against a
string in searches and store tags for each note.'''
def __init__(self, memo, tags=''):
'''initialize a note with memo and optional
space-separated tags. Automatically set the note's
creation date and a unique id.'''
self.memo = memo
self.tags = tags
self.creation_date = datetime.date.today()
global last_id
last_id += 1
self.id = last_id
def match(self, filter):
'''Determine if this note matches the filter
text. Return True if it matches, False otherwise.
Search is case sensitive and matches both text and
tags.'''
return filter in self.memo or filter in self.tagsBefore continuing, we should quickly fire up the interactive interpreter and test our code so far. Test frequently and often because things never work the way you expect them to. Indeed, when I tested my first version of this example, I found out I had forgotten the self argument in the match function! We'll discuss automated testing in Chapter 10, Python Design Patterns I. For now, it suffices to check a few things using the interpreter:
>>> from notebook import Note >>> n1 = Note("hello first") >>> n2 = Note("hello again") >>> n1.id 1 >>> n2.id 2 >>> n1.match('hello') True >>> n2.match('second') False
It looks like everything is behaving as expected. Let's create our notebook next:
class Notebook:
'''Represent a collection of notes that can be tagged,
modified, and searched.'''
def __init__(self):
'''Initialize a notebook with an empty list.'''
self.notes = []
def new_note(self, memo, tags=''):
'''Create a new note and add it to the list.'''
self.notes.append(Note(memo, tags))
def modify_memo(self, note_id, memo):
'''Find the note with the given id and change its
memo to the given value.'''
for note in self.notes:
if note.id == note_id:
note.memo = memo
break
def modify_tags(self, note_id, tags):
'''Find the note with the given id and change its
tags to the given value.'''
for note in self.notes:
if note.id == note_id:
note.tags = tags
break
def search(self, filter):
'''Find all notes that match the given filter
string.'''
return [note for note in self.notes if
note.match(filter)]We'll clean this up in a minute. First, let's test it to make sure it works:
>>> from notebook import Note, Notebook >>> n = Notebook() >>> n.new_note("hello world") >>> n.new_note("hello again") >>> n.notes [<notebook.Note object at 0xb730a78c>, <notebook.Note object at 0xb73103ac>] >>> n.notes[0].id 1 >>> n.notes[1].id 2 >>> n.notes[0].memo 'hello world' >>> n.search("hello") [<notebook.Note object at 0xb730a78c>, <notebook.Note object at 0xb73103ac>] >>> n.search("world") [<notebook.Note object at 0xb730a78c>] >>> n.modify_memo(1, "hi world") >>> n.notes[0].memo 'hi world'
It does work. The code is a little messy though; our modify_tags and modify_memo methods are almost identical. That's not good coding practice. Let's see how we can improve it.
Both methods are trying to identify the note with a given ID before doing something to that note. So, let's add a method to locate the note with a specific ID. We'll prefix the method name with an underscore to suggest that the method is for internal use only, but of course, our menu interface can access the method if it wants to:
def _find_note(self, note_id):
'''Locate the note with the given id.'''
for note in self.notes:
if note.id == note_id:
return note
return None
def modify_memo(self, note_id, memo):
'''Find the note with the given id and change its
memo to the given value.'''
self._find_note(note_id).memo = memoThis should work for now. Let's have a look at the menu interface. The interface simply needs to present a menu and allow the user to input choices. Here's our first try:
import sys
from notebook import Notebook, Note
class Menu:
'''Display a menu and respond to choices when run.'''
def __init__(self):
self.notebook = Notebook()
self.choices = {
"1": self.show_notes,
"2": self.search_notes,
"3": self.add_note,
"4": self.modify_note,
"5": self.quit
}
def display_menu(self):
print("""
Notebook Menu
1. Show all Notes
2. Search Notes
3. Add Note
4. Modify Note
5. Quit
""")
def run(self):
'''Display the menu and respond to choices.'''
while True:
self.display_menu()
choice = input("Enter an option: ")
action = self.choices.get(choice)
if action:
action()
else:
print("{0} is not a valid choice".format(choice))
def show_notes(self, notes=None):
if not notes:
notes = self.notebook.notes
for note in notes:
print("{0}: {1}\n{2}".format(
note.id, note.tags, note.memo))
def search_notes(self):
filter = input("Search for: ")
notes = self.notebook.search(filter)
self.show_notes(notes)
def add_note(self):
memo = input("Enter a memo: ")
self.notebook.new_note(memo)
print("Your note has been added.")
def modify_note(self):
id = input("Enter a note id: ")
memo = input("Enter a memo: ")
tags = input("Enter tags: ")
if memo:
self.notebook.modify_memo(id, memo)
if tags:
self.notebook.modify_tags(id, tags)
def quit(self):
print("Thank you for using your notebook today.")
sys.exit(0)
if __name__ == "__main__":
Menu().run()This code first imports the notebook objects using an absolute import. Relative imports wouldn't work because we haven't placed our code inside a package. The Menu class's run method repeatedly displays a menu and responds to choices by calling functions on the notebook. This is done using an idiom that is rather peculiar to Python; it is a lightweight version of the command pattern that we will discuss in Chapter 10, Python Design Patterns I. The choices entered by the user are strings. In the menu's __init__ method, we create a dictionary that maps strings to functions on the menu object itself. Then, when the user makes a choice, we retrieve the object from the dictionary. The action variable actually refers to a specific method, and is called by appending empty brackets (since none of the methods require parameters) to the variable. Of course, the user might have entered an inappropriate choice, so we check if the action really exists before calling it.
Each of the various methods request user input and call appropriate methods on the Notebook object associated with it. For the search implementation, we notice that after we've filtered the notes, we need to show them to the user, so we make the show_notes function serve double duty; it accepts an optional notes parameter. If it's supplied, it displays only the filtered notes, but if it's not, it displays all notes. Since the notes parameter is optional, show_notes can still be called with no parameters as an empty menu item.
If we test this code, we'll find that modifying notes doesn't work. There are two bugs, namely:
- The notebook crashes when we enter a note ID that does not exist. We should never trust our users to enter correct data!
- Even if we enter a correct ID, it will crash because the note IDs are integers, but our menu is passing a string.
The latter bug can be solved by modifying the Notebook class's _find_note method to compare the values using strings instead of the integers stored in the note, as follows:
def _find_note(self, note_id):
'''Locate the note with the given id.'''
for note in self.notes:
if str(note.id) == str(note_id):
return note
return NoneWe simply convert both the input (note_id) and the note's ID to strings before comparing them. We could also convert the input to an integer, but then we'd have trouble if the user had entered the letter "a" instead of the number "1".
The problem with users entering note IDs that don't exist can be fixed by changing the two modify methods on the notebook to check whether _find_note returned a note or not, like this:
def modify_memo(self, note_id, memo):
'''Find the note with the given id and change its
memo to the given value.'''
note = self._find_note(note_id)
if note:
note.memo = memo
return True
return FalseThis method has been updated to return True or False, depending on whether a note has been found. The menu could use this return value to display an error if the user entered an invalid note. This code is a bit unwieldy though; it would look a bit better if it raised an exception instead. We'll cover those in Chapter 4, Expecting the Unexpected.
Exercises
Write some object-oriented code. The goal is to use the principles and syntax you learned in this chapter to ensure you can use it, instead of just reading about it. If you've been working on a Python project, go back over it and see if there are some objects you can create and add properties or methods to. If it's large, try dividing it into a few modules or even packages and play with the syntax.
If you don't have such a project, try starting a new one. It doesn't have to be something you intend to finish, just stub out some basic design parts. You don't need to fully implement everything, often just a print("this method will do something") is all you need to get the overall design in place. This is called
top-down design, in which you work out the different interactions and describe how they should work before actually implementing what they do. The converse, bottom-up design, implements details first and then ties them all together. Both patterns are useful at different times, but for understanding object-oriented principles, a top-down workflow is more suitable.
If you're having trouble coming up with ideas, try writing a to-do application. (Hint: It would be similar to the design of the notebook application, but with extra date management methods.) It can keep track of things you want to do each day, and allow you to mark them as completed.
Now, try designing a bigger project. It doesn't have to actually do anything, but make sure you experiment with the package and module importing syntax. Add some functions in various modules and try importing them from other modules and packages. Use relative and absolute imports. See the difference, and try to imagine scenarios where you would want to use each one.
Summary
In this chapter, we learned how simple it is to create classes and assign properties and methods in Python. Unlike many languages, Python differentiates between a constructor and an initializer. It has a relaxed attitude toward access control. There are many different levels of scope, including packages, modules, classes, and functions. We understood the difference between relative and absolute imports, and how to manage third-party packages that don't come with Python.
In the next chapter, we'll learn how to share implementation using inheritance.