Book Image

R Programming By Example

By : Omar Trejo Navarro
Book Image

R Programming By Example

By: Omar Trejo Navarro

Overview of this book

R is a high-level statistical language and is widely used among statisticians and data miners to develop analytical applications. Often, data analysis people with great analytical skills lack solid programming knowledge and are unfamiliar with the correct ways to use R. Based on the version 3.4, this book will help you develop strong fundamentals when working with R by taking you through a series of full representative examples, giving you a holistic view of R. We begin with the basic installation and configuration of the R environment. As you progress through the exercises, you'll become thoroughly acquainted with R's features and its packages. With this book, you will learn about the basic concepts of R programming, work efficiently with graphs, create publication-ready and interactive 3D graphs, and gain a better understanding of the data at hand. The detailed step-by-step instructions will enable you to get a clean set of data, produce good visualizations, and create reports for the results. It also teaches you various methods to perform code profiling and performance enhancement with good programming practices, delegation, and parallelization. By the end of this book, you will know how to efficiently work with data, create quality visualizations and reports, and develop code that is modular, expressive, and maintainable.
Table of Contents (12 chapters)

Tools to work efficiently with R

In this section we discuss the tools that will help us when working with R.

Pick an IDE or a powerful editor

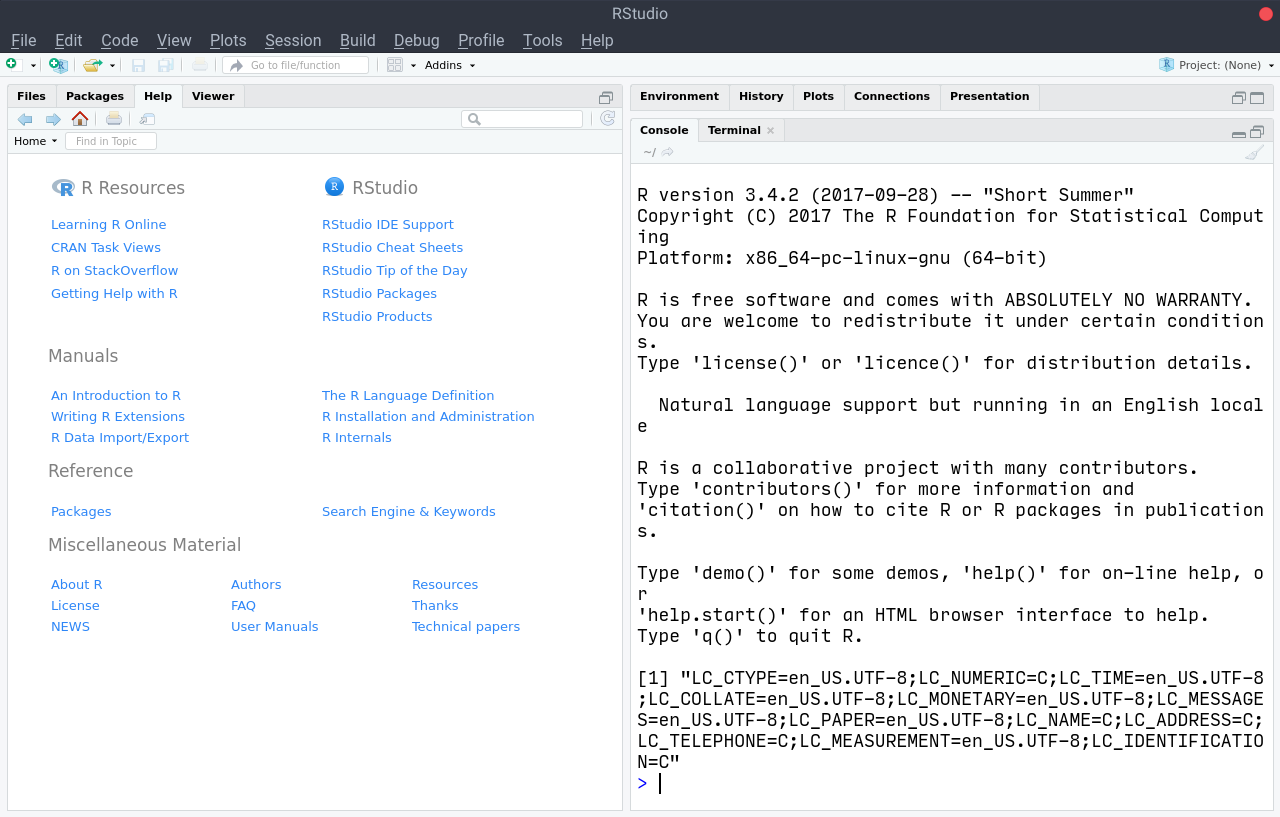
For efficient code development, you may want to try a more powerful editor or an Integrated Development Environment (IDE). The most popular IDE for R is RStudio (https://www.rstudio.com/). It offers an impressive feature set that makes interacting with R much easier. If you're new to R, and programming in general, this is probably the way to go. As you can see in the image below it wraps the console (right side) within a larger application which offers a lot of functionality, and in this case, it is displaying the help system (left side). Furthermore, RStudio offers tabs to navigate files, browse installed packages, visualize plots, among other features, as well as a large amount of configuration options under the top menu dropdowns.

Throughout this book, we will not use any functionality provided by RStudio. All I will show you is pure R functionality. I decided to proceed this way to make sure that the book is useful for any R programmer, including those who do not use RStudio. For RStudio users, this means that there may be easier ways to accomplish some of the tasks I will show, and instead of programming a few lines, you could simply click some buttons. If that's something you prefer, I encourage you to take a look through the excellent RStudio Essential webinars,which can be found in RStudio's website at https://www.rstudio.com/resources/webinars/?wvideo=lxel3j2kos, as well as Stanford's Introduction to R, RStudio (https://web.stanford.edu/class/stats101/intro/intro-lab01.html).

You should be careful to avoid the common mistake of referring to R as RStudio. Since many people are introduced to R through RStudio, they think that RStudio is actually R, which it is not. RStudio is a wrapper around R to extend it's functionality, and is technically known as an IDE.

Experienced programmers may prefer to work with other tools they already know and love and have used for many years. For example, in my case, I prefer to use Emacs (https://www.gnu.org/software/emacs/) for any programming I do. Emacs is a very powerful text editor that you can programatically extend to work the way you want it to by using a programming language known as Elisp, which is a Lisp extension. In case you use Emacs too, the ess package is all you really need.

If you're going to use Emacs, I encourage you to take a look through the ess package's documentation (https://ess.r-project.org/Manual/ess.html) and Johnson's presentation titled Emacs Has No Learning Curve, University of Kansas, 2015 (http://pj.freefaculty.org/guides/Rcourse/emacs-ess/emacs-ess.pdf). If you use Vim, Sublime Text, Atom, or other similar tools, I'm confident you can find useful packages as well.

The send to console functionality

The base R installation provides the console environment we mentioned in the previous section. This console is really all you need to work with R, but it will quickly become cumbersome to type everything directly into it and it may not be your best option. To efficiently work with R, you need to be able to experiment and iterate as fast as you can. Doing so will accelerate your learning curve and productivity.

Whichever tool you use, the key functionality you need is to be able to easily send code snippets into the console without having to type them yourself, or copying them from your editor and pasting them into the console. In RStudio, you can accomplish this by clicking on the Run or Source button in the top-right corner of the code editor panel. In Emacs, you may use the ess-eval-region command.

The efficient write-execute loop

One of the most productive ways to work with R, especially when learning it, is to use the write-execute loop, which makes use of the send to console functionality mentioned in the previous section. This will allow you to do two very important things: develop your code through small and quick iterations, which allow you to see step-by-step progress until you converge to the behavior you seek, and save the code you converged to as your final result, which can be easily reproduced using the source code file you used for your iterations. R source code files use the .R extension.

Assuming you have a source code file ready to send expressions to the console, the basic steps through the write-execute loop are as follows:

  1. Define what behavior you're looking to implement with code.
  2. Write the minimal amount of code necessary to achieve one piece of the behavior you seek in your implementation.
  3. Use the send to console functionality to verify that the result in the console is what you expected, and if it's not, to identify possible causes.
  4. If it's not what you expected, go back to the second step with the purpose of fixing the code until it has the intended piece of behavior.
  5. If it's what you expected, go back to the second step with the purpose of extending the code with another piece of the behavior, until convergence.

This write-execute loop will become second nature to you as you start using it, and when it does, you'll be a more productive R programmer. It will allow you to diagnose issues faster, to quickly experiment with a few ways to accomplishing the same behavior to find which one seems best for your context, and once you have working code, it will also allow you to clean your implementation to keep the same behavior but have better or more readable code.

For experienced programmers, this should be a familiar process, and it's very similar to Test-Driven Development (TDD), but instead of using unit-tests to automatically test the code, you verify the output in the console in each iteration, and you don't have a set of tests to re-test each iteration. Even though TDD will not be used in this book, you can definitely use it in R.

I encourage you to use this write-execute loop to work through the examples presented in this book. At times, we will show step-by-step progress so that you understand the code better, but it's practically impossible to show all of the write-execute loop iterations I went through to develop it, and much of the knowledge you can acquire comes from iterating this way.

Executing R code in non-interactive sessions

Once your code has the functionality you were looking to implement, executing it through an interactive session using the console may not be the best way to do so. In such cases, another option you have is to tell your computer to directly execute the code for you, in a non-interactive session. This means that you won't be able to type commands into the console, but you'll get the benefit of being able to configure your computer to automatically execute code for you, or to integrate it into larger systems where R is only one of many components. This is known as batch mode.

To execute code in the batch mode, you have two options: the old R CMD BATCH command which we won't look into, and the newer Rscript command, which we will. The Rscript is a command that you can execute within your computer's terminal. It receives the name of a source code file and executes its contents.

In the following example, we will make use of various concepts that we will explain in later sections, so if you don't feel ready to understand it, feel free to skip it now and come back to it later.

Suppose you have the following code in a file named greeting.R. It gets the arguments passed through the command line to Rscript through the args object created with the commandArgs() function, assigns the corresponding values to the greeting and name variables, and finally prints a vector that contains those values.

args     <- commandArgs(TRUE)
greeting <- args[1]
name     <- args[2]

print(c(greeting, name))

Once ready, you may use the Rscript command to execute it from your Terminal (not from within your R console) as is shown ahead. The result shows the vector with the greeting and name variable values you passed it.

When you see a Command Prompt that begins with the $ symbol instead of of the > symbol, it means that you should execute that line in your computer's Terminal, not in the R console.
$ Rscript greeting.R Hi John
[1] "Hi" "John"

Note that if you simply execute the file without any arguments, they will be passed as NA values, which allows you to customize your code to deal with such situations:

$ Rscript greeting.R
[1] NA NA

This was a very simple example, but the same mechanism can be used to execute much more complex systems, like the one we will build in the final chapters of this book to constantly retrieve real-time price data from remote servers.

Finally, if you want to provide a mechanism that is closer to the one in Python, you may want to look into the optparse package to create command-line help pages as well as to parse arguments.