The C# language is extensive enough to have dedicated books, and there are indeed books that cover everything from having never seen programming before to advanced design patterns and optimizations. This book is not intended to cover either the very basic things or esoteric concepts only applicable to senior developers. The target audience being beginners, we will take a short tour through a Hello World type example to set the stage and make sure things work on your machine.
If you feel comfortable with how the Visual Studio web app template works and want to dive into the new bits, feel free to skip this section.
We will start with the following steps:
- Start Visual Studio and select Create a new project.
- Select ASP.NET Core Web Application and hit Next.
- Name the solution
Chapter_01_HelloWeb and select a suitable location for this book's exercises (such as C:\Code\Book\Chapter_01) and click on Create.
- On the next screen, make sure ASP.NET Core 5 is selected and choose Empty in the middle section. It is not necessary to check Docker Support or configure Authentication.
- Once the code is loaded and ready, you should verify your installation is working by pressing F5 to run the web application in debug mode. It might take a little while the first time, but hopefully, there are no errors and you are presented with this in your browser:
Figure 1.4 – Running the default web app template
Nothing fancy, but it means you are good to go for doing more complicated things in later chapters. If there are problems getting it to run, this is the time to fix it before proceeding.
Let's look at some of the components and code that make this up.
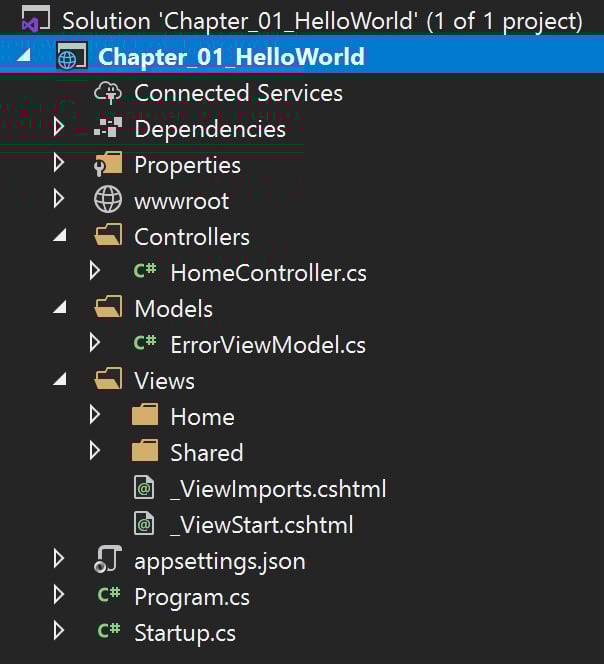
Move your mouse to the right-hand side in Visual Studio, click on Solution, and you will see a drop down of files appearing as shown in the following screenshot:
Figure 1.5 – The file structure of the web app in Visual Studio 2019
This structure is specific to the empty web application template. You are more likely to use an MVC or Blazor template to build more advanced stuff, unless you want to write everything from scratch.
Let's look at the contents of Program.cs:
using Microsoft.AspNetCore.Hosting;
using Microsoft.Extensions.Hosting;
namespace Chapter_01_HelloWeb
{
public class Program
{
public static void Main(string[] args)
{
CreateHostBuilder(args).Build().Run();
}
public static IHostBuilder CreateHostBuilder(string[] args) =>
Host.CreateDefaultBuilder(args)
.ConfigureWebHostDefaults(webBuilder =>
{
webBuilder.UseStartup<Startup>();
});
}
}
We see a Main method, which in this file has the single purpose of starting a process for handling web requests and processes. You can have different types of host processes running, so the recommended pattern is that you run a generic host process, and then further customize it to specify that it is a web hosting process. Since this is the first chapter of the book, you have not been introduced to other types of hosts yet, but in Chapter 2, Cross-Platform Setup, we will get into an example for spinning up a different host type.
In this case, we used the Empty web template, but this is boilerplate code that will be similar in the other web-based templates as well.
There is a reference to Startup in the previous code snippet and this refers to the contents of Startup.cs:
using Microsoft.AspNetCore.Builder;
using Microsoft.AspNetCore.Hosting;
using Microsoft.AspNetCore.Http;
using Microsoft.Extensions.DependencyInjection;
using Microsoft.Extensions.Hosting;
namespace Chapter_01_HelloWeb
{
public class Startup
{
// This method gets called by the runtime. Use this method
// to add services to the container.
public void ConfigureServices(IServiceCollection services)
{
}
// This method gets called by the runtime. Use this method
// to configure the HTTP request pipeline.
public void Configure(IApplicationBuilder app, IWebHostEnvironment env)
{
if (env.IsDevelopment())
{
app.UseDeveloperExceptionPage();
}
app.UseRouting();
app.UseEndpoints(endpoints =>
{
endpoints.MapGet("/", async context =>
{
await context.Response.WriteAsync("Hello World!");
});
});
}
}
}
If you have not written web apps in C# recently, this might be something you are unfamiliar with. In .NET Classic, the ceremony of setting up the configuration for your web app was spread across multiple config files, and the syntax could be slightly different between configuration types. A particularly heinous issue to figure out was when you had a "hidden" web.config file overriding what you thought was the file that would apply. It was also very much a one-size-fits-all setup where you would include lines of XML that were simply not relevant for your application.
In .NET Core, this is centralized to one file with a larger degree of modularity. In more complex applications, it is possible that you'll need to use additional files, but the starting template does not require that. The pattern to observe here is that it is in the form app.UseFeature. For instance, if you add app.UseHttpsRedirection, that means that if the user types in http://localhost, they will automatically be redirected to https://localhost. (It is highly recommended to use https for all websites.) While there is not a lot of logic added in this sample, you should also notice the if statement checking if the environment is a development environment. It is possible to create more advanced per-environment settings, but for a simple thing like deciding whether the detailed exceptions should be displayed in the browser, this is a useful option for doing so.
It is not apparent from the code itself, but these features that are brought in are called middlewares.
Middlewares are more powerful than the impression you get from here; this will be covered in greater detail in later chapters.
The Configure method runs as a sequence loading features dynamically into the startup for the web hosting process. This means that the order of the statements matters, and it's easy to mix this up if you're not paying attention. If app.UseB relies on app.UseA loading first, make sure that's what it looks like in the code as well.
It should be noted that this approach is not specific to web-based apps but will be applicable to other host-based apps as well.
The lines that generate the visible output here are the following:
app.UseEndpoints(endpoints =>
{
endpoints.MapGet("/", async context =>
{
await context.Response.WriteAsync("Hello World!");
});
});
Let's change this to the following:
app.UseEndpoints(endpoints =>
{
endpoints.MapGet("/", async context =>
{
await context.Response.WriteAsync("<h2>The time is now: </h2>" + DateTime.UtcNow.ToString());
});
});
This code means that we tell the .NET runtime to wire up an endpoint listening at the URL and write a response directly to the HTTP conversation. To demonstrate that we can go further than the original "Hello World!" string, we're outputting HTML as part of it in addition to using a variable that generates a dynamic value. (Note: the browser decides whether HTML should be rendered or not in this example, therefore, you might see the tags without the formatting on your computer.)
If you run the application again, you should see the current time being printed:
Figure 1.6 – Hello World with the current time printed
If you have worked on more frontend-centric tasks, you might notice that while the previous snippet uses HTML, it seems to be missing something. Usually, you would apply styling to a web page using Cascading Style Sheets (CSS files), but this approach is a more stripped-down version of CSS where we don't touch that. Later chapters will show you more impressive styling approaches than what we see here.
If you have ever dabbled with anything web before, you have probably learned, either the hard way or by being told so, that you should not mix code and UI. This example seems to violate that rule pretty well.
In general, it is indeed not encouraged to implement a web app this way as one of the basic software engineering principles is to separate concerns. You could, for instance, have a frontend expert create the user interface with very little knowledge of the things going on behind the scenes in the code, and a backend developer handling the business logic only caring about inputs and outputs to the "engine" of the application.
The approach above is not entirely useless though. It is not uncommon for web apps to have a "health endpoint." This is an endpoint that can be called into by either monitoring solutions or by container orchestration solutions when you're dealing with microservices. These are usually only looking for a static response that the web app is alive so we don't need to build user interfaces and complex logic for this. To implement this, you could add the following in Startup.cs while still doing a "proper" web app in parallel:
endpoints.MapGet("/health", async context =>
{
await context.Response.WriteAsync("OK");
});
If you have worked with early versions of Visual Studio (pre 2017), you may have experienced the annoyance of working with the project and solution file for your code. If you added or edited files outside Visual Studio and then tried going back for the compilation and running of the code, it was common to get complaints in the integrated development environment (IDE) about something not being right.
This has been resolved and you can now work with files in other applications and other folders just by saving the resulting file in the correct place in the project's structure.
The project file (.csproj) for a .NET Classic web app starts at 200+ lines of code. For comparison, the web app we just created contains 7 lines (and that includes 2 whitespace lines):
<Project Sdk="Microsoft.NET.Sdk.Web">
<PropertyGroup>
<TargetFramework>net5.0</TargetFramework>
</PropertyGroup>
</Project>
To view this in Visual Studio, you have to right-click the project name and choose Unload Project before choosing Edit .csproj. When you finish editing the file, you need to reload the project to work with it again.
At this point, we recommend that you play around with the code, make edits, and see how it turns out before proceeding.
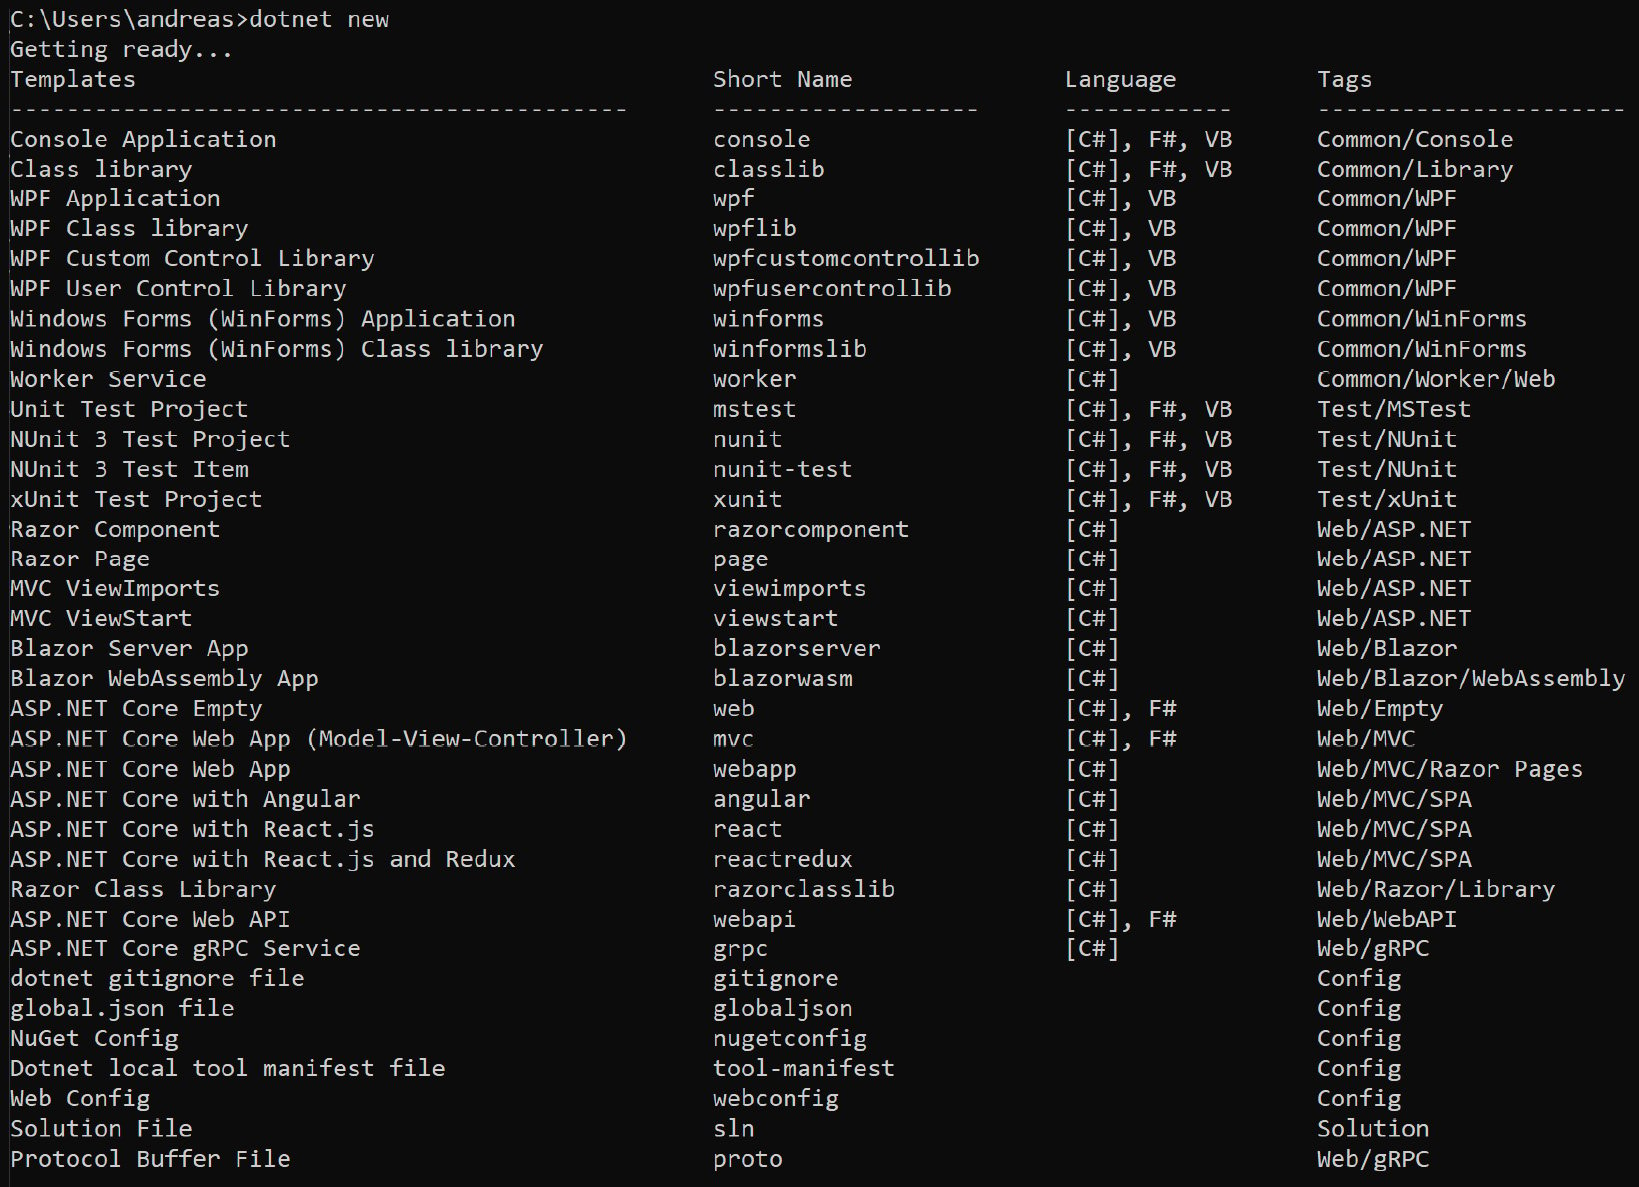
In this walk-through, we relied on Visual Studio 2019 to provide us with a set of templates and a graphical user interface to click through. .NET does not force the use of Visual Studio, so it is possible to replicate this from the command line if you want to work with a different editor. Run the dotnet new command to see the available options with some hints to go along with it:
Figure 1.7 – Listing the available templates in .NET
To replicate what we did in Visual Studio, you would type dotnet new web. The default project name will be the same as the folder you are located in, so make sure you name your folder and change it accordingly.
This should put you in a place where you have some example code to test out and verify that things work on your system. There is, however, more to the C# language, and next, we will take a look at what the newest version of C# brings.
Learning what's new in .NET 5 and C# 9
The general rule of thumb is that new versions of .NET, C#, and Visual Studio are released in the same time frame. This is certainly the easiest way to handle it as well – grab the latest Visual Studio and the other two components follow automatically during installation.
The tooling is not always tightly coupled, so if for some reason you are not able to use the latest versions, you can look into whether there are ways to make it work with previous versions of Visual Studio. (This can usually be found in the requirements documentation from Microsoft.)
A common misconception is that .NET and C# have to be at the same version level and that upgrading one implies upgrading the other. However, the versions of .NET and C# are not directly coupled. This is further illustrated by the fact that C# has reached version 9 whereas .NET is at 5. .NET is not tied to using C# as a language either. (In the past, you had Visual Basic and currently, you also have F#.) If you want to stay at a specific C# version (without upgrading to the latest version of C#), then after you upgrade .NET, that combination will usually still work.
Things that are defined by the C# language are usually backward compatible, but patterns might not be.
As an example, the var keyword was introduced in C# 3. This means that the following declarations are valid:
var i = 10; // Implicitly typed.
int i = 10; // Explicitly typed.
Both variants are okay, and .NET Core 5 will not force either style.
As an example of .NET moving along, there were changes going from .NET Core 1.x to .NET Core 2.x where the syntax of C# did not change, but the way .NET expected authentication to be set up in code meant that your code would fail to work even if the C# code was entirely valid. Make sure you understand where a certain style is enforced by .NET and where C# is the culprit.
You can specify which C# version to use by editing the file for the project (.csproj) and adding the LangVersion attribute:
<Project Sdk="Microsoft.NET.Sdk">
<PropertyGroup>
<OutputType>Exe</OutputType>
<TargetFramework>net5.0</TargetFramework>
</PropertyGroup>
<PropertyGroup>
<LangVersion>9.0</LangVersion>
</PropertyGroup>
</Project>
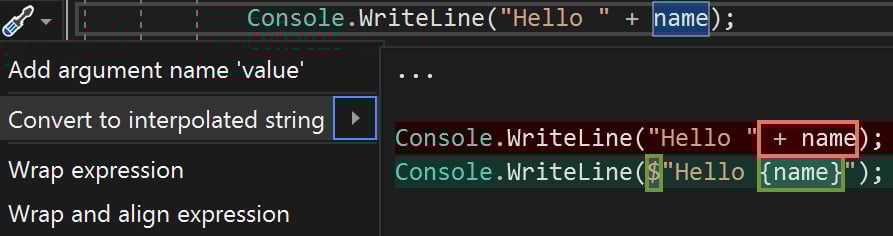
It can be hard to keep track of what can be changed and optimized in the code. With the .NET Compiler Platform released in 2014, nicknamed Roslyn, this improved greatly with the introduction of real-time analysis of your code. Where you previously had to compile your code for the IDE to present errors and warnings, these are now displayed as you are writing your code. It doesn't confine itself to calling out issues preventing your code from running, but will also suggest improvements to be made.
For instance, consider the following:
Console.WriteLine("Hello " + name);
Roslyn will suggest String interpolation as an option:
Console.WriteLine($"Hello {name}");
In a nutshell, this is illustrated in the following figure:
Figure 1.8 – Code improvement suggestions
For a trivial example like this, it may not look like much of an improvement, but it often makes longer strings more readable. Either way, it is a suggestion, not something that is forced upon you.
This means that when the topic is "what's new," that can be broken into two sections – .NET and C#. What's new in .NET will mainly be covered in other chapters. What's new in C# gets a walk-through here and will be used in code samples in subsequent chapters. Note that not all of the code in the book will use C# 9 syntax everywhere, and as long as the new syntax is mainly stylistic, you are advised to choose your own style if you are not part of a larger development team forcing a set of standards.
What's new in .NET 5?
A good deal of improvements is under the hood, making things run more smoothly and better all round. There are, however, a couple of more noticeable improvements too. This chapter will only provide a couple of highlights as the details will come later in the book.
Closing the gap with .NET Classic
With .NET Core 1.0, it was impossible for many projects to be ported from .NET 4.x because there simply were no corresponding libraries for some of the features. .NET Core 3.1 removed this barrier for most practical purposes and with .NET Core 5, the framework is considered feature complete on the API and library side.
Some technologies have been deprecated and have thus not been carried over (see the Removed/changed features section later in this chapter for that). A few such technologies are listed here:
Having discussed what's new in .NET 5, let's move on to C# 9.
What's new in C# 9?
The overarching goal of C# 9 is simplification. The language is mature enough that you can do most things you want in some way, so instead of adding more features, it is about making the features more available. In this section, we will cover new ways to structure your code and explain some of the new code you can create.
Top-level programs
A good example of simplification is top-level programs. With C# 8, the Visual Studio template created this code as the starting point for a console app:
using System;
namespace ConsoleApp2
{
class Program
{
static void Main(string[] args)
{
Console.WriteLine("Hello World");
}
}
}
There is a reason why there are so many lines of code to do so little, but for a beginner, it is a lot of ceremony to get going. The preceding snippet can now be written like this:
Using System;
Console.WriteLine("Hello World");
This does not support omitting classes and methods in general throughout the program. This is about simplifying the Main method, which often does little more than bootstrapping the application, and which you can only have one of in a given application.
Init-only properties
When working with objects, you usually define and create them like this:
static void Main(string[] args)
{
InfoMessage foo = new InfoMessage
{
Id = 1,
Message = "Hello World"
};
}
public class InfoMessage
{
public int Id { get; set; }
public string Message { get; set; }
}
In this code, the properties are mutable, so if you later want to change the ID, that is okay (when the accessor is public). To cover the times when you want a public property to be immutable, a new type of property is introduced with init-only properties:
public class InfoMessage
{
public int Id { get; init; }
public string Message { get; init; }
}
This makes the properties immutable so once you have defined them, they cannot change.
Init accessors and read-only fields
Init accessors are only meant to be used during initialization, but this doesn't conflict with read-only fields and you can use both if you have needs that require a constructor:
public class City
{
private readonly int ZipCode;
private readonly string Name;
public int ZipCode
{
get => ZipCode;
init => ZipCode = (value ?? throw new ArgumentNullException(nameof(ZipCode)));
}
public string Name
{
get => Name;
init => Name = (value ?? throw new ArgumentNullException(nameof(Name)));
}
}
Records
Init works for individual properties, but if you want to make it apply to all properties in a class, you can define the class as a record by using the record keyword:
public record class City
{
public int ZipCode {get; init;}
public string Name {get; init;}
public City(int zip, string name) => (ZipCode, Name) = (zip,name);
}
When you declare the object as a record, this brings you the value of other new features.
With expressions
Since the object has values that cannot be changed, you have to create a new object for the values to change. You could, for instance, have the following:
City Redmond = new City("98052","Redmond");
//The US runs out of zip codes so every existing code is
// assigned
//a 0 as a suffix
City newRedmond = new City("980520","Redmond");
Using the with expression enables you to copy existing properties and just redefine the changed values:
var newRedmond = Redmond with {ZipCode = "980520"};
Value-based equality
A trap for new programmers is the concept of equality. Given the following code, what would the output be?
City Redmond_01 = new City { Name = "Redmond", ZipCode = 98052 };
City Redmond_02 = new City { Name = "Redmond", ZipCode = 98052 };
if (Redmond_01 == Redmond_02)
Console.WriteLine("Equals!");
else
Console.WriteLine("Not equals!");
The output would be Not equals because they are not the same object even if the values are the same. To achieve what we call equal in non-programming parlance, you would have to override the Equals method and compare the individual properties:
class Program
{
static void Main(string[] args)
{
City Redmond_01 = new City{ Name = "Redmond", ZipCode = 98052 };
City Redmond_02 = new City{ Name = "Redmond", ZipCode = 98052 };
if (Redmond_01.Equals(Redmond_02))
Console.WriteLine("City Equals!");
else
Console.WriteLine("City Not equals!");
}
}
public class City
{
public int ZipCode{get; set;}
public string Name{get; set;}
public override bool Equals(object obj)
{
//Check for null and compare run-time types.
if ((obj == null) || !this.GetType().Equals(obj.GetType()))
{
return false;
}
else
{
City c = (City)obj;
return (ZipCode == c.ZipCode) && (Name == c.Name);
}
}
…
}
This would render the output that the two cities are equal.
In Records, this behavior is implied by default and you do not have to write your own Equals method to achieve a value-based comparison. Having if (Redmond_01.Equals(Redmond_02)) in the code should work just like the previous code snippet without the extra public override bool Equals(object obj) part.
You can still override Equals if you have a need for it, but for cases where you want a basic equality check, it's easier to use the built-in functionality.
Data members
With records, you often want the properties to be public, and the intent is that init-only value-setting will be preferred. This is taken as an assumption by C# 9 as well, so you can simplify things further.
Consider the following code:
public data class City
{
public int ZipCode {get; init;}
public string Name {get; init;}
}
It can be written like this:
public data class City {int ZipCode; string Name;}
You can still make the data members private by adding the modifier explicitly.
Positional records
The following line of code sets the properties explicitly:
City Redmond = new City{ Name = "Redmond", ZipCode = 98052 };
Having knowledge of the order the properties are defined in, you can simplify it to the following:
City Redmond = new City(98052, "Redmond");
There are still valid use cases for having extra code to make it clearer what the intent of the code is so use with caution.
Inheritance and records
Inheritance can be tricky when doing equality checks, so C# has a bit of magic happening in the background. Let's add a new class:
public data class City {int ZipCode; string Name;}
public data class CityState : City {string State;}
Due to a hidden virtual method handling the cloning of objects, the following would be valid code:
City Redmond_01 = new CityState{Name = "Redmond", ZipCode = 98052, State = "Washington" };
City Redmond_02 = Redmond_01 with {State = "WA"};
What if you want to compare the two objects for value-based equality?
City Redmond_01 = new City { Name = "Redmond", ZipCode = 98052 };
City Redmond_02 = new CityState { Name = "Redmond", ZipCode = 98052, State = "WA" };
Are these equal? Redmond_02 has all the properties of Redmond_01, but Redmond_01 lacks a property, so it would depend on the perspective you take.
There is a virtual protected property called EqualityContract that is overridden in derived records. To be equal, two objects must have the same EqualityContract property.
Improved target typing
The term target typing is used when it is possible to get the type of an expression from the context it is used in.
For instance, you can use the var keyword when the compiler has enough info to infer the right type:
var foo = 1 //Same as int foo = 1
var bar = "1" //Same as string bar = "1"
Target-typed new expressions
When instantiating new objects with new, you had to specify the type. You can now leave this out if it is clear (to the compiler) which type is being assigned to:
//Old
City Redmond = new City(98052,"Redmond");
//New
City Redmond = new (98052, "Redmond");
//Not valid
var Redmond = new (98052,"Redmond");
Parameter null-checking
It is a common pattern for a method to check if a parameter has a null value if that will cause an error. You can either check if the value is null before performing an operation, or you can throw an error. With null-checking, you make this part of the method signature:
//Old – nothing happens if name is null
void Greeter(string name)
{
if (name != null)
Console.WriteLine($"Hello {name}");
}
//Old – exception thrown if name is null
void Greeter(string name)
{
if (name is null)
throw new ArgumentNullException(nameof(name));
else
Console.WriteLine($"Hello {name}");
}
//New
void Greeter(string name!)
{
Console.WriteLine($"Hello {name}");
}
For methods accepting multiple parameters, this should be a welcome improvement.
Pattern matching
C# 7 introduced a feature called pattern matching. This feature is used to get around the fact that you do not necessarily control all the data structures you use internally in your own code. You could be bringing in external libraries that don't adhere to your object hierarchy and re-arranging your hierarchy to align with this would just bring in other issues.
To achieve this, you use a switch expression, which is similar to a switch statement, but the switch is done based on type pattern instead of value.
C# 9 brings improvements to this with more patterns you can use for matching.
Removed/changed features
It is always interesting to start trying out new features, but there are also features and technologies that have been removed from .NET.
It is common to do house cleaning when bringing out new major versions, and there are many minor changes. Microsoft maintains a list of breaking changes (in .NET 5) at https://docs.microsoft.com/en-us/dotnet/core/compatibility/3.1-5.0.
As stated previously in this chapter, .NET Core 1.0 was not feature complete compared to .NET Classic. NET Core 2 added a lot of APIs, and .NET Core 3 added more of the .NET Frameworks. The transition is now completed, so if you rely on a feature of .NET Classic that is not found in .NET 5, it will not be added later.
Windows Communication Framework
Web services have been around for many years now, and one of the early .NET frameworks for this was Windows Communication Framework (WCF). WCF could be challenging to work with at times but provided contracts for data exchange and a handy code generation utility in Visual Studio. This was deprecated in .NET Core 3, so if you have any of these services that you want to keep, they cannot be ported to .NET 5. This applies both to the server and client side.
It is possible to create a client implementation manually in .NET Core, but it is not trivial and is not recommended. The recommended alternative is moving to a different framework called gRPC. This is an open source remote procedure call (RPC) system. gRPC was developed by Google with support for more modern protocols, such as HTTP/2 for the transport layer, as well as contracts through a format called ProtoBuf.
Web Forms
Windows Forms was the framework for creating "classic" Windows desktop apps (Classic being the pre-Windows 8 design language). This was ported over with .NET Core 3.0.
The web version of this was called Web Forms. That is, technically, there were differences in the code, but the model, with a so-called "code-behind" approach, was similar between the two. It was recommended to move to MVC and Razor style syntax in newer versions of .NET Classic as well, but Web Forms was still supported. This has not been brought over to .NET Core, and you need to look into either MVC or Blazor as alternatives.
Having covered both what's new and what's no more, we will now look more closely at the components that present your web apps to the world at large.


 Free Chapter