

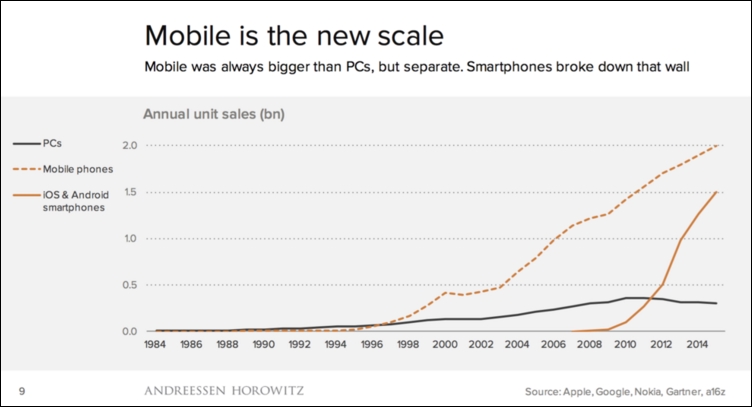
Mobile incident response is a little different from computer incident response, especially if we point out some unique properties of mobile devices, such as the introduction of application stores models, lack of administrative access to smartphones, and mobile's explosive growth. The dramatic growth of annual smartphone unit sales has left the forensic community a lack of time to mature (source for the following graph: http://ben-evans.com/benedictevans/2015/11/7/mobile-ecosystems-and-the-death-of-pcs):
This growth gave birth to many common scenarios in which an examiner would be solicited to respond to a mobile incident, such as malware infection, suspicious device behavior, stolen or lost device, e-discovery, legal hold, or data breach. Thus, setting up an appropriate environment is a key component of mobile incident response. The community is continuously trying to keep pace with this unstoppable growth of technology. The easiest way to set up a mobile forensic workstation is by adopting one of the freely available open source Linux distributions, specially crafted to let the mobile forensic examiners acquire and analyze data from most smartphones by including most of the useful tools and utilities related to mobile forensics. This section will describe how to set up Santoku Linux on a virtual environment. The examiner can also decide to install the operating system directly on a computer, but it's recommended to use virtual environments.
Before setting up Santoku, the following is required:
Santoku Linux
.ISOfile (https://santoku-linux.com/download/).VirtualBox or VMWare Player (in this section, the latest version of Oracle VM VirtualBox version 5.0.16 was used. It can be downloaded from https://www.virtualbox.org/wiki/Downloads).
A host machine with a dual-core processor (minimum), 8 GB RAM, and 40 GB (or larger) free hard drive space.
After installing and running VirtualBox (the default installation path is C:\Program Files\Oracle\VirtualBox\), click on New to create a new virtual machine. A wizard will show up to guide you through different parameters. The first screen is to choose the name and the virtual machine's operating system:

Click on Next and select the appropriate amount of memory for the virtual machine; it's recommended to select at least 4 GB:

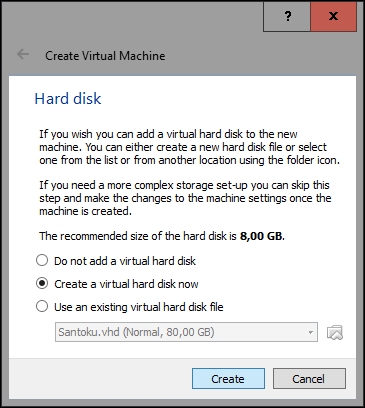
Click on Next and choose Create a virtual hard disk now on the screen that follows:
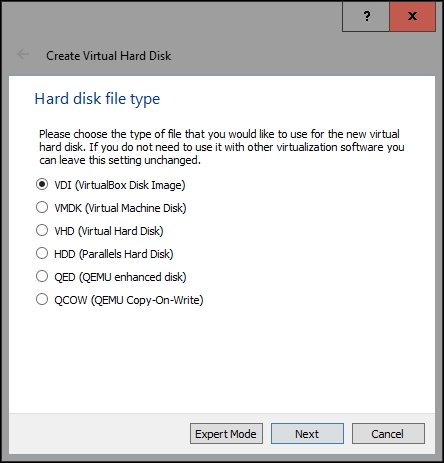
Click on Create and select the VDI (VirtualBox Disk Image) option on the following screen:
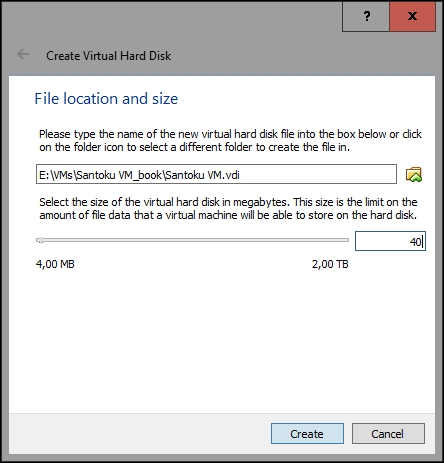
Click on Next; on the Storage and physical hard disk screen leave the Dynamically allocated option selected and click on Next. On the File location and size screen, you can click on the folder icon to choose the location where the virtual hard disk drive will be stored and then select the size of it either by adjusting the slider or by typing the value in gigabytes depending on your needs; however, it's recommended that you allocate around 40 GB:
Click on the Create button, and from the VirtualBox's main window, select the newly created virtual machine and click on Settings:

Select the Storage option on the left of the Settings screen and then click on the CD icon next to Controller: IDE. To add an optical drive, a question box will pop up; select Choose disk:
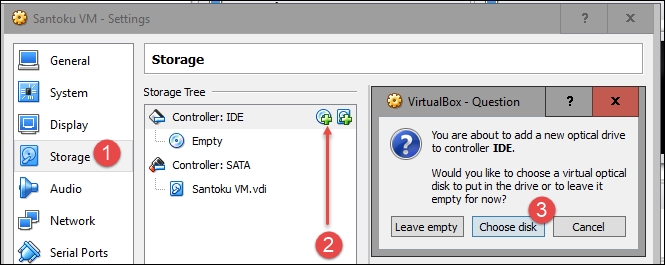
Navigate to your downloaded santoku_0.5.iso file, click on Open and then on Ok, which will bring you back to the main VirtualBox menu.
The virtual machine is now ready and we can proceed with the Santoku installation; select the newly created virtual machine from the main menu and click on Start.
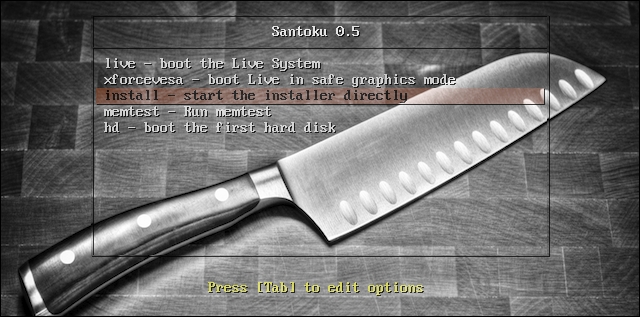
To begin an installation process, choose install – start the installer directly and hit Enter:
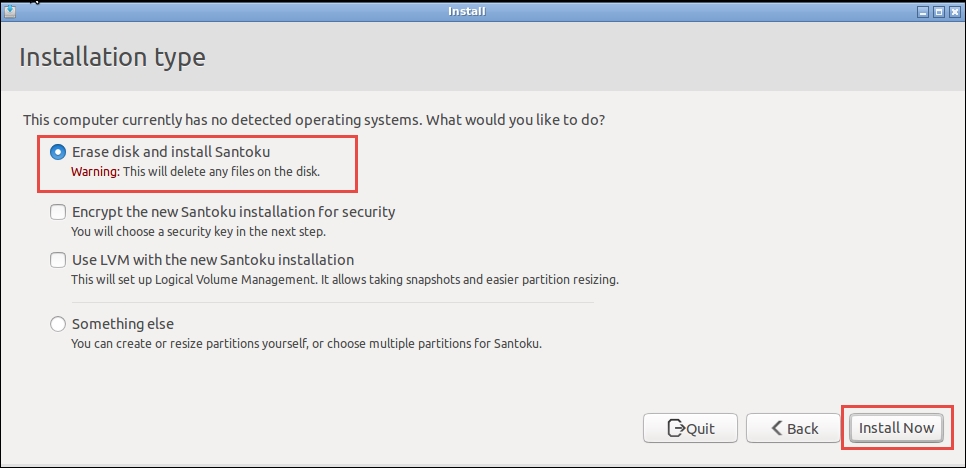
Choose your language and click on Continue; on the Installation type screen, select Erase disk and install Santoku, and click on Install Now as follows:
Choose your time zone and keyboard layout, user name and password settings, and click on Continue. After the installation is complete, reboot when prompted and then log in using the username and password you created during the installation process.
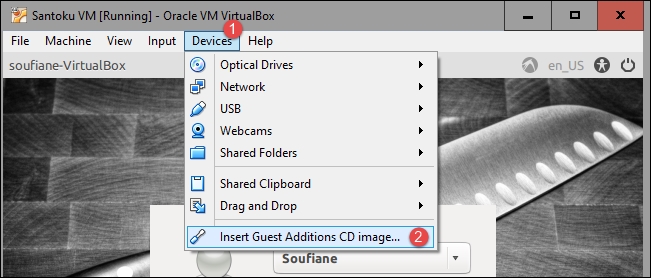
The last step that remains is installing VirtualBox Guest Additions; this is an optional step that will improve the VM graphic, shared folders, and offers other features. Click on Devices | Insert Guest Additions CD image…:
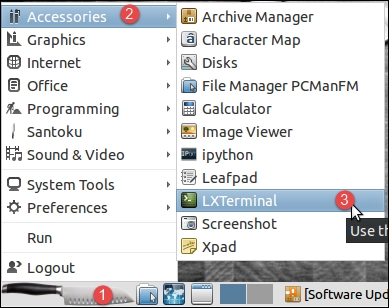
If asked for authentication, type in the password you created during the installation process, click on OK, and close the Removable media detection window that appears. Next, open a terminal window by navigating to Accessories | LXTerminal or simply press Ctrl + Alt + T on the keyboard:
Execute the install script by running the following command:
sudo sh /media/username/VBOXADDITIONS_5.0.16_105871/VBoxLinuxAdditions.run
You will need to enter the administrator password, which you set up during installation. In the preceding command, swap username with the username you are logged in with, and in VBOXADDITIONS_5.0.16_105871 the version following VBOXADDITIONS may be different:

Optionally, you can update local packages index by typing the following command:
sudo apt-get update
After the command is completed, upgrade the packages by typing the following command:
Sudo apt-get upgrade
If asked to continue, type y and hit Enter.
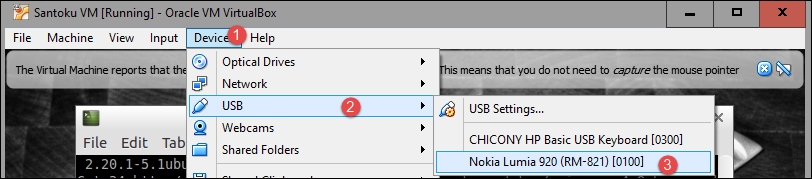
The Santoku Linux VM is now operational; if you want to connect a mobile device to it, click on Devices | USB and select a detected device, as you can see from the following screenshot:
Do not hesitate to visit https://santoku-linux.com/howtos/ to get familiar with the environment and tools it offers.
Obviously, Santoku is not the only option. SANS Institute published a white paper entitled Building a Low Cost Forensics Workstation (https://www.sans.org/reading-room/whitepapers/incident/building-cost-forensics-workstation-895), which describes the requirements for a low cost forensics workstation that can be used in electronic investigations, and they offer a free Linux distribution dedicated to incident response and digital forensics called SANS Investigative Forensic Toolkit (SIFT) Workstation Version 3 (https://digital-forensics.sans.org/community/downloads). SIFT is a very respectable and well-maintained distribution that includes a collection of various tools to aid you in performing forensics analysis tasks. You can find the whole documentation, user manual, tools, commands, and scripts at https://sift.readthedocs.org/en/latest/.
In addition to Santoku and SIFT, CAINE (Computer Aided INvestigative Environment) is another Linux-based distribution that offers an interesting forensic environment and is available at http://www.caine-live.net/.