
XenApp 6.5 can of course provide remote access to applications; however, besides this, XenApp can publish server desktops and resources such as web pages and documents. In this section, we will cover publishing these resources using both AppCenter and PowerShell.
AppCenter is installed along with the XenApp server; however, if required, it can be installed onto a client machine.
Often AppCenter is run remotely by administrators who connect to the XenApp server's desktop. Use the following path to run AppCenter:
Start | Administrative Tools | Citrix | Management Consoles | Citix AppCenter
The first time the console is run, it is necessary to discover the farm. We can do this by selecting to add the local computer (this is usual if we are running AppCenter on the XenApp Server). Ensure that we only discover XenApp, and not Single Sign-on (SSO) servers.
If connecting remotely from AppCenter to XenApp, instead of discovering the local computer, we would add the IP address of any XenApp Server in the farm and ensure we have connectivity on TCP port 2513.
When users connect to the Web Interface server, they are presented with a list of applications that they may access. To create published applications with AppCenter:
If you want an application to appear in the list, it must be "published". Navigating to the Application node of AppCenter, we can use the right-click menu and select the option Publish Application. As we run through the wizard, for our example, we will choose to publish
notepad.exe.Set the application name.
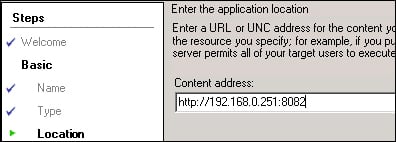
Set the application type by selecting Application | Accessed from a Server | Installed application. Applications can be installed or streamed to servers. We can see from the following screenshot the application type page from the wizard:

As the wizard continues, we choose the remaining options as follows:
Set the executable's name and location.
Set the servers that will host the application. This could be a list of server names from the farm, or the assignment could be to a group of servers known as a worker group.
Assign user access to the application by selecting, most usually, domain groups on the users page of the wizard.
Finally, we can choose to add the application to folders either on the web page or start menu depending on the type of access.
The properties that we set here are the basic properties, and once set, the application can be published immediately.
Besides using the GUI AppCenter, it is also possible to add and configure published applications with PowerShell. The following steps will guide you to do the same:
The PowerShell modules are installed along with the XenApp Server, but as with AppCenter, it can be added to client machines if required.
If it is required to install the snap-ins independently to XenApp, we would navigate the installation DVD to the
<INSTALLDVD>:\Administration\Delivery Services Console\setupfolder. From theCitrix.XenApp.Commands.Client.Install_x86folder we can install the snap-ins for a 32-bit platform and fromCitrix.XenApp.Commands.Client.Install_x64for the 64-bit architecture.Once we have a PowerShell prompt open, we will need to load the required snap-in:
Add-PSSnapin Citrix.XenApp.CommandsWith the snap-in loaded, we create the new application:
New-XAApplication -BrowserName Notepad -ApplicationType ServerInstalled -DisplayName Notepad -CommandLineExecutable "notepad.exe" -ServerNames XA1The application can be associated with users with the following PowerShell command:
Add-XAApplicationAccount Notepad "Example\Domain Users"Finally, the application will need to be enabled with this last line of code:
Set-XAApplication Notepad -Enabled $true
If required, users can access a server desktop. For this, the application type would be set to Server Desktop.
By default, only administrators are allowed access to published desktops in XenApp. For other users, this can be enabled using Citrix Group Policies as shown in the following screenshot from a Citrix User Policy (Group Policies are covered in more detail later):

The published content can be web URL or files on network shares accessible by the client from the XenApp Server. The content may be in the form of PDF documentation or in the form of access to intranet sites that the users will need access to. We can see from the following screenshot that we can provide shortcuts to web resources such as the licensing server web console:
You will soon note that launching an application for the first time takes a little time as the client device has to establish a session on the server. This involves running login scripts, evaluating policies, and loading the user's profile. Once the session is established, other applications launch more quickly on the same server as they share the existing session.
The session exists until the user logs out from all applications. When accessing applications using the Web Interface Services Site with the Citrix Receiver, it is possible to configure session prelaunch. This is achieved by creating a prelaunch application from one of our published applications. When a user logs onto the receiver, a session is then created for him/her immediately or at a scheduled time. This gives faster access to the applications as the session pre-exists.
Note
A user license is used as soon as the user logs on onto the Receiver, not just when they launch apps.
To create a prelaunch application, right-click on an existing application and from the context menu select Other Tasks | Create pre-launch application, as shown in the following screenshot:

We are now ready to test the connection and we will connect to the Web Interface Web Site.
Note
The Web Interface Services Site is for direct connections from the Citrix Receiver; the Web Interface Web Site is used by the web browser and online plugins.
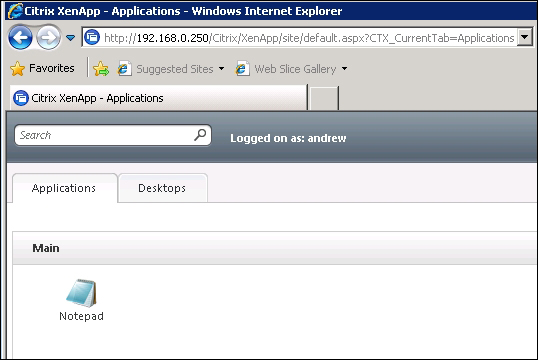
The default Web Site will be http://<yourwebinterfaceserver>/Citrix/XenApp. You will be prompted for your username and password, and possibly your domain name. Once authenticated, you can see a list of your applications associated with your login, content, and desktops. From the following screenshot, we can see the published application, that is, Notepad: