

The ThinApp utilities folder is installed in C:\Program Files\VMware\VMware ThinApp by default. Only the ThinApp packagers need access to the ThinApp utilities folder - end users never need access to it. If desired, you can move this folder to a network share and run all the tools from there. The ThinApp utilities are virtualized using ThinApp so the folder is just as portable as any ThinApp package. Placing the folder on a network share makes it easier to access the tools from any machine. Often when packaging, you are using virtual machines and reverting the virtual machines to clean states between each capture. Having the ThinApp utilities folder on a network share will make them easier to maintain. Changing the version of ThinApp used does not require a new snapshot of your virtual machine. Another benefit is that all your packager colleagues can share one and the same ThinApp utilities folder and settings.
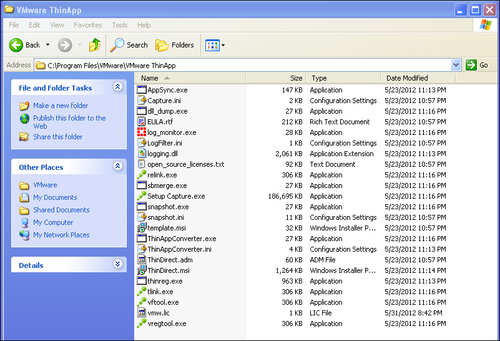
Default location of the ThinApp utilities Folder.
If you don't place the ThinApp utilities folder in the default location, you should make sure that you specify an environment variable called THINSTALL_BIN pointing to the ThinApp utilities folder. This way the build.bat file will find the location of the tools needed while building your project folder. Using the THINSTALL_BIN environment variable allows you to have multiple versions of the ThinApp utilities folder present. You can switch between active folders by simply changing the value of the environment variable.
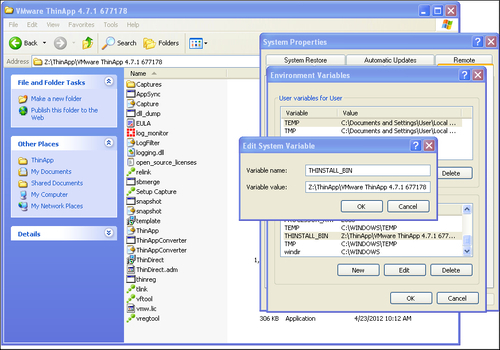
Specify the location of your ThinApp utilities folder with the help of the THINSTALL_BIN environment variable, as shown in the previous screenshot.
Let's have a look at some of the files you'll find within the ThinApp utilities folder. Most of them will be discussed in much more detail later in this book. The following are the files present:
AppSync.exeAppSync is one of the built-in update mechanisms within ThinApp. We will cover AppSync more in depth later in this book. Running AppSync.exe allows you to specify a package to AppSync and an AppSync URL, where the update is located, providing a more dynamic method of updating the deployed ThinApp packages than the AppSync you can configure using
package.ini.log_monitor.exe.The log monitor is a trace tool used to troubleshoot ThinApp packages.
Capture.iniandLogFilter.iniThese are filter files used to filter what is captured while running the log monitor.
relink.exeRelink is used to inject a new runtime, certain settings, and a license key into an existing package without the need to completely rebuild the whole project folder.
sbmerge.exeSbmerge stands for sandbox merge. It is a tool used by packagers to merge the content of a sandbox into an existing project folder. It is a great tool used to apply changes and updates to a project. Running
sbmerge.exewithout any switches will display thehelpfile.Setup Capture.exeSetup Capture is the tool used to capture an application installation and create a project folder. Within Setup Capture you can specify your license key and if you want to change the license key or "licensed to" name, you must change these within Setup Capture and then rebuild your project or run relink on the packages.
You change the license key and "Licensed to" information by launching Setup Capture, clicking on the top-left corner and choosing License, as shown in the following screenshot:

You are now shown the Enter License Key dialog box, as in the following screenshot:

Type in your license key and licensed display name. Click on OK and then Cancel in the Setup Capture main window. You have now successfully updated the license information. Simply rebuild your project to update your packages or run
relink.exe.snapshot.exeThis is the ThinApp snapshot tool. Running
snapshot.exefrom a command prompt allows you to capture an installation and create a project folder without running Setup Capture. Runningsnapshot.exewithout any switches will give you the fullhelpfile. The following procedure will create a project folder usingsnapshot.exe:Run the command
snapshot.exe c:\PreScan.snapshot.Install the application.
Run
snapshot.exe c:\PostScan.snapshot.Run
snapshot.exe c:\PreScan.snapshot -SuggestName c:\PostScan.snapshot.Run the command
snapshot.exe c:\PreScan.snapshot -Diff c:\PostScan.snapshot c:\ProjectFolder.Run
snapshot.exe c:\PreScan.snapshot -SuggestProject c:\PostScan.snapshot c:\OutputTemplate.ini.Run
snapshot.exe c:\OutputTemplate.ini -GenerateProject c:\ProjectFolder.
snapshot.iniSnapshot.iniis the exclusion list used by Setup Capture andsnapshot.exe. Here you can specify parts of the operating system that should not be scanned during the capturing process. The defaults are implemented to keep your project from capturing unnecessary content. It's not recommended to have an antivirus software installed on your capturing machine, but if policy dictates that you must, you can use thesnapshot.inifile to exclude locations for the antivirus log files and such. This keeps the changes from being a part of the captured environment and thereby polluting your project folder.template.msiThinApp can generate an MSI file to simplify the deployment of the ThinApp packages. Using an MSI file will allow the use of any existing deployment tool to distribute ThinApp packages. The MSI files that ThinApp generates are supported by any tool supporting MSI files but are not normal MSI files. ThinApp supports MSI files greater than 2 GB without the use of CAB files. This is accomplished with the help of virtualization within the MSI itself. You cannot use tools such as Orca to modify the MSI properties, since it will destroy the content of the MSI when saved. In order to change the MSI that ThinApp generates, you have to tweak the
template.msifile instead. Changes applied to thetemplate.msi(using Orca or any other tool) file will be incorporated into the MSI files that ThinApp generates.ThinApp.iniThinApp.inicontains the Setup Capture user settings, for example, the options to build or skip build at the end of the capture process.ThinAppConverter.exeandThinAppConverter.iniThinApp Converter is a tool introduced in Version 4.6. With the help of ThinApp Converter and its configuration file
ThinAppConverter.ini, you can automate the capturing process. This was an early version of automation and is more or less replaced with the tool called ThinApp Factory. ThinApp Converter drives the capture process by running virtual machines hosted on ESX or VMware Workstation.ThinAppConverter.iniis pretty much the only documentation available for this tool. There are third-party tools using ThinApp Converter to automatically convert installers into ThinApp project format. Quest ChangeBASE is one such tool using ThinApp Converter.ThinDirect.msiandThinDirect.admThinDirect is a browser helper you install locally on your client. It will add itself as a browser helper to your local Internet Explorer and allows for automated redirection of URLs to specific packaged browsers.
ThinDirect.msiis the standalone installer you use to deploy the browser helper.ThinDirect.admis used to add Group Policy Management to your ThinDirect implementation.ThinDirect.admincludes five different browsers and 25 different URLs for each one. You can change the amount of supported browsers or URLs simply by editing the file in a text editor.thinreg.exeThinreg.exeis a standalone tool that you can copy to any location. Most of the other tools in the ThinApp utilities must reside within the ThinApp utilities folder to function.Thinreg.exeis used to register a package on a client machine, offering the look and feel of a locally-installed application. By registering a package, you can add shortcuts onto your desktop or the Start menu and you can register file extensions, protocols, and object types to a package. Runthinreg.exewithout any arguments for thehelpfile.tlink.exe,vftool.exe, andvregtool.exetlink.exe,vftool.exe, andvregtool.exeare all used to compile your project folder into a virtualized package.Build.batcalls these files.Vregtool.execan also be used to investigate the registry changes located in the sandbox. Runningvregtool.exewithout any switches will show you thehelpfile.