

In simple applications like the one we're creating in this chapter, most of the Backbone code that we write will be in views. I think it's fair to say that views can be the most challenging part of a Backbone app, because there are so many ways that almost everything can be done.
It's important to understand that a Backbone.View instance and a screen full of web apps aren't the same thing. One view in the browser may actually be many Backbone views. The first view that we want to create is a list of all the posts; these will be links to individual post pages. We could do this in two ways: as one big view or as multiple smaller views put together. In this instance, we're going to be using multiple views. Here's how we'll break it down: each list item will be generated by its own view instance. Then, the wrapper around the list items will be another view. You can picture it as looking something like this:
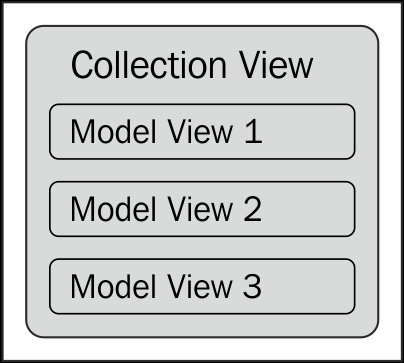
Let's start with the child views. We'll call this PostListView class. Naming views can be a little tricky. Often, we'll have a view for the collection and a view for the model, and we'll just append View to the end of their names, for example, PostView and PostsView. However, a model or collection will have multiple views. The one we're about to write is to list our models. That's why we're calling it PostListView:
var PostListView = Backbone.View.extend({
  tagName: "li",
  template: _.template("<a href='/posts/{{id}}'>{{title}}</a>"),
  render: function () {
    this.el.innerHTML = this.template(this.model.toJSON());
    return this;
  }
});
Just like Backbone.Model and Backbone.Collection, we create a view class by extending Backbone.View. We have three properties in the extending object that make up our PostListView. The first one to look at is the template property; this property holds the template that our view will render. There are plenty of ways to create a template; in this case, we're using the Underscore's template function; we pass a string to _.template, and it returns a function which we can use to generate the correct HTML. Take a look at this template string: it's regular HTML with variables placed within double curly braces.
Next, let's look at the render method. By convention, this is the method that we call to actually render the view. Every view instance has a property named el. This is the base element for the view instance: all other elements for this view go inside it. By default, this is a div element, but we've set the tagName property to li, which means we'll get a list item instead. By the way, there's also a $el property, which is a jQuery object wrapping the el property; this only works if we have jQuery included in our application.
So, inside our render function, we need to fill in this element. In this case, we'll do that by assigning the innerHTML property. To get the HTML output, we use the template we just wrote. That's a function, so we call it, and pass this.model.toJSON(). The this.model portion comes from when we instantiate this view: we'll pass it a model. Every model has a toJSON method, which returns a raw object with just the attributes of the model. Since our model will have the id and title attributes, passing this to our template function will return a string with those values interpolated into the template string we wrote.
We end our render function by returning the view instance. Again, this is just convention. Because of this, we can use the convention where we get the element for this view via view.render().el ; this will render the view and then get the el property. Of course, there's no reason you couldn't return this.el directly from render.
There's one more thing to address here, but it's about Underscore and not Backbone. If you've used the Underscore's template function before, you know that curly braces aren't its normal delimiters. I've switched from the default <%= %> delimiters, because those are the delimiters for our server-side template engine. To change Underscore's delimiters, just add the following code snippet to the top of our app.js file:
_.templateSettings = {
  interpolate: /\{\{(.+?)\}\}/g
};
Of course, you realize that we could make the delimiters whatever we want, as long as a regular expression can match it. I like the curly braces.
Now that we have the view for our list items, we need the parent view that wraps those list items:
var PostsListView = Backbone.View.extend({
  template: _.template("<h1>My Blog</h1><ul></ul>"),
  render: function () {
    this.el.innerHTML = this.template();
    var ul = this.$el.find("ul");
    this.collection.forEach(function (post) {
      ul.append(new PostListView({
        model: post
      }).render().el);
    });
    return this;
  }
});
As views go, this is pretty simple, but we can learn a few new things from it. First, you'll notice that our template doesn't actually use any variables, so there's no reason for us to actually use a template. We could directly assign that HTML string as this.el.innerHTML; however, I like to do the little template dance anyway because I might change the template string to include some variables in the future.
Notice the second line of the render function: we're finding an ul element; the same ul element that we just made as a child element of our root element, this.el. However, instead of using this.el, we're using this.$el.
Next, we're looping over each item in the collection that we'll associate with this view (when we instantiate it). For each post in the collection, we will create a new PostListView class. We pass it an options object, which assigns the view's model as the current post. Then, we render the view and return the view's element. This is then appended to our ul object.
We'll end by returning the view object.