

In the previous chapter, we created a custom Magento 2.0 theme called CompStore. However, what do you think about extending our Magento expertise by creating our own extension? In this chapter, we will create a new extension called TweetsAbout, add a brand new functionality in our theme, learn the main concepts of Magento extension development, and take a look at how the extension packaging process works.
The following topics will be covered in this chapter:
- Magento development overview
- The Zend framework basics
- The Magento 2.0 extension structure
- The Twitter REST API
- Twitter OAuth
- Magento extension project – TweetsAbout
Magento is an MVC-based application divided into modules. Each module has a specific job inside Magento, following a mature software pattern. For example, Magento has a specific module to control product shipping. This kind of approach is very important to create new functionalities and have the flexibility and modularity to extend its power.
According to Zend Framework Case Study available at https://www.zend.com/topics/Magento-CS.pdf, the Magento project chose to go with industry-standard PHP and the Zend framework because of the extremely simple, object-oriented, and flexible solution that encapsulates best practices and agile testing methodologies and that would result in a very rapid development of enterprise-grade web applications.
Using the Zend framework as the main pillar in the Magento project definitely includes the following advantages:
- Magento contributors around the world know the Zend framework
- There is great web services support to integrate Magento with different software solutions in order to share data
- The MVC design pattern helps organize project development
With the Zend framework, Magento has great flexibility in creating and customizing modules, developing new features for the system, and maintaining the core code.
A basic understanding of Zend components could be interesting for developers to take advantage of this great MVC framework.
You can learn more about Zend framework at http://framework.zend.com/.
Magento 2.0 is a modular system as you can see. That is why it is important to maintain all the code organized, and it couldn't be different with Magento extensions. In previous chapters you saw all the directory structure of Magento, but now let's give special attention to the basic Magento module file structure:

In order to create a new extension according to the preceding image, we must create the same directory structure. However, how will they interact with the Magento system?
Some of these directories have an important role to play in the Magento system. They are directories that are responsible for providing basic functionalities and coupling between modules and the Magento system:
Block: Blocks are View classes that are responsible for providing visualization layers between the logical and frontend layer.Controller: These control all the actions of the Magento. Web servers process the requests and Controller redirects them to specific modules according to the URL.etc: This stores all the module XML configuration files.Helper: This stores auxiliary classes that provide forms, validators, and formatters, which are commonly used in business logic.Model: This stores all business logic and the access layer to the data.Setup: Setup classes are classes that control installation and upgrading functionalities.
The other directories support additional configurations and implementations of the module; these are as follows:
The files presented in the root directory are files on which you worked before. The LICENSES and README files are those available for extension distribution purposes.
Now, you have a general concept of creating a new extension for Magento. As a scenario to our development, we will create a simple extension called TweetsAbout to communicate with Twitter via the API and get the latest tweets with the #magento, #packtpub, and #php hashtags.
We will have two simple pages; the first will show a link to the results, and the second will show the tweets.
Let's get to work!
Representational State Transfer (REST) is an architecture created to provide a simple communication channel between different applications over the Internet using mainly the HTTP protocol. It is the hottest data technology nowadays. Facebook, Google, Twitter, and a lot of huge companies have adopted REST applications. With REST APIs, you can read, post, and delete data.
Twitter has a specific format to spread its data on the Web in order to create great integration with different kinds of applications that consume its service. According to Twitter Developers Documentation available at https://dev.twitter.com/rest/public, Twitter REST APIs provide programmatic access to read and write Twitter data. You can author a new Tweet, read an author profile or follower data, and more. The REST API identifies Twitter applications and users using Oauth, and the responses are available in JSON.
Before beginning to code the Magento extension, let's create an account on Twitter Developer to authenticate our new application on the Twitter platform.
Create a new account in Twitter (https://twitter.com/) if you don't have one and access the Twitter Developer page (https://dev.twitter.com/), as in the following screenshot:

We have a lot of options on the developer's website, such as gathering real-time data, crashlytics, and mopub. I strongly suggest that you take a good look at these tools later.
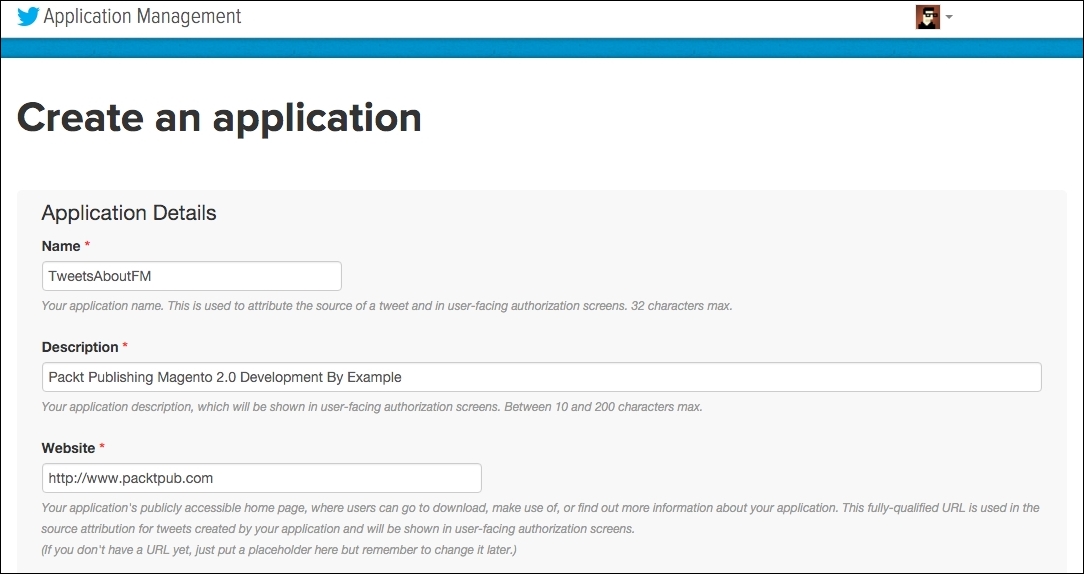
So, let's create a new application to consume Twitter services. Access the URL https://apps.twitter.com/ to create a new Twitter application. In order to use Twitter's public API services, you need to identify your application by generating a token and a secret key.
You can create a new application by clicking on the Create New App button and filling in the form with the following required fields:
- Name: Choose a unique name for your app
- Description: Describe your app
- Website: Provide a personal website/URL
Accept the Developer Agreement to finish your app registration and click on the Create your Twitter Application button.
You can access your application's configurations by clicking on the name of your application. Later on in this chapter, we will discuss how to get the right credentials to integrate our application with Twitter.
Now, we can finally start our Magento 2.0 extension solution.

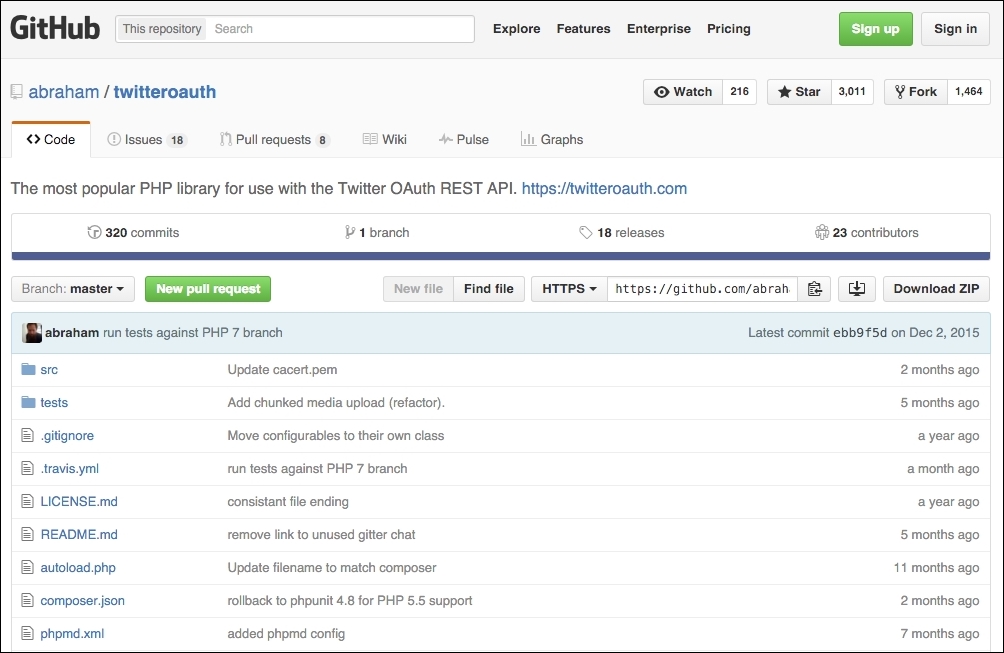
The TwitterOAuth (https://twitteroauth.com/) library provides communication with Twitter via an API. In the TweetsAbout project, this kind of communication is essential for the final proposal of our extension solution. TwitterOAuth is the most popular PHP library to use with the TwitterOAuth REST API.
This project is also available on GitHub (https://github.com/abraham/twitteroauth), as shown in the following screenshot:
To install TwitterOAuth on the TweetsAbout extension, follow this recipe:
- Open the terminal or command prompt.
- Under the
packt/app/code/Packt/TweetsAbout/Apidirectory, run thecomposer require abraham/twitteroauthcommand. - Access https://apps.twitter.com/, click on your application, and click on the Keys and Access Tokens tab to get the following:
- Consumer Key (API Key)
- Consumer Secret (API Secret)
- Access Token
- Access Token Secret
We'll need these credentials to use on our extension later.
To start the module development, we will declare the basic module configurations. Open your favorite code editor, create a new file called module.xml, and save the file in app/code/Packt/TweetsAbout/etc. Enter this code in the file:
<?xml version="1.0"?>
  <config xmlns:xsi="http://www.w3.org/2001/XMLSchema-instance" xsi:noNamespaceSchemaLocation="urn:magento:framework:Module/etc/module.xsd">
      <module name="Packt_TweetsAbout" setup_version="2.0.0"/>
  </config>
Magento 2.0 works with Uniform Resource Names (URN) schema validation to reference XML declarations, as you can observe in the <config> tag. The module.xsd file works by validating whether your module declaration follows the module declaration schema.
The <module> tag contains the vendor and module name. Always follow this example of module name declaration: Vendor_Module.
Under app/code/Packt/TweetsAbout/etc/frontend, create two new files, as follows:
routes.xmlevents.xml
The routes.xml file contains the following code:
<?xml version="1.0"?>
<config xmlns:xsi="http://www.w3.org/2001/XMLSchema-instance" xsi:noNamespaceSchemaLocation="urn:magento:framework:App/etc/routes.xsd">
    <router id="standard">
        <route id="tweetsabout" frontName="tweetsabout">
            <module name="Packt_TweetsAbout" />
        </route>
    </router>
</config>
The routes.xml file tells Magento where to look for the controllers (TweetsAbout/Controller) when the URL http://localhost/packt/tweetsabout is accessed (MVC).
The events.xml file contains the following code:
<?xml version="1.0"?>
<config xmlns:xsi="http://www.w3.org/2001/XMLSchema-instance" xsi:noNamespaceSchemaLocation="urn:magento:framework:Event/etc/events.xsd">
    <event name="page_block_html_topmenu_gethtml_before">
        <observer name="Packt_TweetsAbout_observer" instance="Packt\TweetsAbout\Observer\Topmenu" />
    </event>
</config>
The events.xml file declares an Observer event handler in the module, and this file has the mission of configuring a new TweetsAbout top menu link to access the module in the frontend. Observer listens to events triggered by the user or system. The <event> tag gets basic information of the top menu Block to be handled later in the PHP code, and the <observer> tag declares the Topmenu observer class. In this chapter, we will take a look at how the Topmenu class works. For now, it's important to declare this option.
For further information about Observer, access the Magento official documentation at http://goo.gl/0CTzmn.
Now, it is time to create the registration.php file under the root directory of TweetsAbout. Run the following code:
<?php
\Magento\Framework\Component\ComponentRegistrar::register(
    \Magento\Framework\Component\ComponentRegistrar::MODULE,
    'Packt_TweetsAbout',
    __DIR__
);
The registration.php file has the same role as that of theme registration in Magento System.
Create the composer.json file under the root directory of TweetsAbout via the following code:
{
  "name": "packt/tweets-about",
  "description": "Example of Magento Module - Packt Publishing",
  "type": "magento2-module",
  "version": "1.0.0",
  "license": [
    "OSL-3.0",
    "AFL-3.0"
  ],
  "require": {
    "php": "~5.5.0|~5.6.0|~7.0.0",
    "magento/framework": "~100.0",
    "abraham/twitteroauth": "^0.6.2"
  },
  "autoload": {
    "files": [ "registration.php" ],
    "psr-4": {
      "Packt\\TweetsAbout\\": ""
    }
  },
  "extra": {
        "installer-paths": {
            "app/code/Packt/TweetsAbout/Api": ["abraham/twitteroauth"]
        }
    }
}
You can observe in the composer.json file the declaration of the TwitterOAuth project as a required package to our extension. Also, the file defines the installation directory.
You can copy the LICENSE.txt and LICENSE_AFL.txt files from the Magento root directory to your Packt/TweetsAbout directory. The README.md file is responsible for storing information about the module's scope and some considerations for the purposes of publishing on GitHub (http://github.com/). You can feel free to create the README.md file as you wish.
For now, we have the module declaration and registration files. It's time to create the controllers to start giving some life to the TweetsAbout module.
First, let's create a new file named Index.php. This file will control the access to the initial page of the module. Save it under app/code/Packt/TweetsAbout/Controller/Index/ with the following code:
<?php

  namespace Packt\TweetsAbout\Controller\Index;

  class Index extends \Magento\Framework\App\Action\Action{

      protected $resultPageFactory;

      public function __construct(
          \Magento\Framework\App\Action\Context $context,
          \Magento\Framework\View\Result\PageFactory $resultPageFactory
      ) {
          $this->resultPageFactory = $resultPageFactory;
          parent::__construct($context);
      }

      public function execute(){
          return $this->resultPageFactory->create();
      }
  }
Create another file named Index.php under app/code/Packt/TweetsAbout/Controller/Magento/. This file will control the access to the Magento Tweets page of the module. Save it with the following code:
<?php

  namespace Packt\TweetsAbout\Controller\Magento;

  class Index extends \Magento\Framework\App\Action\Action{

      protected $resultPageFactory;

      public function __construct(
          \Magento\Framework\App\Action\Context $context,
          \Magento\Framework\View\Result\PageFactory $resultPageFactory
      ) {
          $this->resultPageFactory = $resultPageFactory;
          parent::__construct($context);
      }

      public function execute(){
          return $this->resultPageFactory->create();
      }
  }
Create another file named Index.php under app/code/Packt/TweetsAbout/Controller/Packt/. This file will control the access to the Packt tweets page of the module. Save it with the following code:
<?php

  namespace Packt\TweetsAbout\Controller\Packt;

  class Index extends \Magento\Framework\App\Action\Action{

      protected $resultPageFactory;

      public function __construct(
          \Magento\Framework\App\Action\Context $context,
          \Magento\Framework\View\Result\PageFactory $resultPageFactory
      ) {
          $this->resultPageFactory = $resultPageFactory;
          parent::__construct($context);
      }

      public function execute(){
          return $this->resultPageFactory->create();
      }
  }
Create another file named Index.php under app/code/Packt/TweetsAbout/Controller/Php/. This file will control the access to the PHP tweets page of the module. Save it with the following code:
<?php

  namespace Packt\TweetsAbout\Controller\Php;

  class Index extends \Magento\Framework\App\Action\Action{
      protected $resultPageFactory;

      public function __construct(
          \Magento\Framework\App\Action\Context $context,
          \Magento\Framework\View\Result\PageFactory $resultPageFactory
      ) {
          $this->resultPageFactory = $resultPageFactory;
          parent::__construct($context);
      }

      public function execute()
      {
          return $this->resultPageFactory->create();
      }
  }
Magento 2.0 uses namespaces as a PHP standard recommendation (http://www.php-fig.org/psr/) to avoid name collisions between classes and to improve the readability of the code. So, in the namespace instruction, we will declare the class path to follow the PSR-4 pattern (http://www.php-fig.org/psr/psr-4/).
The extends functionality (inheritance) of \Magento\Framework\App\Action\Action provides a functionality to handle actions triggered by the URL access. For example, when the user enters the URL http://<magento_url>/tweetsabout, the routes.xml file redirects to the Index/Index.php controller to treat the user request made by accessing the URL.
The dependency injection of the __construct() method—\Magento\Framework\App\Action\Context $context and \Magento\Framework\View\Result\PageFactory $resultPageFactory—declares the initial construct of the Action class and the view layer to work with the template file.
Note
For further information about the dependency injection, access the Magento official documentation at http://goo.gl/jHFPTr.
Finally, the execute() method renders the layout. We will declare the layout files later on.
At this point, it's important to be familiar with PHP object-oriented programming (http://php.net/manual/en/language.oop5.php). I strongly suggest that you study the main concepts to increase the understanding of the book.
Blocks in Magento 2.0 provide presentation logic for your view templates. In the TweetsAbout project, we will use two blocks to process the view template files.
Under the app/code/Packt/TweetsAbout/Block directory, create a file named Index.php with the following code:
<?php

  namespace Packt\TweetsAbout\Block;

  class Index extends \Magento\Framework\View\Element\Template{

      public function getMagentoUrl(){
          return $this->getData('urlMagento');
      }

      public function getPHPUrl(){
          return $this->getData('urlPHP');
      }

      public function getPacktUrl(){
          return $this->getData('urlPackt');
      }
  }
The three methods, getMagentoUrl(), getPHPUrl(), and getPacktUrl(), get data from layout declaration files to define a URL for each kind of controller and give it to the initial layout of the module.
Now, under the app/code/Packt/TweetsAbout/Block directory, create a file named Tweets.php with the following code:
<?php
  namespace Packt\TweetsAbout\Block;

  require $_SERVER['DOCUMENT_ROOT'] . "/packt/app/code/Packt/TweetsAbout/Api/vendor/autoload.php";
  use Abraham\TwitterOAuth\TwitterOAuth;

  class Tweets extends \Magento\Framework\View\Element\Template{

      private $consumerKey;
      private $consumerSecret;
      private $accessToken;
      private $accessTokenSecret;

    public function searchTweets(){
      $connection = $this->twitterDevAuth();
      $result = $connection->get("search/tweets", array("q" =>$this->getData('hashtag'), "result_type"=>"recent", "count" => 10));

      return $result->statuses;
    }

    private function twitterDevAuth(){
      $this->consumerKey = YOUR_CONSUMER_KEY;
      $this->consumerSecret = YOUR_CONSUMER_SECRET;
      $this->accessToken = YOUR_ACCESS_TOKEN;
      $this->accessTokenSecret  = YOUR_ACCESS_TOKEN_SECRET;

      return new TwitterOAuth($this->consumerKey, $this->consumerSecret, $this->accessToken, $this->accessTokenSecret);
    }
  }
Here are some things to consider about the Tweets.php code:
- The required instruction is to call the autoload, and the use is to append the namespace of the
TwitterOAuthlibrary to work on our extension - In the
twitterDevAuth()method, you must enter the Twitter API credentials - In the
searchTweets()method, the$connection->get("search/tweets", array("q" =>$this->getData('hashtag'), "result_type"=>"recent", "count" => 10))instruction works with the Twitter search API, getting the last 10 results of Twitter posts
Under the app/code/Packt/TweetsAbout/Observer directory, create the Topmenu.php file with the following code:
<?php
namespace Packt\TweetsAbout\Observer;
use Magento\Framework\Event\Observer as EventObserver;
use Magento\Framework\Data\Tree\Node;
use Magento\Framework\Event\ObserverInterface;

class Topmenu implements ObserverInterface{

    /**
     * @param EventObserver $observer
     * @return $this
     */
    public function execute(EventObserver $observer)
    {

      $urlInterface = \Magento\Framework\App\ObjectManager::getInstance()->get('Magento\Framework\UrlInterface');

      $active = strpos($urlInterface->getCurrentUrl(), "tweetsabout");


        /** @var \Magento\Framework\Data\Tree\Node $menu */
        $menu = $observer->getMenu();
        $tree = $menu->getTree();
        $data = [
            'name'      => __("TweetsAbout"),
            'id'        => 'tweetsmenu',
            'url'       => $urlInterface->getBaseUrl() . 'tweetsabout',
            'is_active' => $active
        ];
        $node = new Node($data, 'id', $tree, $menu);
        $menu->addChild($node);
        return $this;
    }
}
The Topmenu.php file dynamically creates a new top menu item for the TweetsAbout module by adding a node in the top menu link schema. The \Magento\Framework\App\ObjectManager::getInstance()->get('Magento\Framework\UrlInterface') instruction gets the base URL and the current URL to create a specific link to the TweetsAbout module. The Topmenu observer works with the Document Object Model (DOM) concept of nodes and trees dynamically.
It's time to handle the presentation layer of the project. First, we will create the layout files (.xml) to handle template behavior and to pass arguments to the template via blocks. Every layout file is assigned by following this pattern: <module_name>_<controller>_<controller_file>.xml. This pattern allows the Magento system to assign the correct files according to its controller automatically.
Under the app/code/Packt/TweetsAbout/view/frontend/layout path, create the tweetsabout_index_index.xml file with the following code:
<?xml version="1.0"?>
<page xmlns:xsi="http://www.w3.org/2001/XMLSchema-instance" layout="1column" xsi:noNamespaceSchemaLocation="urn:magento:framework:View/Layout/etc/page_configuration.xsd">
    <head>
        <title>
            TweetsAbout Module
        </title>
    </head>
    <body>
        <referenceContainer name="content">
            <block class="Packt\TweetsAbout\Block\Index" template="Packt_TweetsAbout::index.phtml">
                <arguments>
                    <argument name="urlMagento" xsi:type="url" path="tweetsabout/magento" />
                    <argument name="urlPHP" xsi:type="url" path="tweetsabout/php" />
                    <argument name="urlPackt" xsi:type="url" path="tweetsabout/packt" />
                </arguments>
            </block>
        </referenceContainer>
    </body>
</page>
The <block> tag binds the Index.php Block to the index.phtml template, and the <arguments> tag transports three URL parameters to the Block. These parameters will be used in the index.phtml file.
Under the app/code/Packt/TweetsAbout/view/frontend/layout path, create the tweetsabout_magento_index.xml file with the following code:
<?xml version="1.0"?>
<page xmlns:xsi="http://www.w3.org/2001/XMLSchema-instance" layout="1column" xsi:noNamespaceSchemaLocation="urn:magento:framework:View/Layout/etc/page_configuration.xsd">
    <head>
        <title>
            TweetsAbout #Magento
        </title>
        <css src="Packt_TweetsAbout::css/source/module.css"/>
    </head>
    <body>
        <referenceContainer name="content">
            <block class="Packt\TweetsAbout\Block\Tweets" template="Packt_TweetsAbout::tweets.phtml">
                <arguments>
                    <argument name="hashtag" xsi:type="string">#magento</argument>
                </arguments>
            </block>
        </referenceContainer>
    </body>
</page>
Under the app/code/Packt/TweetsAbout/view/frontend/layout path, create the tweetsabout_packt_index.xml file with the following code:
<?xml version="1.0"?>
<page xmlns:xsi="http://www.w3.org/2001/XMLSchema-instance" layout="1column" xsi:noNamespaceSchemaLocation="urn:magento:framework:View/Layout/etc/page_configuration.xsd">
    <head>
        <title>
            TweetsAbout #Packtpub
        </title>
        <css src="Packt_TweetsAbout::css/source/module.css"/>
    </head>
    <body>
        <referenceContainer name="content">
            <block class="Packt\TweetsAbout\Block\Tweets" template="Packt_TweetsAbout::tweets.phtml">
                <arguments>
                    <argument name="hashtag" xsi:type="string">#packtpub</argument>
                </arguments>
            </block>
        </referenceContainer>
    </body>
</page>
Under the app/code/Packt/TweetsAbout/view/frontend/layout path, create the tweetsabout_php_index.xml file with the following code:
<?xml version="1.0"?>
<page xmlns:xsi="http://www.w3.org/2001/XMLSchema-instance" layout="1column" xsi:noNamespaceSchemaLocation="urn:magento:framework:View/Layout/etc/page_configuration.xsd">
    <head>
        <title>
            TweetsAbout #PHP
        </title>
        <css src="Packt_TweetsAbout::css/source/module.css"/>
    </head>
    <body>
        <referenceContainer name="content">
            <block class="Packt\TweetsAbout\Block\Tweets" template="Packt_TweetsAbout::tweets.phtml">
                <arguments>
                    <argument name="hashtag" xsi:type="string">#php</argument>
                </arguments>
            </block>
        </referenceContainer>
    </body>
</page>
The <css> tag loads the CSS rules of the template. The <block> tag binds the Tweets.php Block to the tweets.phtml file. The <argument name="hashtag"> tag transports the hashtag parameter to the Tweets.php Block to search the latest mentions of the specific hashtag in the Twitter database.
Now, let's create the template files.
Under the app/code/Packt/TweetsAbout/view/frontend/templates path, create the index.phtml file with the following code:
<h2>Recent TweetsAbout: </h2>
<ul>
  <li>
    <a href="<?php echo $block->escapeHtml($block->getMagentoUrl()) ?>">
      <span><?php echo __('Magento')?></span>
    </a>
  </li>
  <li>
    <a href="<?php echo $block->escapeHtml($block->getPacktUrl()) ?>">
      <span><?php echo __('Packtpub')?></span>
    </a>
  </li>
  <li>
    <a href="<?php echo $block->escapeHtml($block->getPHPUrl()) ?>">
      <span><?php echo __('PHP')?></span>
    </a>
  </li>
</ul>
The $block object has access to the methods of Block/Index.php, and the URL of the pages build dynamically.
Under the app/code/Packt/TweetsAbout/view/frontend/templates path, create the tweets.phtml file with the following code:
<?php
  $tweets = $block->searchTweets();
?>

<?php foreach ($tweets as $tweet){ ?>
  <p class="tweet">
    <a href="<?php echo $tweet->user->url; ?>">
      <img src="<?php echo $tweet->user->profile_image_url; ?>" alt="profile">
    </a>
    <b>Created: </b><?php echo $tweet->created_at; ?>
    <br />
    <br />

    <a href="<?php echo isset($tweet->entities->urls[0]->url) ? $tweet->entities->urls[0]->url : "#"; ?>" target="_blank"><?php echo $tweet->text;?></a>

  </p>
  <hr />
<?php } ?>
The searchTweets() method loads tweets according to the URL accessed, and PHP processes the data to show the results to the user.
Under the app/code/Packt/TweetsAbout/view/frontend/web/css/source path, create the module.less file with the following code:
 .tweet {background-color: #878787; padding:15px; border:1px dotted}
.tweet a {color: #ffffff}
.tweet a:hover {text-decoration: underline;}To deploy the module, follow this recipe:
- Open the terminal or command prompt.
- Access the
packt/bindirectory. - Then, run the
php magento module:enable --clear-static-content Packt_TweetsAboutcommand. - Run the
php magento setup:upgradecommand. - Next, run the
php magento setup:static-content:deploycommand. - In some cases, it is necessary to give
writepermissions again to the directories.
If everything goes alright, when you access the URL http://localhost/packt, you will see one link for the TweetsAbout extension in the topmost menu. Just click on it to see how the extension works. Take a look at the following screenshot:
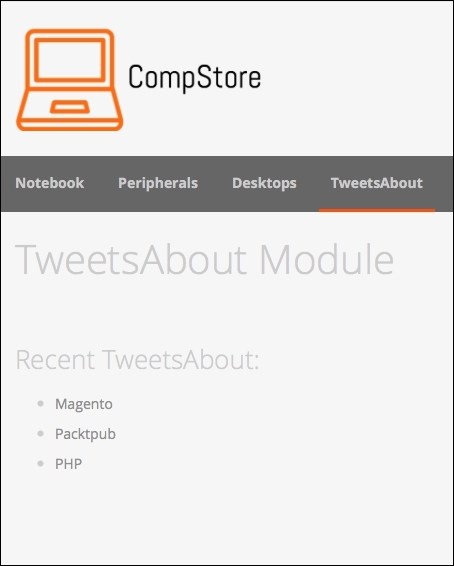
You can navigate to the links to see how the pages work, as in the following screenshot:
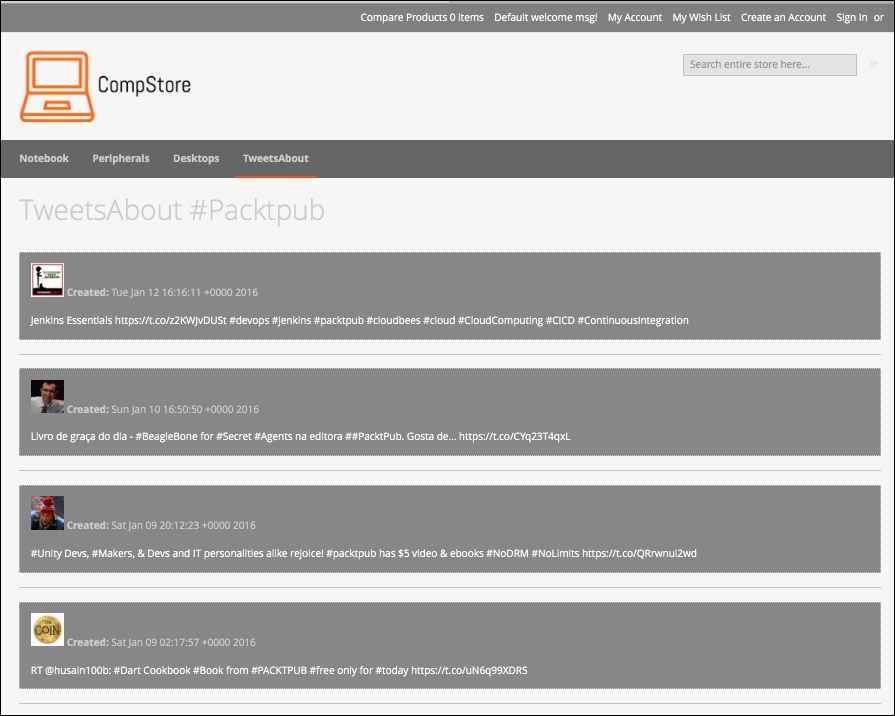
The extension gets the ten last tweets in real time with the date, picture, and post. It's really awesome to watch our work running!
For sure, this extension can get a lot better, but it is only a starting point for big achievements.
Once you have your extension ready to work, you can publish it in the Magento Connect service (http://www.magentocommerce.com/magento-connect). Magento Connect is a service in which Magento members can share their open source or commercial extensions with Magento Community. The main contributions are generally based on the following:
- Modules
- Language packs
- Design interfaces
- Themes
Once you have the composer.json file configured, you can package your module by compacting it as a .zip file in the vendor-name_package-name-1.0.0.zip format.
Upload the module in your personal account in GitHub, and Magento can retrieve it to publish.
For further information, it's strongly recommended that you to access the official documentation available on the Magento Developers official site at http://devdocs.magento.com/guides/v2.0/extension-dev-guide/package_module.html.
Controllers
First, let's create a new file named Index.php. This file will control the access to the initial page of the module. Save it under app/code/Packt/TweetsAbout/Controller/Index/ with the following code:
<?php

  namespace Packt\TweetsAbout\Controller\Index;

  class Index extends \Magento\Framework\App\Action\Action{

      protected $resultPageFactory;

      public function __construct(
          \Magento\Framework\App\Action\Context $context,
          \Magento\Framework\View\Result\PageFactory $resultPageFactory
      ) {
          $this->resultPageFactory = $resultPageFactory;
          parent::__construct($context);
      }

      public function execute(){
          return $this->resultPageFactory->create();
      }
  }
Create another file named Index.php under app/code/Packt/TweetsAbout/Controller/Magento/. This file will control the access to the Magento Tweets page of the module. Save it with the following code:
<?php

  namespace Packt\TweetsAbout\Controller\Magento;

  class Index extends \Magento\Framework\App\Action\Action{

      protected $resultPageFactory;

      public function __construct(
          \Magento\Framework\App\Action\Context $context,
          \Magento\Framework\View\Result\PageFactory $resultPageFactory
      ) {
          $this->resultPageFactory = $resultPageFactory;
          parent::__construct($context);
      }

      public function execute(){
          return $this->resultPageFactory->create();
      }
  }
Create another file named Index.php under app/code/Packt/TweetsAbout/Controller/Packt/. This file will control the access to the Packt tweets page of the module. Save it with the following code:
<?php

  namespace Packt\TweetsAbout\Controller\Packt;

  class Index extends \Magento\Framework\App\Action\Action{

      protected $resultPageFactory;

      public function __construct(
          \Magento\Framework\App\Action\Context $context,
          \Magento\Framework\View\Result\PageFactory $resultPageFactory
      ) {
          $this->resultPageFactory = $resultPageFactory;
          parent::__construct($context);
      }

      public function execute(){
          return $this->resultPageFactory->create();
      }
  }
Create another file named Index.php under app/code/Packt/TweetsAbout/Controller/Php/. This file will control the access to the PHP tweets page of the module. Save it with the following code:
<?php

  namespace Packt\TweetsAbout\Controller\Php;

  class Index extends \Magento\Framework\App\Action\Action{
      protected $resultPageFactory;

      public function __construct(
          \Magento\Framework\App\Action\Context $context,
          \Magento\Framework\View\Result\PageFactory $resultPageFactory
      ) {
          $this->resultPageFactory = $resultPageFactory;
          parent::__construct($context);
      }

      public function execute()
      {
          return $this->resultPageFactory->create();
      }
  }
Magento 2.0 uses namespaces as a PHP standard recommendation (http://www.php-fig.org/psr/) to avoid name collisions between classes and to improve the readability of the code. So, in the namespace instruction, we will declare the class path to follow the PSR-4 pattern (http://www.php-fig.org/psr/psr-4/).
The extends functionality (inheritance) of \Magento\Framework\App\Action\Action provides a functionality to handle actions triggered by the URL access. For example, when the user enters the URL http://<magento_url>/tweetsabout, the routes.xml file redirects to the Index/Index.php controller to treat the user request made by accessing the URL.
The dependency injection of the __construct() method—\Magento\Framework\App\Action\Context $context and \Magento\Framework\View\Result\PageFactory $resultPageFactory—declares the initial construct of the Action class and the view layer to work with the template file.
Note
For further information about the dependency injection, access the Magento official documentation at http://goo.gl/jHFPTr.
Finally, the execute() method renders the layout. We will declare the layout files later on.
At this point, it's important to be familiar with PHP object-oriented programming (http://php.net/manual/en/language.oop5.php). I strongly suggest that you study the main concepts to increase the understanding of the book.
Blocks in Magento 2.0 provide presentation logic for your view templates. In the TweetsAbout project, we will use two blocks to process the view template files.
Under the app/code/Packt/TweetsAbout/Block directory, create a file named Index.php with the following code:
<?php

  namespace Packt\TweetsAbout\Block;

  class Index extends \Magento\Framework\View\Element\Template{

      public function getMagentoUrl(){
          return $this->getData('urlMagento');
      }

      public function getPHPUrl(){
          return $this->getData('urlPHP');
      }

      public function getPacktUrl(){
          return $this->getData('urlPackt');
      }
  }
The three methods, getMagentoUrl(), getPHPUrl(), and getPacktUrl(), get data from layout declaration files to define a URL for each kind of controller and give it to the initial layout of the module.
Now, under the app/code/Packt/TweetsAbout/Block directory, create a file named Tweets.php with the following code:
<?php
  namespace Packt\TweetsAbout\Block;

  require $_SERVER['DOCUMENT_ROOT'] . "/packt/app/code/Packt/TweetsAbout/Api/vendor/autoload.php";
  use Abraham\TwitterOAuth\TwitterOAuth;

  class Tweets extends \Magento\Framework\View\Element\Template{

      private $consumerKey;
      private $consumerSecret;
      private $accessToken;
      private $accessTokenSecret;

    public function searchTweets(){
      $connection = $this->twitterDevAuth();
      $result = $connection->get("search/tweets", array("q" =>$this->getData('hashtag'), "result_type"=>"recent", "count" => 10));

      return $result->statuses;
    }

    private function twitterDevAuth(){
      $this->consumerKey = YOUR_CONSUMER_KEY;
      $this->consumerSecret = YOUR_CONSUMER_SECRET;
      $this->accessToken = YOUR_ACCESS_TOKEN;
      $this->accessTokenSecret  = YOUR_ACCESS_TOKEN_SECRET;

      return new TwitterOAuth($this->consumerKey, $this->consumerSecret, $this->accessToken, $this->accessTokenSecret);
    }
  }
Here are some things to consider about the Tweets.php code:
- The required instruction is to call the autoload, and the use is to append the namespace of the
TwitterOAuthlibrary to work on our extension - In the
twitterDevAuth()method, you must enter the Twitter API credentials - In the
searchTweets()method, the$connection->get("search/tweets", array("q" =>$this->getData('hashtag'), "result_type"=>"recent", "count" => 10))instruction works with the Twitter search API, getting the last 10 results of Twitter posts
Under the app/code/Packt/TweetsAbout/Observer directory, create the Topmenu.php file with the following code:
<?php
namespace Packt\TweetsAbout\Observer;
use Magento\Framework\Event\Observer as EventObserver;
use Magento\Framework\Data\Tree\Node;
use Magento\Framework\Event\ObserverInterface;

class Topmenu implements ObserverInterface{

    /**
     * @param EventObserver $observer
     * @return $this
     */
    public function execute(EventObserver $observer)
    {

      $urlInterface = \Magento\Framework\App\ObjectManager::getInstance()->get('Magento\Framework\UrlInterface');

      $active = strpos($urlInterface->getCurrentUrl(), "tweetsabout");


        /** @var \Magento\Framework\Data\Tree\Node $menu */
        $menu = $observer->getMenu();
        $tree = $menu->getTree();
        $data = [
            'name'      => __("TweetsAbout"),
            'id'        => 'tweetsmenu',
            'url'       => $urlInterface->getBaseUrl() . 'tweetsabout',
            'is_active' => $active
        ];
        $node = new Node($data, 'id', $tree, $menu);
        $menu->addChild($node);
        return $this;
    }
}
The Topmenu.php file dynamically creates a new top menu item for the TweetsAbout module by adding a node in the top menu link schema. The \Magento\Framework\App\ObjectManager::getInstance()->get('Magento\Framework\UrlInterface') instruction gets the base URL and the current URL to create a specific link to the TweetsAbout module. The Topmenu observer works with the Document Object Model (DOM) concept of nodes and trees dynamically.
It's time to handle the presentation layer of the project. First, we will create the layout files (.xml) to handle template behavior and to pass arguments to the template via blocks. Every layout file is assigned by following this pattern: <module_name>_<controller>_<controller_file>.xml. This pattern allows the Magento system to assign the correct files according to its controller automatically.
Under the app/code/Packt/TweetsAbout/view/frontend/layout path, create the tweetsabout_index_index.xml file with the following code:
<?xml version="1.0"?>
<page xmlns:xsi="http://www.w3.org/2001/XMLSchema-instance" layout="1column" xsi:noNamespaceSchemaLocation="urn:magento:framework:View/Layout/etc/page_configuration.xsd">
    <head>
        <title>
            TweetsAbout Module
        </title>
    </head>
    <body>
        <referenceContainer name="content">
            <block class="Packt\TweetsAbout\Block\Index" template="Packt_TweetsAbout::index.phtml">
                <arguments>
                    <argument name="urlMagento" xsi:type="url" path="tweetsabout/magento" />
                    <argument name="urlPHP" xsi:type="url" path="tweetsabout/php" />
                    <argument name="urlPackt" xsi:type="url" path="tweetsabout/packt" />
                </arguments>
            </block>
        </referenceContainer>
    </body>
</page>
The <block> tag binds the Index.php Block to the index.phtml template, and the <arguments> tag transports three URL parameters to the Block. These parameters will be used in the index.phtml file.
Under the app/code/Packt/TweetsAbout/view/frontend/layout path, create the tweetsabout_magento_index.xml file with the following code:
<?xml version="1.0"?>
<page xmlns:xsi="http://www.w3.org/2001/XMLSchema-instance" layout="1column" xsi:noNamespaceSchemaLocation="urn:magento:framework:View/Layout/etc/page_configuration.xsd">
    <head>
        <title>
            TweetsAbout #Magento
        </title>
        <css src="Packt_TweetsAbout::css/source/module.css"/>
    </head>
    <body>
        <referenceContainer name="content">
            <block class="Packt\TweetsAbout\Block\Tweets" template="Packt_TweetsAbout::tweets.phtml">
                <arguments>
                    <argument name="hashtag" xsi:type="string">#magento</argument>
                </arguments>
            </block>
        </referenceContainer>
    </body>
</page>
Under the app/code/Packt/TweetsAbout/view/frontend/layout path, create the tweetsabout_packt_index.xml file with the following code:
<?xml version="1.0"?>
<page xmlns:xsi="http://www.w3.org/2001/XMLSchema-instance" layout="1column" xsi:noNamespaceSchemaLocation="urn:magento:framework:View/Layout/etc/page_configuration.xsd">
    <head>
        <title>
            TweetsAbout #Packtpub
        </title>
        <css src="Packt_TweetsAbout::css/source/module.css"/>
    </head>
    <body>
        <referenceContainer name="content">
            <block class="Packt\TweetsAbout\Block\Tweets" template="Packt_TweetsAbout::tweets.phtml">
                <arguments>
                    <argument name="hashtag" xsi:type="string">#packtpub</argument>
                </arguments>
            </block>
        </referenceContainer>
    </body>
</page>
Under the app/code/Packt/TweetsAbout/view/frontend/layout path, create the tweetsabout_php_index.xml file with the following code:
<?xml version="1.0"?>
<page xmlns:xsi="http://www.w3.org/2001/XMLSchema-instance" layout="1column" xsi:noNamespaceSchemaLocation="urn:magento:framework:View/Layout/etc/page_configuration.xsd">
    <head>
        <title>
            TweetsAbout #PHP
        </title>
        <css src="Packt_TweetsAbout::css/source/module.css"/>
    </head>
    <body>
        <referenceContainer name="content">
            <block class="Packt\TweetsAbout\Block\Tweets" template="Packt_TweetsAbout::tweets.phtml">
                <arguments>
                    <argument name="hashtag" xsi:type="string">#php</argument>
                </arguments>
            </block>
        </referenceContainer>
    </body>
</page>
The <css> tag loads the CSS rules of the template. The <block> tag binds the Tweets.php Block to the tweets.phtml file. The <argument name="hashtag"> tag transports the hashtag parameter to the Tweets.php Block to search the latest mentions of the specific hashtag in the Twitter database.
Now, let's create the template files.
Under the app/code/Packt/TweetsAbout/view/frontend/templates path, create the index.phtml file with the following code:
<h2>Recent TweetsAbout: </h2>
<ul>
  <li>
    <a href="<?php echo $block->escapeHtml($block->getMagentoUrl()) ?>">
      <span><?php echo __('Magento')?></span>
    </a>
  </li>
  <li>
    <a href="<?php echo $block->escapeHtml($block->getPacktUrl()) ?>">
      <span><?php echo __('Packtpub')?></span>
    </a>
  </li>
  <li>
    <a href="<?php echo $block->escapeHtml($block->getPHPUrl()) ?>">
      <span><?php echo __('PHP')?></span>
    </a>
  </li>
</ul>
The $block object has access to the methods of Block/Index.php, and the URL of the pages build dynamically.
Under the app/code/Packt/TweetsAbout/view/frontend/templates path, create the tweets.phtml file with the following code:
<?php
  $tweets = $block->searchTweets();
?>

<?php foreach ($tweets as $tweet){ ?>
  <p class="tweet">
    <a href="<?php echo $tweet->user->url; ?>">
      <img src="<?php echo $tweet->user->profile_image_url; ?>" alt="profile">
    </a>
    <b>Created: </b><?php echo $tweet->created_at; ?>
    <br />
    <br />

    <a href="<?php echo isset($tweet->entities->urls[0]->url) ? $tweet->entities->urls[0]->url : "#"; ?>" target="_blank"><?php echo $tweet->text;?></a>

  </p>
  <hr />
<?php } ?>
The searchTweets() method loads tweets according to the URL accessed, and PHP processes the data to show the results to the user.
Under the app/code/Packt/TweetsAbout/view/frontend/web/css/source path, create the module.less file with the following code:
 .tweet {background-color: #878787; padding:15px; border:1px dotted}
.tweet a {color: #ffffff}
.tweet a:hover {text-decoration: underline;}To deploy the module, follow this recipe:
- Open the terminal or command prompt.
- Access the
packt/bindirectory. - Then, run the
php magento module:enable --clear-static-content Packt_TweetsAboutcommand. - Run the
php magento setup:upgradecommand. - Next, run the
php magento setup:static-content:deploycommand. - In some cases, it is necessary to give
writepermissions again to the directories.
If everything goes alright, when you access the URL http://localhost/packt, you will see one link for the TweetsAbout extension in the topmost menu. Just click on it to see how the extension works. Take a look at the following screenshot:
You can navigate to the links to see how the pages work, as in the following screenshot:
The extension gets the ten last tweets in real time with the date, picture, and post. It's really awesome to watch our work running!
For sure, this extension can get a lot better, but it is only a starting point for big achievements.
Once you have your extension ready to work, you can publish it in the Magento Connect service (http://www.magentocommerce.com/magento-connect). Magento Connect is a service in which Magento members can share their open source or commercial extensions with Magento Community. The main contributions are generally based on the following:
- Modules
- Language packs
- Design interfaces
- Themes
Once you have the composer.json file configured, you can package your module by compacting it as a .zip file in the vendor-name_package-name-1.0.0.zip format.
Upload the module in your personal account in GitHub, and Magento can retrieve it to publish.
For further information, it's strongly recommended that you to access the official documentation available on the Magento Developers official site at http://devdocs.magento.com/guides/v2.0/extension-dev-guide/package_module.html.
Blocks
Blocks in Magento 2.0 provide presentation logic for your view templates. In the TweetsAbout project, we will use two blocks to process the view template files.
Under the app/code/Packt/TweetsAbout/Block directory, create a file named Index.php with the following code:
<?php

  namespace Packt\TweetsAbout\Block;

  class Index extends \Magento\Framework\View\Element\Template{

      public function getMagentoUrl(){
          return $this->getData('urlMagento');
      }

      public function getPHPUrl(){
          return $this->getData('urlPHP');
      }

      public function getPacktUrl(){
          return $this->getData('urlPackt');
      }
  }
The three methods, getMagentoUrl(), getPHPUrl(), and getPacktUrl(), get data from layout declaration files to define a URL for each kind of controller and give it to the initial layout of the module.
Now, under the app/code/Packt/TweetsAbout/Block directory, create a file named Tweets.php with the following code:
<?php
  namespace Packt\TweetsAbout\Block;

  require $_SERVER['DOCUMENT_ROOT'] . "/packt/app/code/Packt/TweetsAbout/Api/vendor/autoload.php";
  use Abraham\TwitterOAuth\TwitterOAuth;

  class Tweets extends \Magento\Framework\View\Element\Template{

      private $consumerKey;
      private $consumerSecret;
      private $accessToken;
      private $accessTokenSecret;

    public function searchTweets(){
      $connection = $this->twitterDevAuth();
      $result = $connection->get("search/tweets", array("q" =>$this->getData('hashtag'), "result_type"=>"recent", "count" => 10));

      return $result->statuses;
    }

    private function twitterDevAuth(){
      $this->consumerKey = YOUR_CONSUMER_KEY;
      $this->consumerSecret = YOUR_CONSUMER_SECRET;
      $this->accessToken = YOUR_ACCESS_TOKEN;
      $this->accessTokenSecret  = YOUR_ACCESS_TOKEN_SECRET;

      return new TwitterOAuth($this->consumerKey, $this->consumerSecret, $this->accessToken, $this->accessTokenSecret);
    }
  }
Here are some things to consider about the Tweets.php code:
- The required instruction is to call the autoload, and the use is to append the namespace of the
TwitterOAuthlibrary to work on our extension - In the
twitterDevAuth()method, you must enter the Twitter API credentials - In the
searchTweets()method, the$connection->get("search/tweets", array("q" =>$this->getData('hashtag'), "result_type"=>"recent", "count" => 10))instruction works with the Twitter search API, getting the last 10 results of Twitter posts
Under the app/code/Packt/TweetsAbout/Observer directory, create the Topmenu.php file with the following code:
<?php
namespace Packt\TweetsAbout\Observer;
use Magento\Framework\Event\Observer as EventObserver;
use Magento\Framework\Data\Tree\Node;
use Magento\Framework\Event\ObserverInterface;

class Topmenu implements ObserverInterface{

    /**
     * @param EventObserver $observer
     * @return $this
     */
    public function execute(EventObserver $observer)
    {

      $urlInterface = \Magento\Framework\App\ObjectManager::getInstance()->get('Magento\Framework\UrlInterface');

      $active = strpos($urlInterface->getCurrentUrl(), "tweetsabout");


        /** @var \Magento\Framework\Data\Tree\Node $menu */
        $menu = $observer->getMenu();
        $tree = $menu->getTree();
        $data = [
            'name'      => __("TweetsAbout"),
            'id'        => 'tweetsmenu',
            'url'       => $urlInterface->getBaseUrl() . 'tweetsabout',
            'is_active' => $active
        ];
        $node = new Node($data, 'id', $tree, $menu);
        $menu->addChild($node);
        return $this;
    }
}
The Topmenu.php file dynamically creates a new top menu item for the TweetsAbout module by adding a node in the top menu link schema. The \Magento\Framework\App\ObjectManager::getInstance()->get('Magento\Framework\UrlInterface') instruction gets the base URL and the current URL to create a specific link to the TweetsAbout module. The Topmenu observer works with the Document Object Model (DOM) concept of nodes and trees dynamically.
It's time to handle the presentation layer of the project. First, we will create the layout files (.xml) to handle template behavior and to pass arguments to the template via blocks. Every layout file is assigned by following this pattern: <module_name>_<controller>_<controller_file>.xml. This pattern allows the Magento system to assign the correct files according to its controller automatically.
Under the app/code/Packt/TweetsAbout/view/frontend/layout path, create the tweetsabout_index_index.xml file with the following code:
<?xml version="1.0"?>
<page xmlns:xsi="http://www.w3.org/2001/XMLSchema-instance" layout="1column" xsi:noNamespaceSchemaLocation="urn:magento:framework:View/Layout/etc/page_configuration.xsd">
    <head>
        <title>
            TweetsAbout Module
        </title>
    </head>
    <body>
        <referenceContainer name="content">
            <block class="Packt\TweetsAbout\Block\Index" template="Packt_TweetsAbout::index.phtml">
                <arguments>
                    <argument name="urlMagento" xsi:type="url" path="tweetsabout/magento" />
                    <argument name="urlPHP" xsi:type="url" path="tweetsabout/php" />
                    <argument name="urlPackt" xsi:type="url" path="tweetsabout/packt" />
                </arguments>
            </block>
        </referenceContainer>
    </body>
</page>
The <block> tag binds the Index.php Block to the index.phtml template, and the <arguments> tag transports three URL parameters to the Block. These parameters will be used in the index.phtml file.
Under the app/code/Packt/TweetsAbout/view/frontend/layout path, create the tweetsabout_magento_index.xml file with the following code:
<?xml version="1.0"?>
<page xmlns:xsi="http://www.w3.org/2001/XMLSchema-instance" layout="1column" xsi:noNamespaceSchemaLocation="urn:magento:framework:View/Layout/etc/page_configuration.xsd">
    <head>
        <title>
            TweetsAbout #Magento
        </title>
        <css src="Packt_TweetsAbout::css/source/module.css"/>
    </head>
    <body>
        <referenceContainer name="content">
            <block class="Packt\TweetsAbout\Block\Tweets" template="Packt_TweetsAbout::tweets.phtml">
                <arguments>
                    <argument name="hashtag" xsi:type="string">#magento</argument>
                </arguments>
            </block>
        </referenceContainer>
    </body>
</page>
Under the app/code/Packt/TweetsAbout/view/frontend/layout path, create the tweetsabout_packt_index.xml file with the following code:
<?xml version="1.0"?>
<page xmlns:xsi="http://www.w3.org/2001/XMLSchema-instance" layout="1column" xsi:noNamespaceSchemaLocation="urn:magento:framework:View/Layout/etc/page_configuration.xsd">
    <head>
        <title>
            TweetsAbout #Packtpub
        </title>
        <css src="Packt_TweetsAbout::css/source/module.css"/>
    </head>
    <body>
        <referenceContainer name="content">
            <block class="Packt\TweetsAbout\Block\Tweets" template="Packt_TweetsAbout::tweets.phtml">
                <arguments>
                    <argument name="hashtag" xsi:type="string">#packtpub</argument>
                </arguments>
            </block>
        </referenceContainer>
    </body>
</page>
Under the app/code/Packt/TweetsAbout/view/frontend/layout path, create the tweetsabout_php_index.xml file with the following code:
<?xml version="1.0"?>
<page xmlns:xsi="http://www.w3.org/2001/XMLSchema-instance" layout="1column" xsi:noNamespaceSchemaLocation="urn:magento:framework:View/Layout/etc/page_configuration.xsd">
    <head>
        <title>
            TweetsAbout #PHP
        </title>
        <css src="Packt_TweetsAbout::css/source/module.css"/>
    </head>
    <body>
        <referenceContainer name="content">
            <block class="Packt\TweetsAbout\Block\Tweets" template="Packt_TweetsAbout::tweets.phtml">
                <arguments>
                    <argument name="hashtag" xsi:type="string">#php</argument>
                </arguments>
            </block>
        </referenceContainer>
    </body>
</page>
The <css> tag loads the CSS rules of the template. The <block> tag binds the Tweets.php Block to the tweets.phtml file. The <argument name="hashtag"> tag transports the hashtag parameter to the Tweets.php Block to search the latest mentions of the specific hashtag in the Twitter database.
Now, let's create the template files.
Under the app/code/Packt/TweetsAbout/view/frontend/templates path, create the index.phtml file with the following code:
<h2>Recent TweetsAbout: </h2>
<ul>
  <li>
    <a href="<?php echo $block->escapeHtml($block->getMagentoUrl()) ?>">
      <span><?php echo __('Magento')?></span>
    </a>
  </li>
  <li>
    <a href="<?php echo $block->escapeHtml($block->getPacktUrl()) ?>">
      <span><?php echo __('Packtpub')?></span>
    </a>
  </li>
  <li>
    <a href="<?php echo $block->escapeHtml($block->getPHPUrl()) ?>">
      <span><?php echo __('PHP')?></span>
    </a>
  </li>
</ul>
The $block object has access to the methods of Block/Index.php, and the URL of the pages build dynamically.
Under the app/code/Packt/TweetsAbout/view/frontend/templates path, create the tweets.phtml file with the following code:
<?php
  $tweets = $block->searchTweets();
?>

<?php foreach ($tweets as $tweet){ ?>
  <p class="tweet">
    <a href="<?php echo $tweet->user->url; ?>">
      <img src="<?php echo $tweet->user->profile_image_url; ?>" alt="profile">
    </a>
    <b>Created: </b><?php echo $tweet->created_at; ?>
    <br />
    <br />

    <a href="<?php echo isset($tweet->entities->urls[0]->url) ? $tweet->entities->urls[0]->url : "#"; ?>" target="_blank"><?php echo $tweet->text;?></a>

  </p>
  <hr />
<?php } ?>
The searchTweets() method loads tweets according to the URL accessed, and PHP processes the data to show the results to the user.
Under the app/code/Packt/TweetsAbout/view/frontend/web/css/source path, create the module.less file with the following code:
 .tweet {background-color: #878787; padding:15px; border:1px dotted}
.tweet a {color: #ffffff}
.tweet a:hover {text-decoration: underline;}To deploy the module, follow this recipe:
- Open the terminal or command prompt.
- Access the
packt/bindirectory. - Then, run the
php magento module:enable --clear-static-content Packt_TweetsAboutcommand. - Run the
php magento setup:upgradecommand. - Next, run the
php magento setup:static-content:deploycommand. - In some cases, it is necessary to give
writepermissions again to the directories.
If everything goes alright, when you access the URL http://localhost/packt, you will see one link for the TweetsAbout extension in the topmost menu. Just click on it to see how the extension works. Take a look at the following screenshot:
You can navigate to the links to see how the pages work, as in the following screenshot:
The extension gets the ten last tweets in real time with the date, picture, and post. It's really awesome to watch our work running!
For sure, this extension can get a lot better, but it is only a starting point for big achievements.
Once you have your extension ready to work, you can publish it in the Magento Connect service (http://www.magentocommerce.com/magento-connect). Magento Connect is a service in which Magento members can share their open source or commercial extensions with Magento Community. The main contributions are generally based on the following:
- Modules
- Language packs
- Design interfaces
- Themes
Once you have the composer.json file configured, you can package your module by compacting it as a .zip file in the vendor-name_package-name-1.0.0.zip format.
Upload the module in your personal account in GitHub, and Magento can retrieve it to publish.
For further information, it's strongly recommended that you to access the official documentation available on the Magento Developers official site at http://devdocs.magento.com/guides/v2.0/extension-dev-guide/package_module.html.
Observer
Under the app/code/Packt/TweetsAbout/Observer directory, create the Topmenu.php file with the following code:
<?php
namespace Packt\TweetsAbout\Observer;
use Magento\Framework\Event\Observer as EventObserver;
use Magento\Framework\Data\Tree\Node;
use Magento\Framework\Event\ObserverInterface;

class Topmenu implements ObserverInterface{

    /**
     * @param EventObserver $observer
     * @return $this
     */
    public function execute(EventObserver $observer)
    {

      $urlInterface = \Magento\Framework\App\ObjectManager::getInstance()->get('Magento\Framework\UrlInterface');

      $active = strpos($urlInterface->getCurrentUrl(), "tweetsabout");


        /** @var \Magento\Framework\Data\Tree\Node $menu */
        $menu = $observer->getMenu();
        $tree = $menu->getTree();
        $data = [
            'name'      => __("TweetsAbout"),
            'id'        => 'tweetsmenu',
            'url'       => $urlInterface->getBaseUrl() . 'tweetsabout',
            'is_active' => $active
        ];
        $node = new Node($data, 'id', $tree, $menu);
        $menu->addChild($node);
        return $this;
    }
}
The Topmenu.php file dynamically creates a new top menu item for the TweetsAbout module by adding a node in the top menu link schema. The \Magento\Framework\App\ObjectManager::getInstance()->get('Magento\Framework\UrlInterface') instruction gets the base URL and the current URL to create a specific link to the TweetsAbout module. The Topmenu observer works with the Document Object Model (DOM) concept of nodes and trees dynamically.
It's time to handle the presentation layer of the project. First, we will create the layout files (.xml) to handle template behavior and to pass arguments to the template via blocks. Every layout file is assigned by following this pattern: <module_name>_<controller>_<controller_file>.xml. This pattern allows the Magento system to assign the correct files according to its controller automatically.
Under the app/code/Packt/TweetsAbout/view/frontend/layout path, create the tweetsabout_index_index.xml file with the following code:
<?xml version="1.0"?>
<page xmlns:xsi="http://www.w3.org/2001/XMLSchema-instance" layout="1column" xsi:noNamespaceSchemaLocation="urn:magento:framework:View/Layout/etc/page_configuration.xsd">
    <head>
        <title>
            TweetsAbout Module
        </title>
    </head>
    <body>
        <referenceContainer name="content">
            <block class="Packt\TweetsAbout\Block\Index" template="Packt_TweetsAbout::index.phtml">
                <arguments>
                    <argument name="urlMagento" xsi:type="url" path="tweetsabout/magento" />
                    <argument name="urlPHP" xsi:type="url" path="tweetsabout/php" />
                    <argument name="urlPackt" xsi:type="url" path="tweetsabout/packt" />
                </arguments>
            </block>
        </referenceContainer>
    </body>
</page>
The <block> tag binds the Index.php Block to the index.phtml template, and the <arguments> tag transports three URL parameters to the Block. These parameters will be used in the index.phtml file.
Under the app/code/Packt/TweetsAbout/view/frontend/layout path, create the tweetsabout_magento_index.xml file with the following code:
<?xml version="1.0"?>
<page xmlns:xsi="http://www.w3.org/2001/XMLSchema-instance" layout="1column" xsi:noNamespaceSchemaLocation="urn:magento:framework:View/Layout/etc/page_configuration.xsd">
    <head>
        <title>
            TweetsAbout #Magento
        </title>
        <css src="Packt_TweetsAbout::css/source/module.css"/>
    </head>
    <body>
        <referenceContainer name="content">
            <block class="Packt\TweetsAbout\Block\Tweets" template="Packt_TweetsAbout::tweets.phtml">
                <arguments>
                    <argument name="hashtag" xsi:type="string">#magento</argument>
                </arguments>
            </block>
        </referenceContainer>
    </body>
</page>
Under the app/code/Packt/TweetsAbout/view/frontend/layout path, create the tweetsabout_packt_index.xml file with the following code:
<?xml version="1.0"?>
<page xmlns:xsi="http://www.w3.org/2001/XMLSchema-instance" layout="1column" xsi:noNamespaceSchemaLocation="urn:magento:framework:View/Layout/etc/page_configuration.xsd">
    <head>
        <title>
            TweetsAbout #Packtpub
        </title>
        <css src="Packt_TweetsAbout::css/source/module.css"/>
    </head>
    <body>
        <referenceContainer name="content">
            <block class="Packt\TweetsAbout\Block\Tweets" template="Packt_TweetsAbout::tweets.phtml">
                <arguments>
                    <argument name="hashtag" xsi:type="string">#packtpub</argument>
                </arguments>
            </block>
        </referenceContainer>
    </body>
</page>
Under the app/code/Packt/TweetsAbout/view/frontend/layout path, create the tweetsabout_php_index.xml file with the following code:
<?xml version="1.0"?>
<page xmlns:xsi="http://www.w3.org/2001/XMLSchema-instance" layout="1column" xsi:noNamespaceSchemaLocation="urn:magento:framework:View/Layout/etc/page_configuration.xsd">
    <head>
        <title>
            TweetsAbout #PHP
        </title>
        <css src="Packt_TweetsAbout::css/source/module.css"/>
    </head>
    <body>
        <referenceContainer name="content">
            <block class="Packt\TweetsAbout\Block\Tweets" template="Packt_TweetsAbout::tweets.phtml">
                <arguments>
                    <argument name="hashtag" xsi:type="string">#php</argument>
                </arguments>
            </block>
        </referenceContainer>
    </body>
</page>
The <css> tag loads the CSS rules of the template. The <block> tag binds the Tweets.php Block to the tweets.phtml file. The <argument name="hashtag"> tag transports the hashtag parameter to the Tweets.php Block to search the latest mentions of the specific hashtag in the Twitter database.
Now, let's create the template files.
Under the app/code/Packt/TweetsAbout/view/frontend/templates path, create the index.phtml file with the following code:
<h2>Recent TweetsAbout: </h2>
<ul>
  <li>
    <a href="<?php echo $block->escapeHtml($block->getMagentoUrl()) ?>">
      <span><?php echo __('Magento')?></span>
    </a>
  </li>
  <li>
    <a href="<?php echo $block->escapeHtml($block->getPacktUrl()) ?>">
      <span><?php echo __('Packtpub')?></span>
    </a>
  </li>
  <li>
    <a href="<?php echo $block->escapeHtml($block->getPHPUrl()) ?>">
      <span><?php echo __('PHP')?></span>
    </a>
  </li>
</ul>
The $block object has access to the methods of Block/Index.php, and the URL of the pages build dynamically.
Under the app/code/Packt/TweetsAbout/view/frontend/templates path, create the tweets.phtml file with the following code:
<?php
  $tweets = $block->searchTweets();
?>

<?php foreach ($tweets as $tweet){ ?>
  <p class="tweet">
    <a href="<?php echo $tweet->user->url; ?>">
      <img src="<?php echo $tweet->user->profile_image_url; ?>" alt="profile">
    </a>
    <b>Created: </b><?php echo $tweet->created_at; ?>
    <br />
    <br />

    <a href="<?php echo isset($tweet->entities->urls[0]->url) ? $tweet->entities->urls[0]->url : "#"; ?>" target="_blank"><?php echo $tweet->text;?></a>

  </p>
  <hr />
<?php } ?>
The searchTweets() method loads tweets according to the URL accessed, and PHP processes the data to show the results to the user.
Under the app/code/Packt/TweetsAbout/view/frontend/web/css/source path, create the module.less file with the following code:
 .tweet {background-color: #878787; padding:15px; border:1px dotted}
.tweet a {color: #ffffff}
.tweet a:hover {text-decoration: underline;}To deploy the module, follow this recipe:
- Open the terminal or command prompt.
- Access the
packt/bindirectory. - Then, run the
php magento module:enable --clear-static-content Packt_TweetsAboutcommand. - Run the
php magento setup:upgradecommand. - Next, run the
php magento setup:static-content:deploycommand. - In some cases, it is necessary to give
writepermissions again to the directories.
If everything goes alright, when you access the URL http://localhost/packt, you will see one link for the TweetsAbout extension in the topmost menu. Just click on it to see how the extension works. Take a look at the following screenshot:
You can navigate to the links to see how the pages work, as in the following screenshot:
The extension gets the ten last tweets in real time with the date, picture, and post. It's really awesome to watch our work running!
For sure, this extension can get a lot better, but it is only a starting point for big achievements.
Once you have your extension ready to work, you can publish it in the Magento Connect service (http://www.magentocommerce.com/magento-connect). Magento Connect is a service in which Magento members can share their open source or commercial extensions with Magento Community. The main contributions are generally based on the following:
- Modules
- Language packs
- Design interfaces
- Themes
Once you have the composer.json file configured, you can package your module by compacting it as a .zip file in the vendor-name_package-name-1.0.0.zip format.
Upload the module in your personal account in GitHub, and Magento can retrieve it to publish.
For further information, it's strongly recommended that you to access the official documentation available on the Magento Developers official site at http://devdocs.magento.com/guides/v2.0/extension-dev-guide/package_module.html.
Views
It's time to handle the presentation layer of the project. First, we will create the layout files (.xml) to handle template behavior and to pass arguments to the template via blocks. Every layout file is assigned by following this pattern: <module_name>_<controller>_<controller_file>.xml. This pattern allows the Magento system to assign the correct files according to its controller automatically.
Under the app/code/Packt/TweetsAbout/view/frontend/layout path, create the tweetsabout_index_index.xml file with the following code:
<?xml version="1.0"?>
<page xmlns:xsi="http://www.w3.org/2001/XMLSchema-instance" layout="1column" xsi:noNamespaceSchemaLocation="urn:magento:framework:View/Layout/etc/page_configuration.xsd">
    <head>
        <title>
            TweetsAbout Module
        </title>
    </head>
    <body>
        <referenceContainer name="content">
            <block class="Packt\TweetsAbout\Block\Index" template="Packt_TweetsAbout::index.phtml">
                <arguments>
                    <argument name="urlMagento" xsi:type="url" path="tweetsabout/magento" />
                    <argument name="urlPHP" xsi:type="url" path="tweetsabout/php" />
                    <argument name="urlPackt" xsi:type="url" path="tweetsabout/packt" />
                </arguments>
            </block>
        </referenceContainer>
    </body>
</page>
The <block> tag binds the Index.php Block to the index.phtml template, and the <arguments> tag transports three URL parameters to the Block. These parameters will be used in the index.phtml file.
Under the app/code/Packt/TweetsAbout/view/frontend/layout path, create the tweetsabout_magento_index.xml file with the following code:
<?xml version="1.0"?>
<page xmlns:xsi="http://www.w3.org/2001/XMLSchema-instance" layout="1column" xsi:noNamespaceSchemaLocation="urn:magento:framework:View/Layout/etc/page_configuration.xsd">
    <head>
        <title>
            TweetsAbout #Magento
        </title>
        <css src="Packt_TweetsAbout::css/source/module.css"/>
    </head>
    <body>
        <referenceContainer name="content">
            <block class="Packt\TweetsAbout\Block\Tweets" template="Packt_TweetsAbout::tweets.phtml">
                <arguments>
                    <argument name="hashtag" xsi:type="string">#magento</argument>
                </arguments>
            </block>
        </referenceContainer>
    </body>
</page>
Under the app/code/Packt/TweetsAbout/view/frontend/layout path, create the tweetsabout_packt_index.xml file with the following code:
<?xml version="1.0"?>
<page xmlns:xsi="http://www.w3.org/2001/XMLSchema-instance" layout="1column" xsi:noNamespaceSchemaLocation="urn:magento:framework:View/Layout/etc/page_configuration.xsd">
    <head>
        <title>
            TweetsAbout #Packtpub
        </title>
        <css src="Packt_TweetsAbout::css/source/module.css"/>
    </head>
    <body>
        <referenceContainer name="content">
            <block class="Packt\TweetsAbout\Block\Tweets" template="Packt_TweetsAbout::tweets.phtml">
                <arguments>
                    <argument name="hashtag" xsi:type="string">#packtpub</argument>
                </arguments>
            </block>
        </referenceContainer>
    </body>
</page>
Under the app/code/Packt/TweetsAbout/view/frontend/layout path, create the tweetsabout_php_index.xml file with the following code:
<?xml version="1.0"?>
<page xmlns:xsi="http://www.w3.org/2001/XMLSchema-instance" layout="1column" xsi:noNamespaceSchemaLocation="urn:magento:framework:View/Layout/etc/page_configuration.xsd">
    <head>
        <title>
            TweetsAbout #PHP
        </title>
        <css src="Packt_TweetsAbout::css/source/module.css"/>
    </head>
    <body>
        <referenceContainer name="content">
            <block class="Packt\TweetsAbout\Block\Tweets" template="Packt_TweetsAbout::tweets.phtml">
                <arguments>
                    <argument name="hashtag" xsi:type="string">#php</argument>
                </arguments>
            </block>
        </referenceContainer>
    </body>
</page>
The <css> tag loads the CSS rules of the template. The <block> tag binds the Tweets.php Block to the tweets.phtml file. The <argument name="hashtag"> tag transports the hashtag parameter to the Tweets.php Block to search the latest mentions of the specific hashtag in the Twitter database.
Now, let's create the template files.
Under the app/code/Packt/TweetsAbout/view/frontend/templates path, create the index.phtml file with the following code:
<h2>Recent TweetsAbout: </h2>
<ul>
  <li>
    <a href="<?php echo $block->escapeHtml($block->getMagentoUrl()) ?>">
      <span><?php echo __('Magento')?></span>
    </a>
  </li>
  <li>
    <a href="<?php echo $block->escapeHtml($block->getPacktUrl()) ?>">
      <span><?php echo __('Packtpub')?></span>
    </a>
  </li>
  <li>
    <a href="<?php echo $block->escapeHtml($block->getPHPUrl()) ?>">
      <span><?php echo __('PHP')?></span>
    </a>
  </li>
</ul>
The $block object has access to the methods of Block/Index.php, and the URL of the pages build dynamically.
Under the app/code/Packt/TweetsAbout/view/frontend/templates path, create the tweets.phtml file with the following code:
<?php
  $tweets = $block->searchTweets();
?>

<?php foreach ($tweets as $tweet){ ?>
  <p class="tweet">
    <a href="<?php echo $tweet->user->url; ?>">
      <img src="<?php echo $tweet->user->profile_image_url; ?>" alt="profile">
    </a>
    <b>Created: </b><?php echo $tweet->created_at; ?>
    <br />
    <br />

    <a href="<?php echo isset($tweet->entities->urls[0]->url) ? $tweet->entities->urls[0]->url : "#"; ?>" target="_blank"><?php echo $tweet->text;?></a>

  </p>
  <hr />
<?php } ?>
The searchTweets() method loads tweets according to the URL accessed, and PHP processes the data to show the results to the user.
Under the app/code/Packt/TweetsAbout/view/frontend/web/css/source path, create the module.less file with the following code:
 .tweet {background-color: #878787; padding:15px; border:1px dotted}
.tweet a {color: #ffffff}
.tweet a:hover {text-decoration: underline;}To deploy the module, follow this recipe:
- Open the terminal or command prompt.
- Access the
packt/bindirectory. - Then, run the
php magento module:enable --clear-static-content Packt_TweetsAboutcommand. - Run the
php magento setup:upgradecommand. - Next, run the
php magento setup:static-content:deploycommand. - In some cases, it is necessary to give
writepermissions again to the directories.
If everything goes alright, when you access the URL http://localhost/packt, you will see one link for the TweetsAbout extension in the topmost menu. Just click on it to see how the extension works. Take a look at the following screenshot:
You can navigate to the links to see how the pages work, as in the following screenshot:
The extension gets the ten last tweets in real time with the date, picture, and post. It's really awesome to watch our work running!
For sure, this extension can get a lot better, but it is only a starting point for big achievements.
Once you have your extension ready to work, you can publish it in the Magento Connect service (http://www.magentocommerce.com/magento-connect). Magento Connect is a service in which Magento members can share their open source or commercial extensions with Magento Community. The main contributions are generally based on the following:
- Modules
- Language packs
- Design interfaces
- Themes
Once you have the composer.json file configured, you can package your module by compacting it as a .zip file in the vendor-name_package-name-1.0.0.zip format.
Upload the module in your personal account in GitHub, and Magento can retrieve it to publish.
For further information, it's strongly recommended that you to access the official documentation available on the Magento Developers official site at http://devdocs.magento.com/guides/v2.0/extension-dev-guide/package_module.html.
CSS
Under the app/code/Packt/TweetsAbout/view/frontend/web/css/source path, create the module.less file with the following code:
 .tweet {background-color: #878787; padding:15px; border:1px dotted}
.tweet a {color: #ffffff}
.tweet a:hover {text-decoration: underline;}To deploy the module, follow this recipe:
- Open the terminal or command prompt.
- Access the
packt/bindirectory. - Then, run the
php magento module:enable --clear-static-content Packt_TweetsAboutcommand. - Run the
php magento setup:upgradecommand. - Next, run the
php magento setup:static-content:deploycommand. - In some cases, it is necessary to give
writepermissions again to the directories.
If everything goes alright, when you access the URL http://localhost/packt, you will see one link for the TweetsAbout extension in the topmost menu. Just click on it to see how the extension works. Take a look at the following screenshot:
You can navigate to the links to see how the pages work, as in the following screenshot:
The extension gets the ten last tweets in real time with the date, picture, and post. It's really awesome to watch our work running!
For sure, this extension can get a lot better, but it is only a starting point for big achievements.
Once you have your extension ready to work, you can publish it in the Magento Connect service (http://www.magentocommerce.com/magento-connect). Magento Connect is a service in which Magento members can share their open source or commercial extensions with Magento Community. The main contributions are generally based on the following:
- Modules
- Language packs
- Design interfaces
- Themes
Once you have the composer.json file configured, you can package your module by compacting it as a .zip file in the vendor-name_package-name-1.0.0.zip format.
Upload the module in your personal account in GitHub, and Magento can retrieve it to publish.
For further information, it's strongly recommended that you to access the official documentation available on the Magento Developers official site at http://devdocs.magento.com/guides/v2.0/extension-dev-guide/package_module.html.
Deploying the module
To deploy the module, follow this recipe:
- Open the terminal or command prompt.
- Access the
packt/bindirectory. - Then, run the
php magento module:enable --clear-static-content Packt_TweetsAboutcommand. - Run the
php magento setup:upgradecommand. - Next, run the
php magento setup:static-content:deploycommand. - In some cases, it is necessary to give
writepermissions again to the directories.
If everything goes alright, when you access the URL http://localhost/packt, you will see one link for the TweetsAbout extension in the topmost menu. Just click on it to see how the extension works. Take a look at the following screenshot:
You can navigate to the links to see how the pages work, as in the following screenshot:
The extension gets the ten last tweets in real time with the date, picture, and post. It's really awesome to watch our work running!
For sure, this extension can get a lot better, but it is only a starting point for big achievements.
Once you have your extension ready to work, you can publish it in the Magento Connect service (http://www.magentocommerce.com/magento-connect). Magento Connect is a service in which Magento members can share their open source or commercial extensions with Magento Community. The main contributions are generally based on the following:
- Modules
- Language packs
- Design interfaces
- Themes
Once you have the composer.json file configured, you can package your module by compacting it as a .zip file in the vendor-name_package-name-1.0.0.zip format.
Upload the module in your personal account in GitHub, and Magento can retrieve it to publish.
For further information, it's strongly recommended that you to access the official documentation available on the Magento Developers official site at http://devdocs.magento.com/guides/v2.0/extension-dev-guide/package_module.html.
Magento Connect
Once you have your extension ready to work, you can publish it in the Magento Connect service (http://www.magentocommerce.com/magento-connect). Magento Connect is a service in which Magento members can share their open source or commercial extensions with Magento Community. The main contributions are generally based on the following:
- Modules
- Language packs
- Design interfaces
- Themes
Once you have the composer.json file configured, you can package your module by compacting it as a .zip file in the vendor-name_package-name-1.0.0.zip format.
Upload the module in your personal account in GitHub, and Magento can retrieve it to publish.
For further information, it's strongly recommended that you to access the official documentation available on the Magento Developers official site at http://devdocs.magento.com/guides/v2.0/extension-dev-guide/package_module.html.
Packaging and publishing your module
Once you have the composer.json file configured, you can package your module by compacting it as a .zip file in the vendor-name_package-name-1.0.0.zip format.
Upload the module in your personal account in GitHub, and Magento can retrieve it to publish.
For further information, it's strongly recommended that you to access the official documentation available on the Magento Developers official site at http://devdocs.magento.com/guides/v2.0/extension-dev-guide/package_module.html.
You worked on a lot in this chapter! Congratulations. Now, you have solid grasp of the concept in Magento 2.0 extension development. You can note that Magento development has strict rules, but once you learn the basics, you can master Magento with hard work and study. Keep the good work going!
As a suggestion, try to read the official documentation and do projects that demand more user interaction, such as the admin panel and development of dynamic formularies. You can even increase the power of TweetsAbout. The sky is the limit!
In the next chapter, we will start to work with Magento mobile by testing and configuring some great options. See you!