Configuring Sequelize within an Express application
After we have installed our development tools and database, we can begin installing and configuring our application with Sequelize and Express. Express is a minimal web framework for Node.js runtime applications. Our Node.js application will use Sequelize to correspond with the database, and Express will relay those query results to the browser. More information on Express, along with a complete reference, can be found here: https://expressjs.com.
Within Command Prompt, PowerShell, or the terminal, enter the following commands for initializing our project:
mkdir airline
cd airline
npm init -y
This will create a directory called airline; then, we will change our working directory to the airline folder, and we will run an initialization script from the node package manager (npm). The npm command will create a package.json file that contains a bare configuration for npm to use on this project. After that, we will need to install the minimum required Node.js modules for our application, as follows:
npm install express @sequelize/core mysql2
Here is an online resource that you may refer to for a complete list of options for npm:
https://docs.npmjs.com/cli/v7/commands
Sequelize has a companion executable to help us initialize our project, manage updates to our schema, and handle database migrations. We can install it as a global (--location=global) binary within our userspace by entering the following command in our terminal:
npm install --location=global sequelize-cli
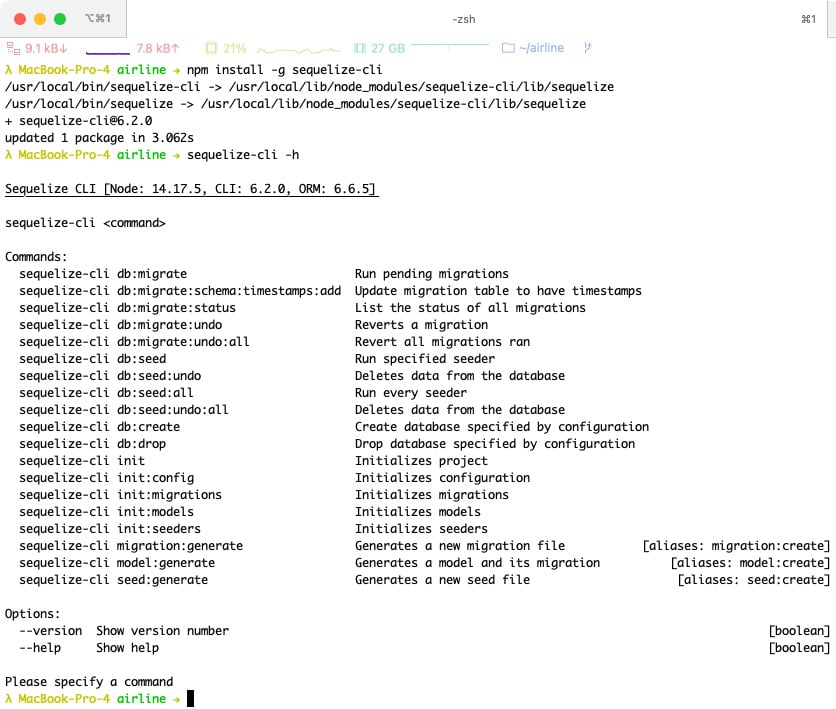
For a full list of commands available to you, the CLI has documentation built in that can be exposed using the -h or --help flags, as illustrated in the following screenshot:

Figure 1.21 – Sequelize CLI installation and help guide
The next step is to initialize a generic template that Sequelize provides for us from the CLI. This will generate several directories for configuration, migration, seed, and model files. Here’s the code to do this:
sequelize init
The following list offers a brief explanation of the directories created by the CLI in our project’s directory:
config: A directory that contains a database connection configuration file in JavaScript Object Notation (JSON) format. Thesequelize-clitool uses this configuration file to migrate schema and data files, but these configuration settings could also be used for our Node.js application as well.migrations: A directory containing Node.js files with instructions for Sequelize on how to scaffold your database’s schema and structure.models: A collection of Node.js files with Sequelize schema definitions.seeders: Similar to themigrationsdirectory but instead of defining our database’s schema, we will define our database’s data.
Now that we have the initial foundation of our application, we can edit our Sequelize configuration file located in config/config.json. Depending on which installation instructions you followed, the username and password values may be different than the book’s code base. The code is illustrated in the following snippet:
{
  "development": {
    "username": "root",
    "password": null,
    "database": "airline",
    "host": "127.0.0.1",
    "dialect": "mysql"
  },
  "test": {
    "username": "root",
    "password": null,
    "database": "airline",
    "host": "127.0.0.1",
    "dialect": "mysql"
  },
  "production": {
    "username": "root",
    "password": null,
    "database": "airline",
    "host": "127.0.0.1",
    "dialect": "mysql"
  }
}
If you do not wish to keep usernames and passwords in a file (which is a good idea for production environments or version control repositories), there is an alternative form for the configuration file that can accept an environment key with a connection Uniform Resource Identifier (URI) resource as the input (for example, mysql://root:[email protected]:3306/airline), as illustrated in the following code snippet:
{
  "development": {
    "use_env_variable": "DB_DEV_ENV"
  },
  "test": {
    "use_env_variable": "DB_TEST_ENV"
  },
  "production": {
    "use_env_variable": "DB_PRODUCTION_ENV"
  }
}
If we wanted to use the development configuration, our Node.js application would know to look for the connection parameters/URI from an environment variable called DB_DEV_ENV (you may use the same environment variable for any stage). For more options and configuration settings for the Sequelize CLI, refer to this resource: https://github.com/sequelize/cli/blob/master/docs/README.md.
Note
You can toggle between which environment you would like your application to be in by setting a NODE_ENV environment variable. The default value is development but if we wanted to use our production environment, we would set the environment like so: NODE_ENV=production.
Connecting Sequelize with Express
We can now begin building our Node.js application by creating an index.js file within the project’s directory and opening the file in our IDE of choice. Let us begin by typing in the following code:
const express = require("express");
const app = express();
const models = require("./models");
models.sequelize.sync().then(function () {
    console.log("> database has been synced");
    }).catch(function (err) {
    console.log(" > there was an issue synchronizing the
                    database", err);
});
app.get('/', function (req, res) {
    res.send("Welcome to Avalon Airlines!");
});
app.listen(3000, function () {
    console.log("> express server has started");
});
We begin by declaring our Express/web application variables (express and app) with the first two lines of the code. The next line is shorthand for invoking the ./models/index.js file that was created by the Sequelize CLI from earlier (we will go into details of that file in the next chapter). The following line runs the Sequelize sync() command, which will synchronize your model definitions with a database by creating the necessary tables, indices, and so on. It will also establish associations/relations, execute sync-related hooks/events, and so on.
The sync() command offers several options that are encapsulated within an object as the first parameter, as outlined here:
force: A Boolean value that will drop your database’s tables before re-creating them.match: A regular expression (regex) value to match against table names to sync. Useful for testing or to ensure only certain tables are affected by theforceoption within a production environment.logging: A Boolean or function value.true(the default) will useconsole.logwhen executing queries for logging.falsewill disable entirely, and a function can be used to send logs and context to another adapter. This book will go into detail about this option in a later chapter.schema: A string value for defining which database to operate in. Useful for when you are using a DBMS such as Postgres, which allows you to separate tables by not only a database (which MySQL calls a “schema”) but also by a namespace (which Postgres calls “schema”).searchPath: A string value to define the defaultsearch_pathfor Postgres databases only. This option will not pertain to this book’s code base or content.hooks: A Boolean value (defaults totrue) to execute several hooks/events that are related to sync events (beforeSync,afterSync,beforeBulkSync, andafterBulkSync).falsewill disable events from executing.alter: An object with the following parameter:drop: A Boolean value that prevents anydropstatements from being executed when Sequelize needs to runALTERcommands within the database.
You can define these options like so:
models.sequelize.sync({
  force: true,
  logging: false
})
Note
It is not recommended by the Sequelize community to run the force option as true within a production environment. This could have unintentional consequences such as deleting vital customer/user information. The force option is for when you are still prototyping your application and want to start your application on a clean slate per iteration.
The next command, app.get(...), instructs the Express framework to route the "/" (root) path of our web application to the scoped function (in this case, we are sending text back to the browser, as shown in Figure 1.22). After that, we start the Express server by calling app.listen(...), which will tell our application to listen for Hypertext Transfer Protocol (HTTP) events on port 3000, which can be accessed in our browser via http://localhost:3000 or http://127.0.0.1:3000, depending on your network interface settings. For starting our application, we can run the following command within our terminal/PowerShell:
node index.js
You should see text displayed on your screen indicating the following:
- Express has started
- A SQL query was executed
- The database has been synced
Note
Sequelize will automatically execute a SELECT 1+1 AS result query as a method for checking on the database connection’s health. Not all DBMSs offer a way of sending a ping packet to check whether a connection is successful or not.
Now, when you open your browser and visit the previously mentioned URL, you should see a page similar to what is shown here:

Figure 1.22 – Welcome page
Every time we make a change to our application, we will need to terminate our current process (Ctrl + C) within the terminal. This will send a SIGINT signal to the process, which will send an interrupt signal to the process in order to begin cleaning up and then exit/stop. To avoid having to restart our process manually after every change, we can install a separate process to help facilitate this for us called Nodemon (more information can be found here: https://nodemon.io/).
Nodemon may be installed as a global binary by running the following command:
npm install -g nodemon
You can confirm if the installation was successful by typing in the following:
nodemon index.js
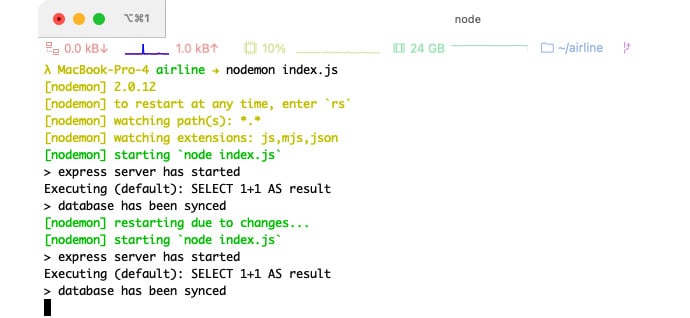
This should start our Node.js application while simultaneously watching for changed files within our project’s directory. Once we have made a modification to the project, we should see Nodemon automatically restarting our process, as illustrated in the following screenshot:

Figure 1.23 – Nodemon automatically restarting the application
The last step for this chapter is to make a few adjustments to our package.json file, as follows:
- Add
"private": trueunder the"name": "airline,"line. This adjustment will prevent us (or anyone else on the team) from publishing our project to the public npm registry. - Look for the
scriptsobject and replace whatever content is there with"start": "nodemon index.js". This will allow us to start our application by running the following command:npm run start
The final package.json file should look similar to this:
{
  "name": "airline",
  "private": true,
  "version": "1.0.0",
  "description": "",
  "main": "index.js",
  "scripts": {
    "start": "nodemon index.js"
  },
  "author": "",
  "license": "ISC",
  "dependencies": {
    "express": "^4.17.1",
    "mysql2": "^2.3.0",
    "@sequelize/core": „latest"
  }
}


