An event loop is a runtime model that enables users to run all operations from a single thread – irrespective of whether the operations access long-running external resources or not. For this to work, the event loop needs to make requests to an event provider, which calls the specified event handlers. In Node.js, the libuv library is used for event loop implementation.
The reason for giving libuv the most space in Figure 1.1 is to highlight the importance of this library. Internally, libuv is used for everything regarding I/O, which arguably is the most crucial piece of any framework. I/O lets a framework communicate with other resources, such as files, servers, or databases. By default, dealing with I/O is done in a blocking manner. This means that the sequence of operations in our application is essentially stopped, waiting for the I/O operation to finish.
Two strategies for mitigating the performance implications of blocking I/O exist.
The first strategy is to create new threads for actually performing these blocking I/O operations. Since a thread contains an independent group of operations, it can run concurrently, eventually not stopping the operations running in the original thread of the application.
The second strategy is to not use blocking I/O at all. Instead, use an alternative variant, which is usually called non-blocking I/O or asynchronous I/O. Non-blocking I/O works with callbacks, that is, functions that are called under certain conditions – for instance when the I/O operation is finished. Node.js uses libuv to make extensive use of this second strategy. This allows Node.js to run all code in a single thread, while I/O operations run concurrently.
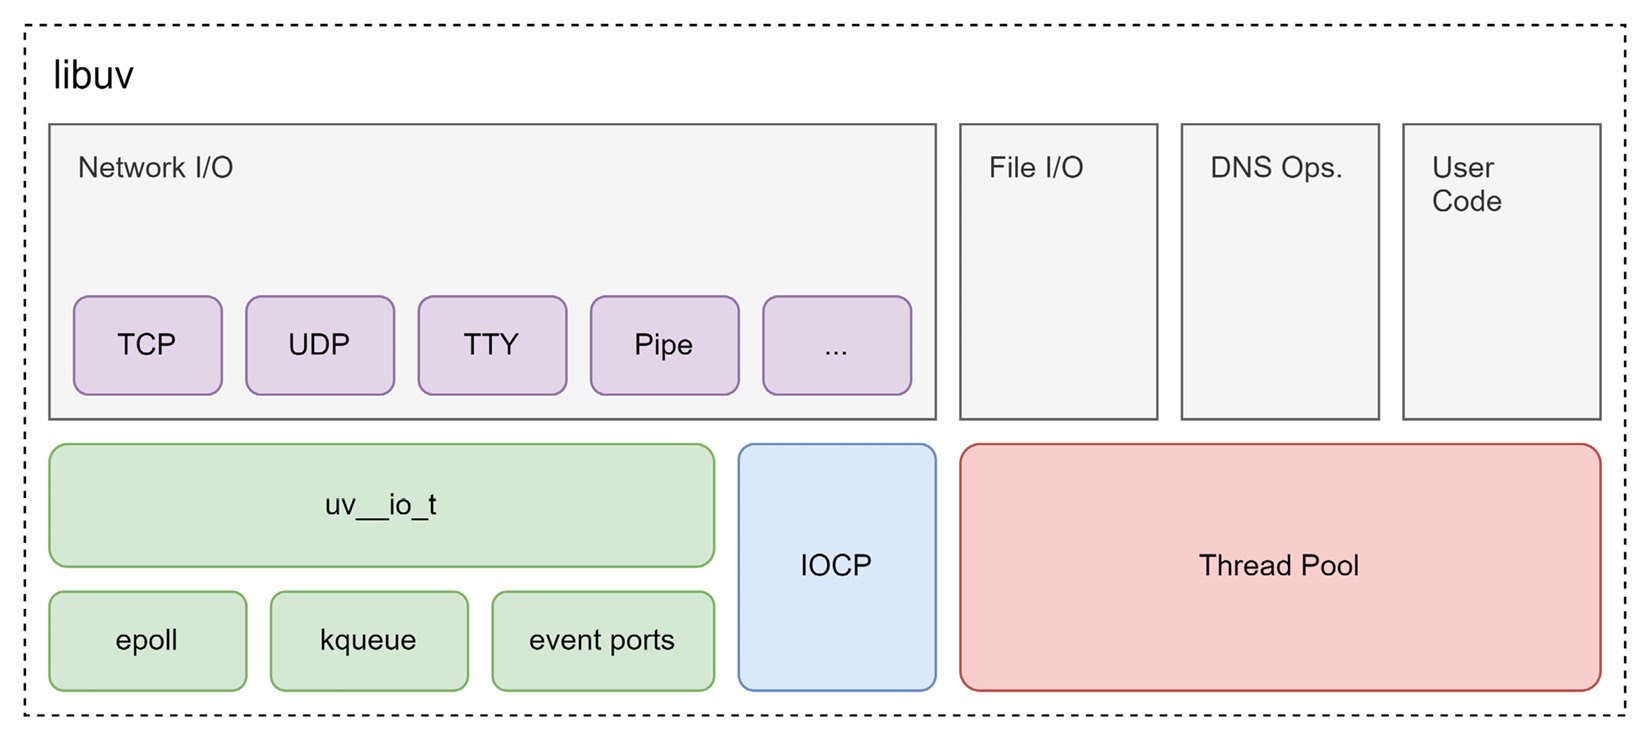
In Figure 1.3, the building blocks of libuv are displayed. The key part is that libuv already comes with a lot of functionality to handle network I/O. Furthermore, file and DNS operations are also covered well:
Figure 1.3 – Building blocks of libuv
In addition to the different I/O operations, the library comes with a set of different options for handling asynchronous user code.
The event loop itself follows the reactor design pattern. Wikipedia describes the pattern as follows:
The reactor design pattern is an event handling pattern for handling service requests delivered concurrently to a service handler by one or more inputs. The service handler then demultiplexes the incoming requests and dispatches them synchronously to the associated request handlers. (https://en.wikipedia.org/wiki/Reactor_pattern)
Importantly, this definition mentions synchronous dispatch. This means that code that is run through the event loop is guaranteed to not run into any conflicts. The event loop makes sure that code is always run sequentially. Even though the I/O operations may concurrently run, our callbacks will never be invoked in parallel. From our perspective, even though Node.js will internally (through libuv) use multiple threads, the whole application is single-threaded.
The following is a simple script that shows you the basic behavior of the event loop at play – we’ll discuss how to run this in the Using Node.js from the command line section:
events.js
console.log('A [start]');
setTimeout(() => console.log('B [timeout]'), 0);
Promise.resolve().then(() => console.log('C [promise]'));
console.log('D [end]');
We will run this script in the next section when we learn about the command line usage of Node.js. In the meantime, put some thought into the preceding code and write down the order in which you’ll see the console output. Do you think it will print in an “A B C D” order, or something else?
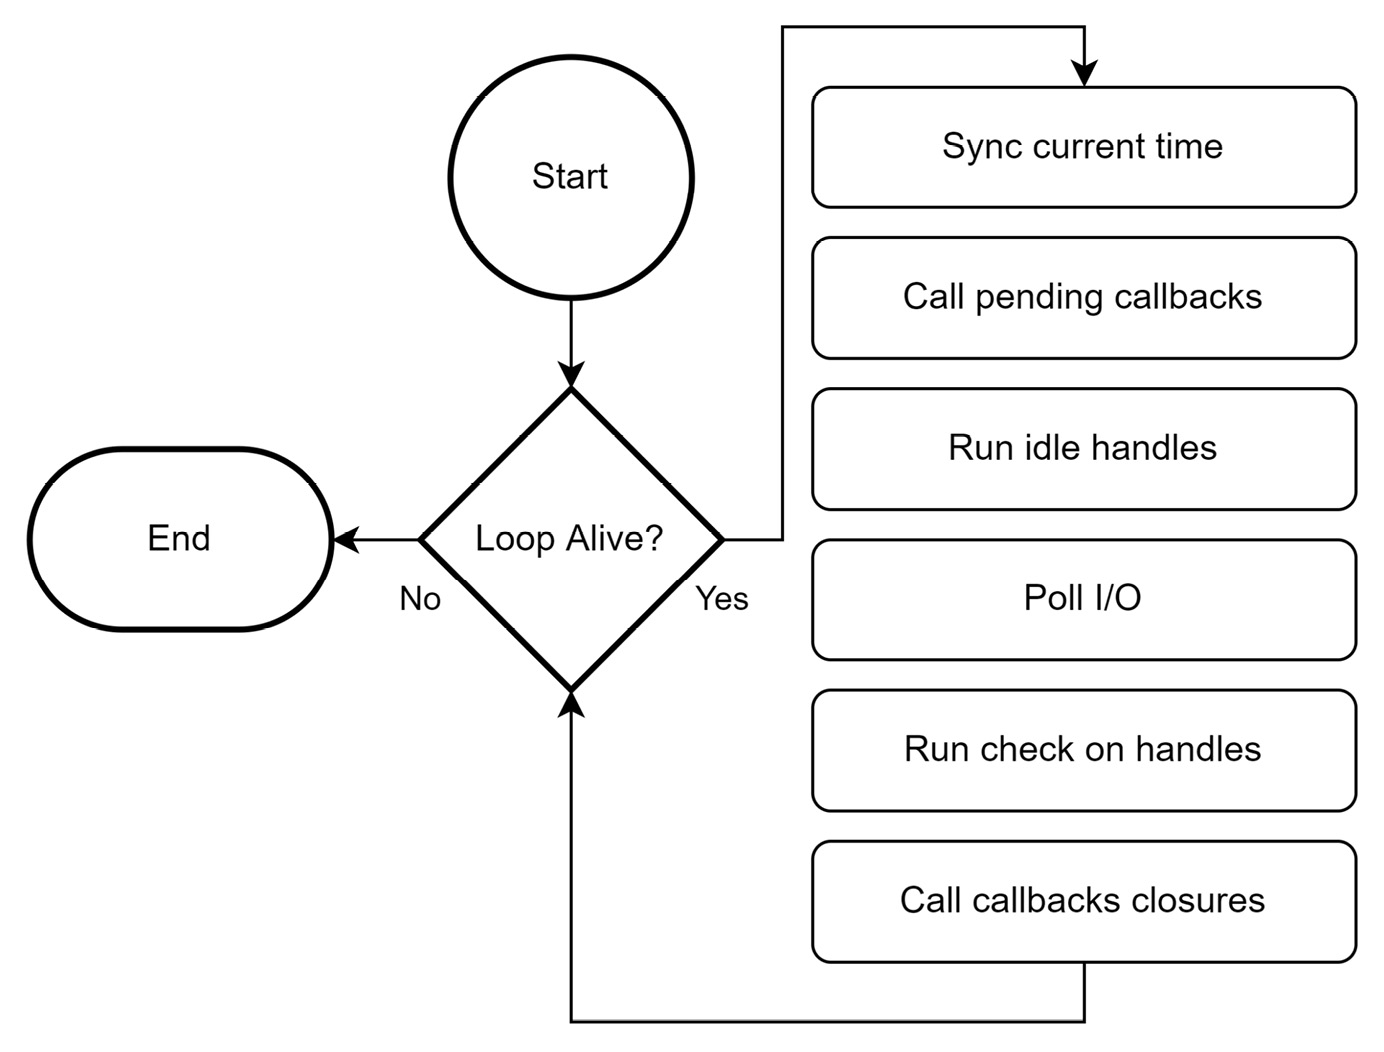
The algorithm of the implementation of the event loop in libuv is displayed in Figure 1.4:
Figure 1.4 – The implementation of the event loop in libuv
While the code snippet only deals with JavaScript-related constructs (such as console, Promise, and setTimeout), in general, the callbacks are associated with resources that go beyond Node.js, such as file system changes or network requests. Some of these resources may have an operating system equivalent; others only exist in form of blocking I/O.
Consequently, the event loop implementation always considers its thread pool and polls for progressed I/O operations. Timers (such as setTimeout in the example script) are only run in the beginning. To know whether a timer needs to be run, its due time is compared with the current time. The current time is synced with the system time initially. If there is nothing to be done anymore (that is, no active timer, no resource waiting to finish, etc.), then the loop exits.
Let’s see how we can run Node.js to solidify our knowledge about the event loop.


 Free Chapter


