
Using Node.js from the command line
Using JavaScript for a web application just requires you to open the website in a browser. The browser will evaluate the included JavaScript and run it. When you want to use JavaScript as a scripting language, you need to find a new way of running JavaScript. Node.js offers this new way – running JavaScript in a terminal, inside our computer, or from a server.
When Node.js is installed, it comes with a set of command-line tools that will be available in the terminal of your choice. For this book, you’ll need to know about three different executables that we’ll use throughout the chapters:
- node: The main application to run a Node.js script
- npm: The default package manager – more on that later
- npx: A very convenient utility to run npm binaries
For now, we only need to know about node. If we want to run the events.js script from the previous section, we need to execute the following command in the directory in which the script (events.js) has been placed. You can place it there by just inserting the content from the previous events.js listing:
$ node events.js

A [start]

D [end]

C [promise]

B [timeout]
The command is shown after the conventional $ sign indicating the command prompt. The output of running the script is shown below the node events.js command.
As you can see, the order is “A D C B” – that is, Node.js first handled all the sequential operations before the callbacks of the promise were handled. Finally, the timeout callback was handled.
The reason for handling the promise callback before the timeout callback lies in the event loop. In JavaScript, promises spawn so-called micro tasks, which are placed in the pending callback section of the libuv event loop from Figure 1.4. The timeout callback, however, is treated like a full task. The difference between them lies within the event loop. Micro tasks are placed in an optimized queue that is actually peeked multiple times per event loop iteration.
According to libuv, the timeout callback can only be run when its timer is due. Since we only placed it in the event loop during the idle handles (i.e., main section) of the event loop, we need to wait until the next iteration of the event loop.
The node command-line application can also receive additional parameters. The official documentation goes into all details (https://nodejs.org/api/cli.html). A helpful one is -e (short version of --eval) to just evaluate a script directly from the command-line input without requiring a file to run:
$ node -e "console.log(new Date())"

2022-04-29T09:20:44.401
Another very helpful command line flag is --inspect. This opens the standard port for graphical inspection, for example, via the Chrome web browser.
Let’s run an application with a bit of continuous logic to justify an inspection session. In the terminal on your machine, run the following:
$ node -e "setInterval(() => console.log(Math.random()), 60 * 1000)" --inspect

Debugger listening on ws://127.0.0.1:9229/64c26b8a-0ba9-484f-902d-759135ad76a2

For help, see: https://nodejs.org/en/docs/inspector
Now we can run a graphical application. Let’s use the Chrome web browser. Open it and go to chrome://inspect. This is a special Chrome-internal URL that allows us to see the available targets.
The following figure (Figure 1.5) shows how inspecting the Node.js application in the Chrome web browser may look:
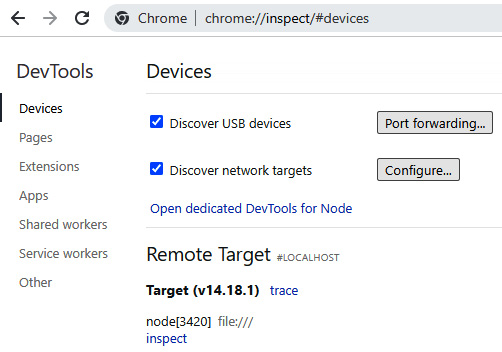
Figure 1.5 – Inspecting the Node.js application in the Chrome web browser
In this case, Chrome detected our application with the process ID 3420 running. On your machine, the process ID will most likely be different. No filename was given, as we started with the -e command-line option.
When you click on inspect, you’ll open the standard Chrome DevTools. Instead of debugging a website, you can now debug the Node.js application. For instance, you’ll already get the same console output that you see in the command line.
When you follow the link to the evaluated script from the DevTools console, you’ll get the ability to place breakpoints or pause the execution. Pausing the execution may not work immediately, as an active JavaScript operation is required for that.
In Figure 1.6, you see how debugging a Node.js script in the Chrome DevTools can look:
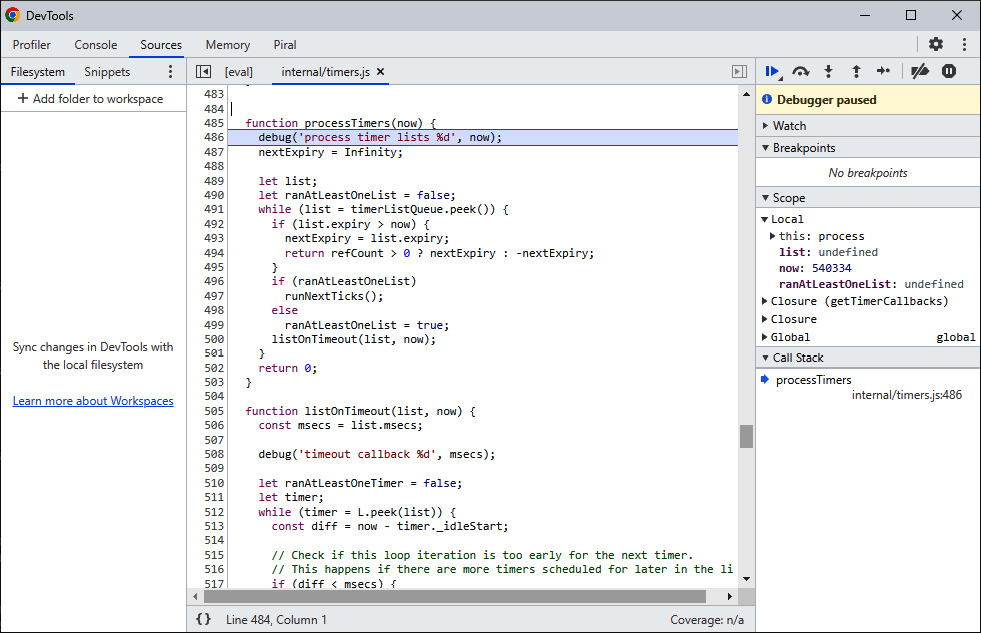
Figure 1.6 – Debugging a Node.js script in the Chrome DevTools
In the preceding example, JavaScript is only run every minute. When the pause occurs, you should end up in the internal/timers.js part of Node.js itself. This is a different JavaScript file, but it’s part of the whole Node.js framework. The file can be integrated because it follows certain conventions and rules that are known as CommonJS.