
Setting up your environment
Before we start coding, we need to ensure that we have everything we need installed and ready to use.
The only thing that is absolutely necessary in order to use Svelte is to have Node.js installed. The Svelte compiler itself is written in JavaScript, and it requires Node.js to be executed. Additionally, our development toolchain (the Webpack bundler and all the other build tools) run on Node.js, too.
For our sample application to work, we will also need a back-end service, as mentioned in the previous chapter, which we can run on our development machine.
Installing Node.js
If you don't have it already, you need to install the Node.js framework in your development machine.
While Svelte 3 officially requires Node.js 8 or higher, my recommendation is to use the latest Long-Term Support (LTS) version; at the time of writing, this is version 12.
The default Node.js installation comes with NPM too, which is the main package manager for JavaScript applications. Our Svelte project will heavily depend on NPM, too.
Installing on Windows
On Windows, the easiest approach is to install Node.js using the official installer downloaded from https://nodejs.org/en/download/.
From that page, fetch the Windows Installer (.msi) for the LTS version, selecting the correct architecture of your operating system (64-bit is the most common one at the time of writing). After downloading the installer, launch the application and follow the installation instructions on screen. The official installer includes NPM too. Note that the installer requires Administrator privileges, and you might need to authenticate with the system.
Using WSL on Windows 10
If you're on Windows 10, you have the option of using the Windows Subsystem for Linux (WSL) tool, which lets you run a full-fledged Linux environment within your Windows machine, and it is deeply integrated with Visual Studio Code. Many Node.js developers prefer to use WSL on Windows as some packages on NPM are not optimized for Windows.
If you decide to use WSL, you first need to enable it on Windows 10. Microsoft has published the necessary instructions at https://aka.ms/wsldocs. After WSL is installed and you have a Linux distribution ready, follow the instructions for Linux in the following section.
Installing on macOS
Just like on Windows, on macOS, you can install Node.js and NPM with the official installer published on https://nodejs.org/en/download/.
From that page, fetch the macOS Installer (.pkg) for the LTS version, which includes NPM too. After downloading it, launch the installer and follow the steps on screen.
Installing on Linux
On Linux, installing Node.js varies according to your distribution.
The Node.js project publishes pre-compiled binaries for Linux, for both x64 (64-bit Intel-compatible CPU) and ARM (both 32-bit and 64-bit). However, these require manual installation.
While most Linux distributions do ship official packages with Node.js, they're often very outdated, and I do not recommend using them.
Installing using a package manager
NodeSource maintains "semi-official" packages for the most popular Linux distributions. While these are not maintained by the Node.js project or the OpenJS Foundation, a link to these packages is available on the official Node.js website, too, and they're arguably the most popular option for Linux users.
These packages are available in the following forms:
- DEB packages, which is the format supported by Debian, Ubuntu, and other Debian-based distributions, including Linux Mint and Raspberry Pi OS.
- RPM packages, which is the format supported by Red Hat Enterprise Linux, CentOS, Fedora, Amazon Linux, and distributions based on those.
- Snaps for all distributions that support snapd.
You can find the list of packages and installation instructions on GitHub: https://github.com/nodesource/distributions
Installing from the official binaries
As mentioned, the Node.js project publishes official binaries for Node.js for all architectures, but they come without an installer.
Nevertheless, using the binary tarball (a .tar.gz archive) can give you more control over the version(s) of Node.js that you run, as well as more flexibility.
To install Node.js using the official binary tarball, I recommend uncompressing it into a folder such as /usr/local/node-$NODE_VERSION-linux-x64 and then creating a symbolic link to that folder from /usr/local/node. Not only will this give you the flexibility to update Node.js by downloading a new tarball and changing the symbolic link, but it will also minimize the chances that another package you install from your distribution's repositories brings in a conflicting binary.
To start, set the version of Node.js you want to use in an environmental variable for the next commands. As of the time of writing, the latest LTS version available is 12.18.3, but check on https://nodejs.org first:
$ NODE_VERSION="v12.18.3"
Then, download and uncompress the binary tarball:
$ curl -LO http://nodejs.org/dist/$NODE_VERSION/node $NODE_   VERSION-linux-x64.tar.gz
$ tar xzf node-$NODE_VERSION-linux-x64.tar.gz
$ sudo cp -rp node-$NODE_VERSION-linux-x64 /usr/local/
$ sudo ln -s /usr/local/node-$NODE_VERSION-linux-x64 /usr/   local/node
After this, the Node.js binary is available at /usr/local/node/bin/node.
You can add /usr/local/node/bin to your $PATH to be able to invoke node directly. The instructions for doing this depend on the shell you use and on the location of your shell's profile file (for example .bash_profile or .zprofile). Normally, after identifying the correct file, you'd append the following line to it:
export PATH=$PATH:/usr/local/node/bin
Installing using NVM
For macOS and Linux (including WSL on Windows 10), an alternative way to install Node.js and NPM is to use NVM, or the Node Version Manager.
NVM is a set of scripts that allow Node.js to be installed and updated, multiple versions maintained, and even different versions of Node.js specified on a per-project basis.
Full reference to NVM and all its options can be found on the project's GitHub page: https://github.com/nvm-sh/nvm
Here are the commands to install NVM on a macOS, Linux, and WSL environment, selecting version 12:
$ curl -o- https://raw.githubusercontent.com/nvm-sh/nvm/   v0.35.3/install.sh | bash
$ nvm install 12
Verifying that Node.js and NPM are installed
Regardless of your platform and operating system, to test whether Node.js and NPM are installed correctly, you can open a terminal and run the following command:
$ node -v
v12.18.3
$ npm -v
6.14.5
You should see the versions of Node.js and NPM that you just installed, just like in my example above (your versions might be newer than mine).
Setting up Visual Studio Code
Let me begin this section by saying that this is fully optional, and you're welcome to use your favorite code editor instead.
However, while all editors are good, Visual Studio Code is probably the most convenient option for working with Svelte, thanks to having specific extensions for it that offer syntax highlighting and checking, autocompletion, and so on.
If you're not familiar with Visual Studio Code, it's a free and open source editor from Microsoft that runs on Windows, macOS, and Linux, and it is highly customizable thanks to its vast extension marketplace. Visual Studio Code is the most popular code editor according to the StackOverflow 2019 Developer Survey, and it's especially popular among developers working with JavaScript.
To start with Visual Studio Code, follow these steps:
- Download the installer for your platform from the official website: https://code.visualstudio.com. Then, install it by following the usual process for your operating system or distribution.
- After installing Visual Studio Code, install the free Svelte extension from the Visual Studio Marketplace: https://aka.ms/vscode-svelte. This extension provides syntax highlighting and autocompletion for Svelte components, as well as support for diagnostic messages, and it's strongly recommended for everyone working with Svelte.
- For debugging within the editor, it's useful to install the Debugger for Chrome extension from the Marketplace (similar extensions exist for Firefox and Edge, too):https://aka.ms/vscode-chrome-debugger.
- Lastly, another very useful extension is the NPM one, which is again free from the Visual Studio Marketplace: https://aka.ms/vscode-npm. This affords conveniences for using NPM commands directly within the editor, without using a terminal.
Note
If you are working on Windows 10 with Node.js installed on WSL, you might want to configure Visual Studio Code for using WSL, too. The editor should automatically detect the presence of WSL and recommend the extension to you, but full instructions (and gotchas) are available in the documentation: https://code.visualstudio.com/docs/remote/wsl
Launching the back-end service
As mentioned in the first chapter, just like in most other real-world situations, our demo application requires a back-end service. This provides REST APIs to access a persistent data store, as well as user authentication.
To keep us focused on working on our Svelte code base, I've built a small application to provide these back-end services. Its source code is available on GitHub (https://bit.ly/sveltebook, in the api-server folder) and it's distributed as a pre-compiled executable that you can run on your laptop and that works together with the app you're developing.
Running the pre-compiled binary
The simplest way to get the back-end service running is to download the pre-compiled binary from the GitHub project page, and is available for Windows, macOS, and Linux.
Go to https://bit.ly/sveltebook and look for Pre-compiled binaries links in the README.md file, and then download the one for your operating system and architecture. The file is an archive (tar.gz or zip) that contains the application you need to run.
For most users, launching the application requires just double-clicking on the executable. A terminal window should launch automatically, running a local server.
Note for macOS users
The pre-compiled binary is not signed with an Apple developer certificate, and Gatekeeper will refuse to run it in newer versions of macOS. If this happens to you, you will notice an error saying that the app is coming from an unidentified developer.
To run the application on macOS, you can either (temporarily) disable Gatekeeper and allow unsigned applications (refer to the Apple Support page: https://apple.co/2E3mVYP ) or run this command: xattr -rc path/to/application (where path/to/application is the location of the downloaded binary).
The back-end application stores data on your local disk, in a folder called data in the same location where you placed the downloaded binary.
To terminate the application, in most cases, you just need to close the terminal window.
Running with Docker
If you have Docker installed in your laptop, you can also launch the back-end service as a container.
This command should work for most users:
$ docker run --rm -p 4343:4343 \
    -v ~/data:/data \
    italypaleale/sveltebook
This command will launch the Docker container, exposing port 4343 on the local machine for our Svelte application to interact with. It also stores persistent data (for example, your journal entries) in the data folder inside your home directory.
To kill the back-end service, press Ctrl + C in the terminal window, or close the terminal.
Check whether the application is working
To test whether the back-end application is working correctly, open your web browser and visit the following link:
If everything is fine, you should see a welcome page:
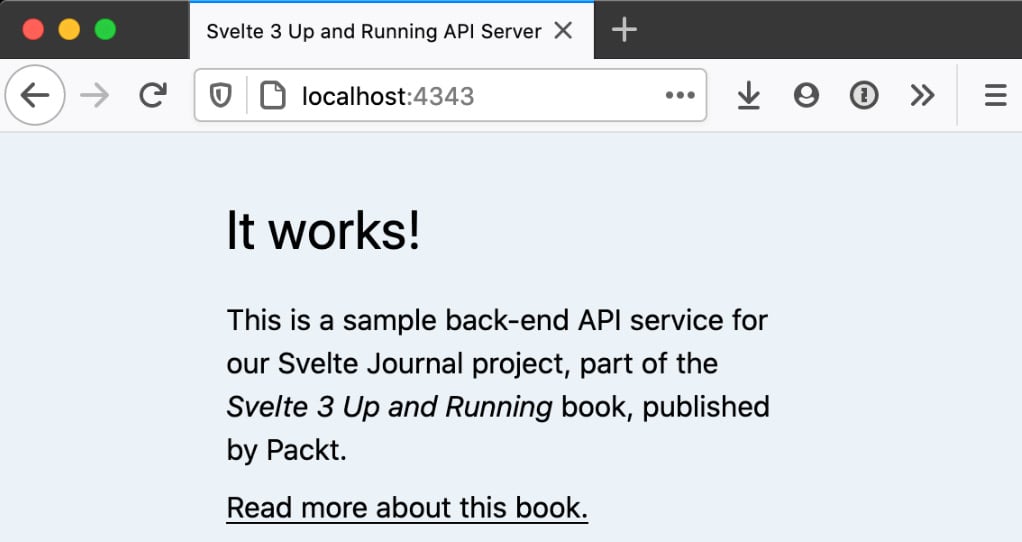
Figure 2.1 – Screenshot of the welcome page in the back-end server application