
In this appendix we will walk through downloading, installing, and setting up the XAMPP package. XAMPP is a free package that has a collection of free applications assembled to provide you with an easy-to-setup web server (Apache), database server (MySQL), and server-side scripting language (PHP). XAMPP lets you experiment with these technologies and develop your own web applications.
Setting up an AMP (Apache, MySQL, PHP) environment has typically required configuring the different applications to work on their own, and then to work with each other. With XAMPP this interplay has already been set up for you, and the system comes ready configured and ready to go. In addition to being easy to get started, XAMPP includes a number of useful extensions, code libraries, and other applications, all already configured so you don't need to spend a long time trying to get them working together.
Note
Note that we are installing XAMPP here as a 'development' or 'testing' environment only. We will only be using XAMPP for testing and exploring the technologies, and not as a 'production' environment for serving our website to the outside world. Setting up a production web server and a database server, and securing and optimizing them is a topic beyond the scope of this text.
There is a version of the XAMPP package available for Windows, Linux, Mac OS X, and the Solaris operating system. XAMPP is free to download, and the package contains the following:
The AMP environment of Apache, MySQL, PHP.
PHP 4 and PHP 5, and many extensions.
phpMyAdmin, the leading web-based interface to MySQL.
The PEAR library. PEAR (PHP Extension and Application Repository) is a framework for reusable PHP components, and is a favorite among professional PHP developers. You can find out more about PEAR at
pear.php.net.eAccelerator, a PHP caching utility to speed up the serving of your pages.
FileZilla, an FTP server.
An implementation of OpenSSL for running your site under HTTPS.
The advantage of the XAMPP package is that everything you need is collected together for you, tested, and ready to go. The downside is that you will have a very large file to download. On the brighter side, you only have to download one file rather than downloading lots of files, and then trying to get them working.
The home of the XAMPP package is the sitewww.apachefriends.org/en/ . The installation walkthrough in this chapter may not solve all your problems, and only covers Windows. If you find yourself in need of further help, check out the XAMPP documentation page at:
http://www.apachefriends.org/en/faq-xampp.html
Details of the XAMPP package itself can be found at:
http://www.apachefriends.org/en/xampp.html
On that page, you will find a link to the XAMPP version of your particular operating system. We will be choosing XAMPP for Windows. Clicking the XAMPP for Windows link on this page brings you to:
http://www.apachefriends.org/en/xampp-windows.html
You will find that there are several options for downloading XAMPP. First, you can choose from one of three types of package:
XAMPP
XAMPP add-ons
XAMPP Lite
Each of these packages is available in different download formats, a Windows installer file, a ZIP file, or a self-extracting 7-ZIP archive:
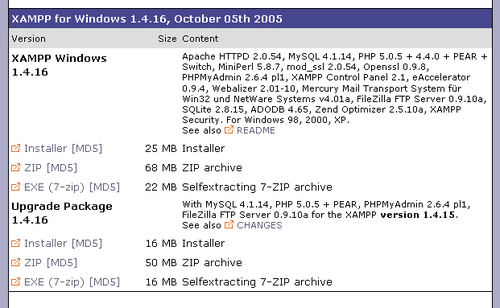
We will be choosing the Installer version of the full XAMPP package. This is some 25MB to download. You can choose the Upgrade Package if you already have an earlier version of XAMPP installed on your system.
The XAMPP add-ons package consists of more open-source technologies, such as Python, Perl, Tomcat, and Cocoon. We will not need them in this book. The XAMPP Lite package is half the size of the full XAMPP package, but it does contain everything that you will need to run the code in this book. However, the Lite package does not come as a Windows installer.
Clicking the Installer link takes you to a page where you select the 'nearest' Sourceforge mirror site from which to download the file. You can download the file from any of the sites listed, so you might want to pick the one nearest to you. The downloaded file will have a filename of the form:
xampp-win32-1.4.16-installer.exe.
The 1.4.16 part is the current XAMPP version.
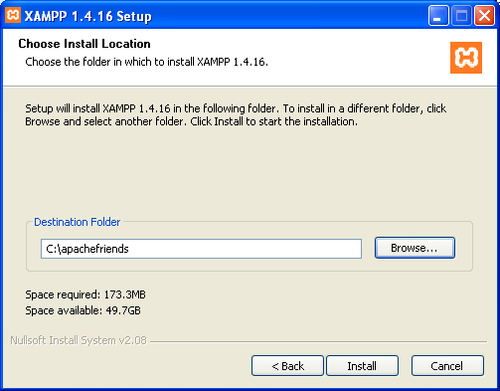
We will install the XAMP package into a folder called c:\apachefriends\. You can either create this folder before you begin, or from within the installation process.
We begin by double-clicking on the file, and we will be presented with a dropdown to choose the language of our installation. Select English and click OK to move on to the welcome page, which displays a simple message, and you can click Next to move to the start of the process.
You will be presented with a dialog asking you to choose the location for XAMPP to install its files into. XAMPP will create a folder called xampp in the Destination Folder specified, and add its files in there. Clicking the Browse button allows you to create the apachefriends folder if you have not already done so, and then the folder can be selected:
Click Install to continue and the installation begins. The files are extracted and copied to the specified folder. A command-line window will open at one point, right before the end; do not be disturbed by that! After the command-line window closes, the installation is complete, and you are presented with the end screen. Click Finish to complete the installation.
After clicking Finish, you will be asked if you wish to install the XAMPP servers as Windows services. This will save you the trouble of having to start them manually every time you boot up.
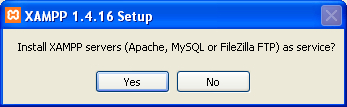
Click Yes to begin installing these servers as Windows Services.
Note
If you are running the IIS server or Skype VOIP application, then exit them before attempting to install Apache as a Windows Service. Otherwise, the Apache service will fail to install as a Windows Service, with XAMPP reporting a problem with port 443 (for Skype) or port 80 (for IIS).
You will first be asked if you wish to install Apache as a Windows service. Again, click Yes. Then you will be asked if you wish to install MySQL as a Windows Service. Again, click Yes. The next choice is if you want to install Filezilla FTP as a Windows Service. We don't have need of an FTP server in this book, so you can click No.
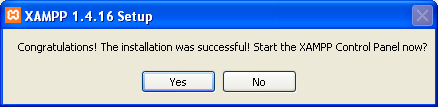
After this, you are presented with a congratulatory message, and an option to view the Control Panel:
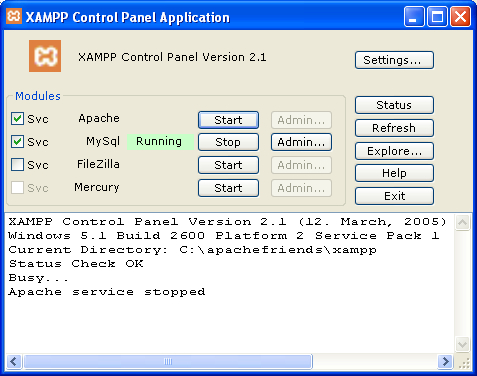
The XAMPP Control Panel is used to control and monitor the status of the services that XAMPP has installed. When the Control Panel is running, you will see an icon like:

in your System Tray, and you can double-click it to get the XAMPP Control Panel back on your screen. If you have closed the Control Panel, you can open it again from Start | Programs | apachefriends | xampp | CONTROL XAMPP SERVER PANEL. Alternatively, you can control and monitor these services in the usual way from the Windows Control Panel, (Start | Settings | Control Panel), by using the Services area found in Administrative Tools.
With our servers installed as services, we are ready to go. Open up your browser, and enter http://localhost/ into the navigation bar. You should see the following splash screen, inviting you to select a language. We will select English:

Now you will be taken to your XAMPP homepage. In future you will directly be taken to this page when you enter http://localhost/ into your browser, bypassing the language splash screen.
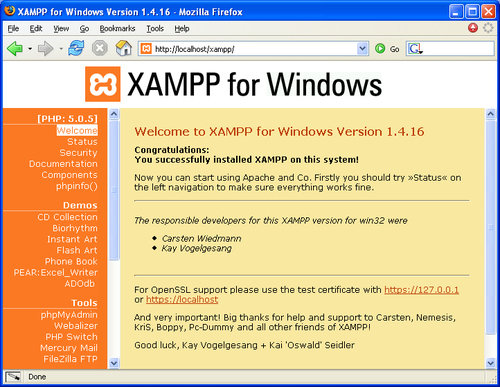
You will find a range of options in the left-hand panel for you to test out what comes with XAMPP. Of particular interest is phpMyAdmin, which we will be making use of in many parts of the book, and which is likely to become a very important tool as you work more with PHP and MySQL. You can click the link in the left-hand panel, or enter its URL (http://localhost/phpMyAdmin/) directly into the browser to get started with it.
There is one step left. By default, XAMPP is configured to run PHP 5. We will need to set XAMPP to run PHP 4. PHP-Nuke is written in PHP 4, so it is sensible to be running this while using PHP-Nuke. Although there is great compatibility for PHP 4 applications running under PHP 5, there is no particular reason to run PHP 5 for PHP-Nuke, so we will make the switch.
There is a file called php-switch.bat in the apachefriends\xampp\ folder that allows you to make the switch between PHP 5 and PHP 4 (and back again). However, before you can use it you need to stop the Apache Service.
Open up the XAMPP Control Panel, and click the Stop button next to the Apache service. You should see a message reporting the service has been stopped:
Now double-click the file php-switch.bat in the apachefriends\xampp folder, and a command‑line window will open, and you will be prompted to choose the version of PHP.
Simply press 4 followed by Enter, and XAMPP will switch over to PHP 4 for you. Once it has completed, you will see a message containing this report:
OKAY ... PHP SWITCHING WAS SUCCESSFUL
Press any key to close the window. You will now have to restart Apache from the Control Panel by clicking the Start button, and then you can return to your browser and visit your XAMPP home page. Once you are finished with the Control Panel, click Exit to shut it down.
You can use php-switch.bat to switch back to PHP 5 again if you want to continue working with PHP 5, but remember to stop the Apache service before using it.
Before we finish off, it's worth noting two important folders in your XAMPP installation.
htdocs:This folder is your 'document root'. A file placed in this folder will be made available by the web server. We will be copying our installation of PHP-Nuke into this folder to get it working properly.apache:This folder contains a file calledapache_installservice.bat. If Apache failed to install as a service during the installation process, then you can run this file to try again. Also in theapachefolder is a folder calledbin. This contains most of the binary files of the XAMPP installation, and also a number of configuration files. In particular, it contains the PHP configuration file,php.ini. There are twophp.inifiles in the standard installation of XAMPP, but if you need to make changes to 'the PHP configuration file', you should make changes to thephp.inifile in theapache\bin\folder or you may find your changes do not have any effect.
Your XAMPP installation is now set up and working, and you are ready to begin installing PHP‑Nuke!