Book Image

C# 8 and .NET Core 3 Projects Using Azure - Second Edition

By : Paul Michaels, Dirk Strauss, Jas Rademeyer
Book Image

C# 8 and .NET Core 3 Projects Using Azure - Second Edition

By: Paul Michaels, Dirk Strauss, Jas Rademeyer

Overview of this book

.NET Core is a general-purpose, modular, cross-platform, and opensource implementation of .NET. The latest release of .NET Core 3 comes with improved performance and security features, along with support for desktop applications. .NET Core 3 is not only useful for new developers looking to start learning the framework, but also for legacy developers interested in migrating their apps. Updated with the latest features and enhancements, this updated second edition is a step-by-step, project-based guide. The book starts with a brief introduction to the key features of C# 8 and .NET Core 3. You'll learn to work with relational data using Entity Framework Core 3, before understanding how to use ASP.NET Core. As you progress, you’ll discover how you can use .NET Core to create cross-platform applications. Later, the book will show you how to upgrade your old WinForms apps to .NET Core 3. The concluding chapters will then help you use SignalR effectively to add real-time functionality to your applications, before demonstrating how to implement MongoDB in your apps. Finally, you'll delve into serverless computing and how to build microservices using Docker and Kubernetes. By the end of this book, you'll be proficient in developing applications using .NET Core 3.
Table of Contents (13 chapters)

Creating a new WinForms application

Let's start by creating a new .NET Core 3.0 WinForms application and later we'll also see how to upgrade an old .NET Core WinForms app to 3.0, so that we can show both ways of achieving this.

To follow this section, you'll need to install the WinForms designer described in the Technical requirements section. It's worth pointing out that this tool is in preview at the time of writing and therefore has a number of limitations, so the instructions have changed in order to cater to those limitations.

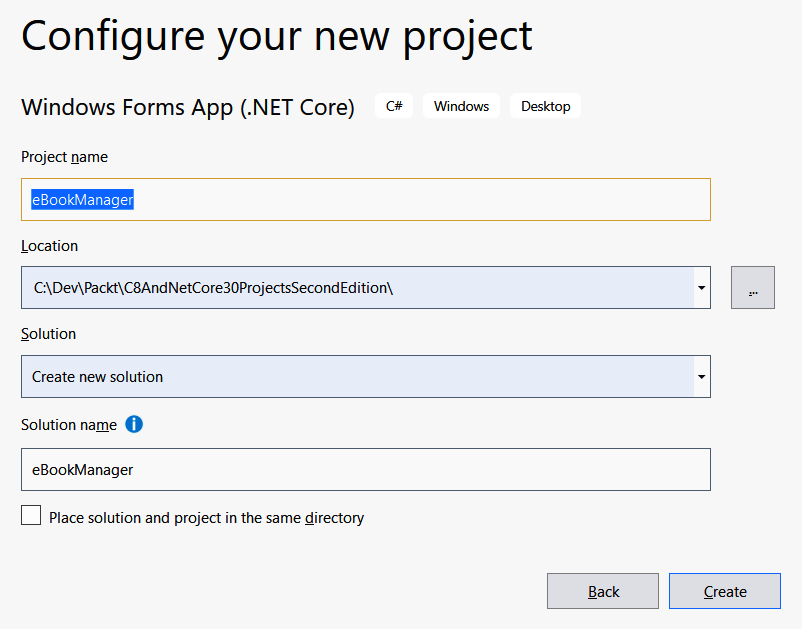
Using Visual Studio 2019, we will create a simple Windows Forms App template project. You can call the application anything you like, but I called mine eBookManager:

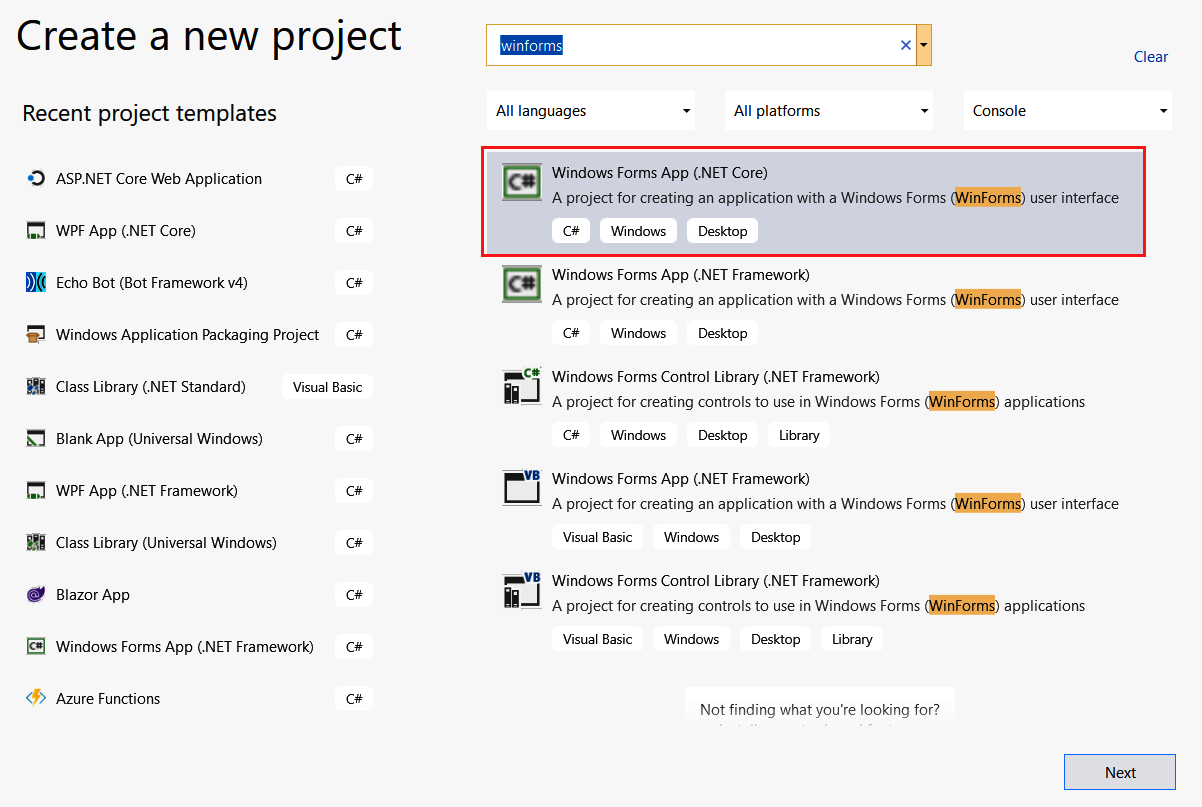
The process of creating a new project has changed slightly in Visual Studio 2019, and you are required to select the type of application, followed by where to create it:

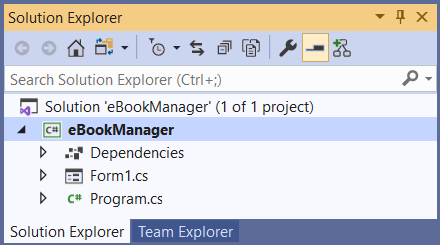
The project will be created and will look as follows:

Since this is .NET Core, you can do all of this from the command line. In PowerShell, running the following command will create an identical project: dotnet new winforms -n eBookManager.

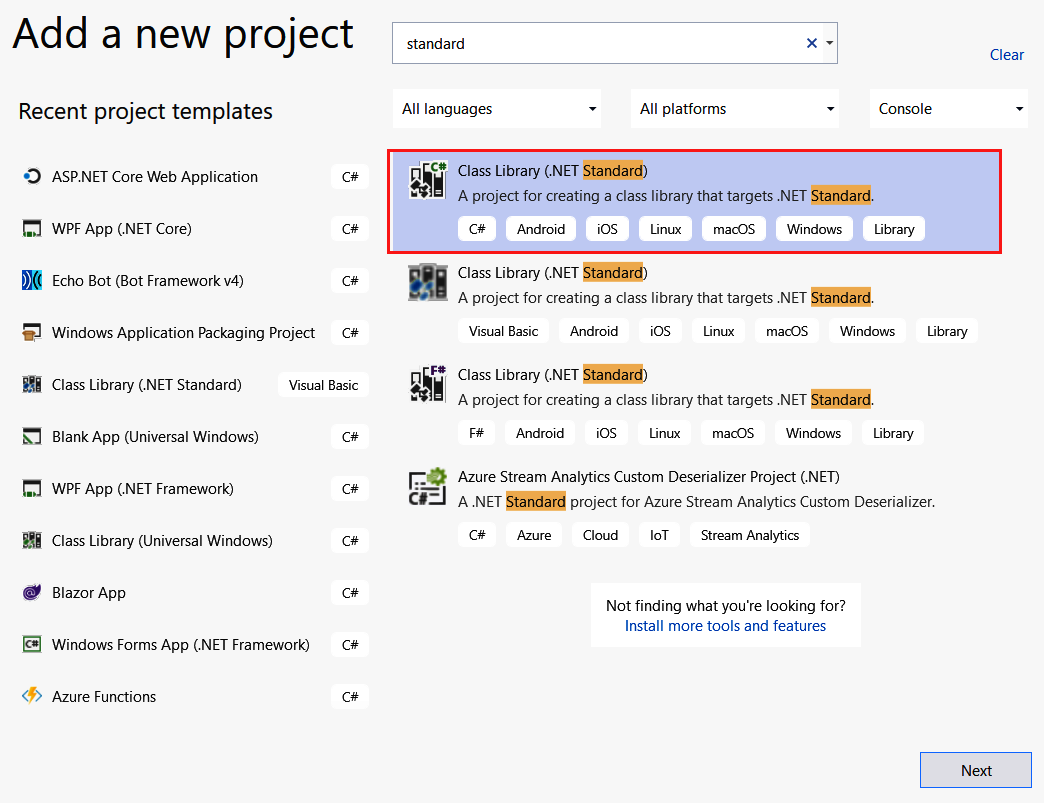
Our solution needs a class library project to contain the classes that drive the eBookManager application. In .NET Core 3.0, we have the option of creating either a .NET Core class library or a .NET Standard class library.

.NET Standard is a bit of a strange concept. In and of itself, it is not a technology, but a contract; creating a .NET Standard class library simply prevents you from using anything that is .NET Core—(or framework—) specific, and does not adhere to .NET Standard. The following document illustrates the .NET Standard versions, and what releases of Core and Framework support them: https://github.com/dotnet/standard/blob/master/docs/versions.md.

Add a new Class Library (.NET Standard) project to your solution and call it eBookManager.Engine:

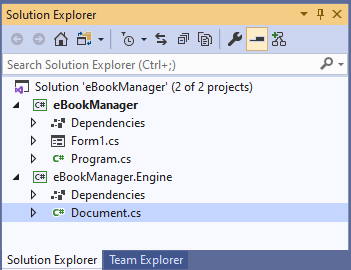
A class library project is added to the solution with the default class name. Change this class to Document:

The Document class will represent a single eBook. When thinking of a book, we can have multiple properties representing a single book, but that would be representative of all books. An example of this would be the author. All books must have an author; otherwise, they would not exist.

The properties I have added to the class are merely my interpretation of what might represent a book. Feel free to add additional code to make this your own. Open the Document.cs file and add the following code to the class:

public class Document
{
public string Title { get; set; }
public string FileName { get; set; }
public string Extension { get; set; }
public DateTime LastAccessed { get; set; }
public DateTime Created { get; set; }
public string FilePath { get; set; }
public string FileSize { get; set; }
public string ISBN { get; set; }
public string Price { get; set; }
public string Publisher { get; set; }
public string Author { get; set; }
public DateTime PublishDate { get; set; }
public DeweyDecimal Classification { get; set; }
public string Category { get; set; }
}

You will notice that I have included a property called Classification of type DeweyDecimal. We have not added this class yet and will do so next. To the eBookManager.Engine project, add a class called DeweyDecimal. If you don't want to go to this level of classification for your eBooks, you can leave this class out. I have included it for the sake of completeness. We're going to introduce a neat little feature that's been in Visual Studio for some time: if you hover over the DeweyDecimal text, you'll see a lightbulb appear (you can bring this menu up manually by holding the Ctrl key and the dot key (Ctrl + .). I will be using this shortcut profusely throughout the rest of the book!):

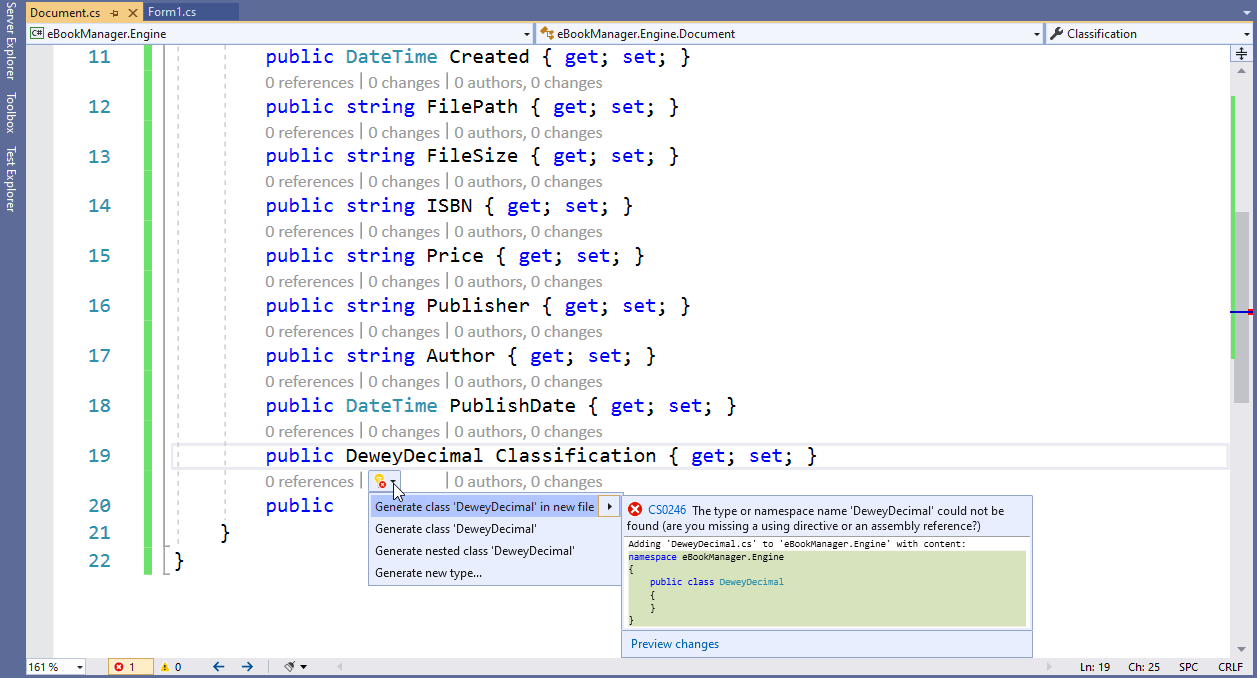
This allows us to create a new class with a couple of keystrokes. It also means that the name of the class will match the class name in the calling code.

You can use the lightbulb menu to create methods, add using statements, and even import NuGet libraries!

The DeweyDecimal system is quite big. For this reason, I have not catered for every book classification available. I have also assumed that you only want to be working with programming eBooks. In reality, however, you may want to add other classifications, such as literature, the sciences, the arts, and so on. It is up to you:

  1. Open up the DeweyDecimal class and add the following code to the class:
public class DeweyDecimal
{
public string ComputerScience { get; set; } = "000";
public string DataProcessing { get; set; } = "004";
public string ComputerProgramming { get; set; } = "005";
}

Word nerds may disagree with me here, but I would like to remind them that I'm a code nerd. The classifications represented here are just so that I can catalog programming- and computer science-related eBooks. As mentioned earlier, you can change this to suit your needs.

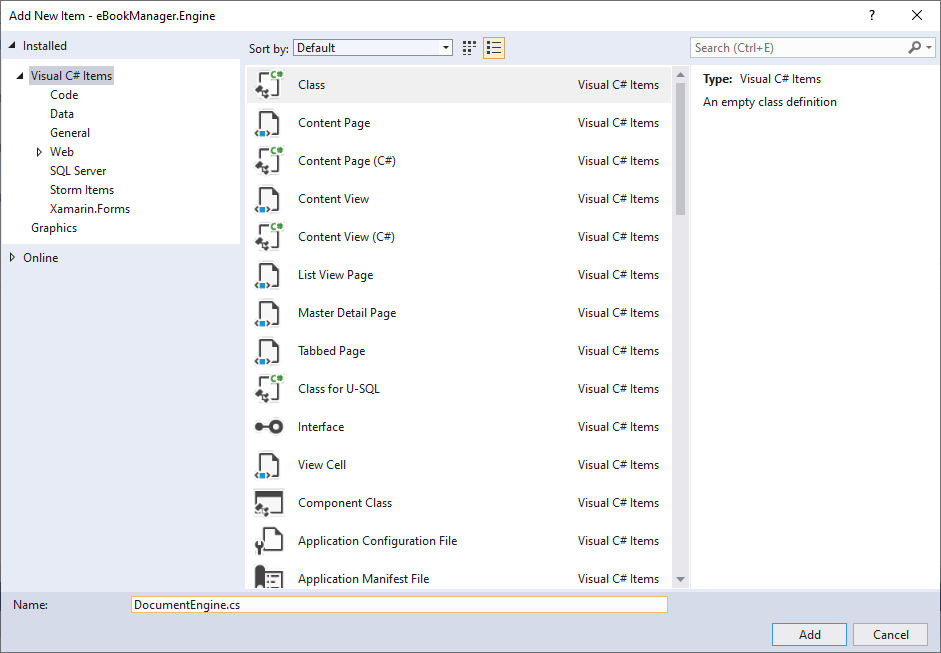
  1. We now need to add in the heart of the eBookManager.Engine solution. This is a class called DocumentEngine and will contain the methods you need in order to work with the documents:

Your eBookManager.Engine solution will now contain the following classes:

  • DeweyDecimal
  • Document
  • DocumentEngine
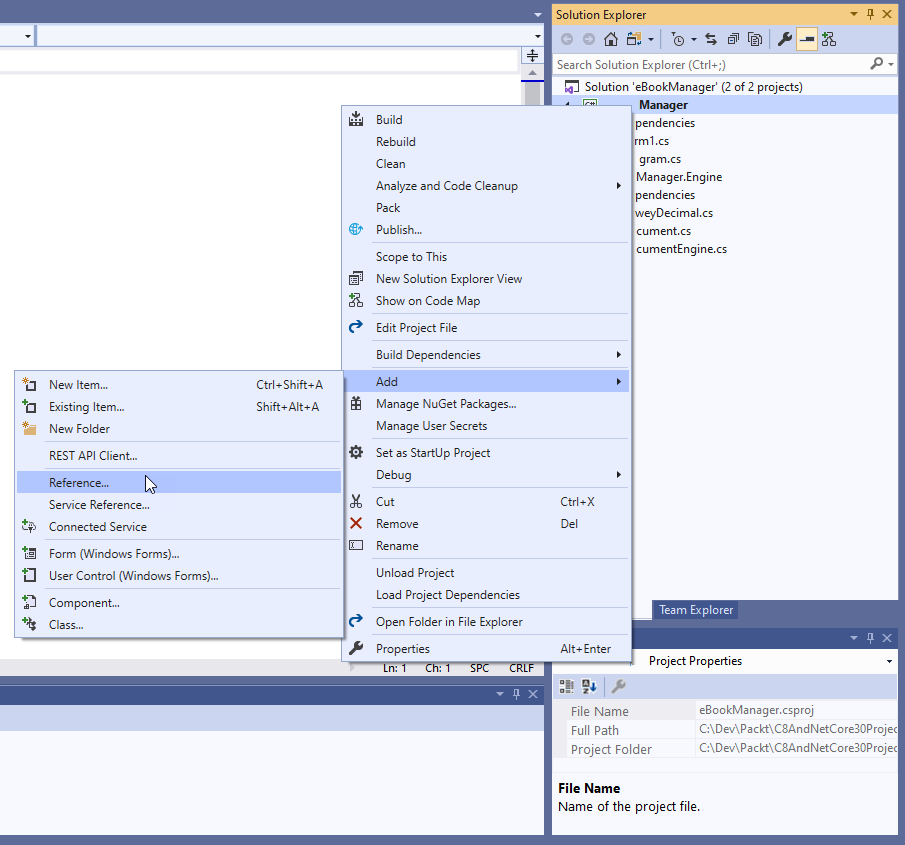
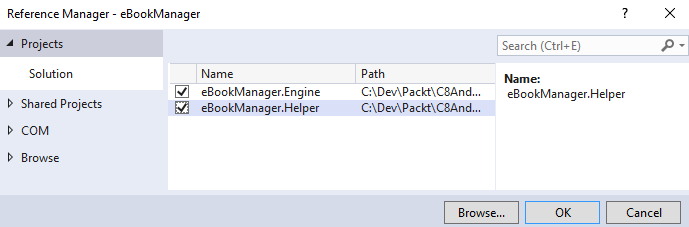
  1. We now need to add a reference to eBookManager.Engine from the eBookManager project:

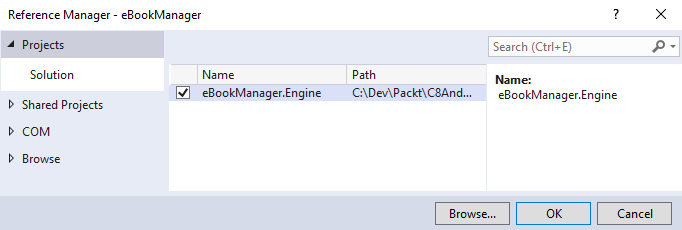
The eBookManager.Engine project will be available in the Projects section in the Reference Manager screen:

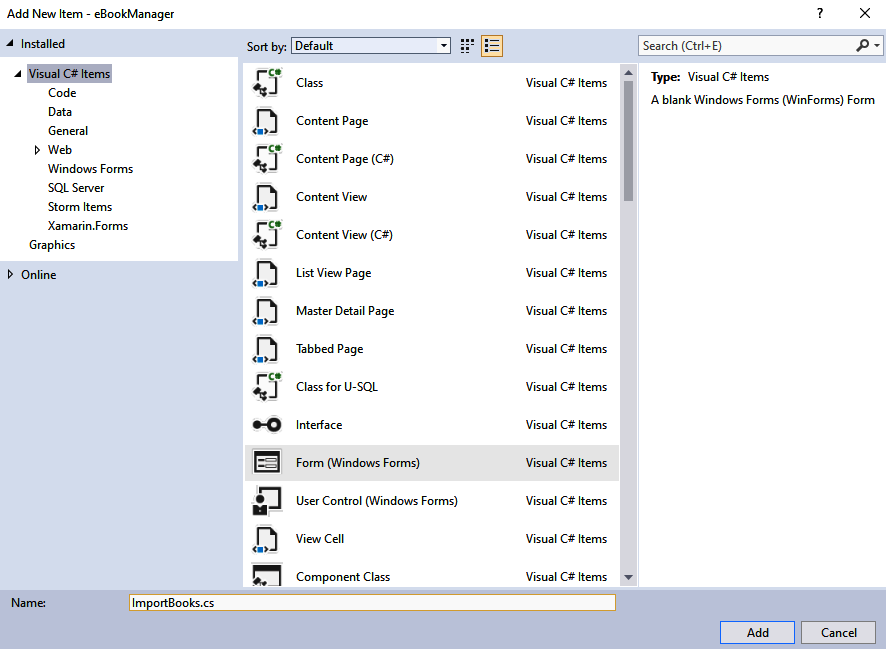
  1. Once we have added the reference, we need a Windows Form that will be responsible for importing new books. Add a new form called ImportBooks to the eBookManager solution:
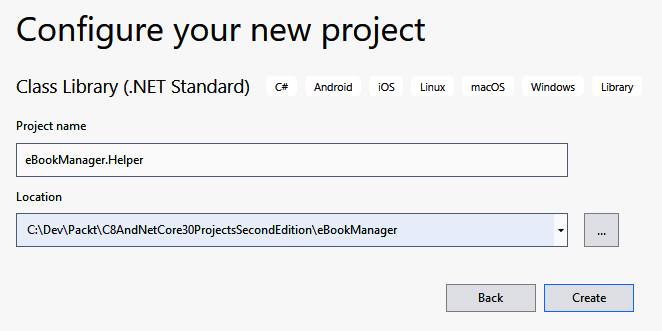
  1. We'll create a separate project for extension methods. Add the eBookManager.Helper class library project (again, as a .NET Standard class library project):
  1. We'll reference that from our main project (as before):

We've now set up the basics needed for our eBookManager application. Next, we will venture further into the guts of the application by writing some code.

Virtual storage spaces and extension methods

Let's start by discussing the logic behind virtual storage space. This is a single virtual representation of several physical spaces on your hard drive (or hard drives). A storage space will be seen as a single area where a specific group of eBooks is stored. I use the term "stored" loosely because the storage space doesn't exist. It's more representative of a grouping than a physical space on the hard drive:

  1. To start creating virtual storage spaces, add a new class called StorageSpace to the eBookManager.Engine project. Open the StorageSpace.cs file and add the following code to it:
using System;
using System.Collections.Generic;
namespace eBookManager.Engine
{
[Serializable]
public class StorageSpace
{
public int ID { get; set; }
public string Name { get; set; }
public string Description { get; set; }
public List<Document> BookList { get; set; }
}
}

Note that you need to include the System.Collections.Generic namespace here, because the StorageSpace class contains a property called BookList of type List<Document> that will contain all the books in that particular storage space.

Now we need to focus our attention on the eBookManager.Helper project and add a new class called ExtensionMethods. This will be a static class because extension methods need to be static in nature in order to act on the various objects defined by the extension methods.

  1. The new ExtensionMethods class will initially look as follows:
public static class ExtensionMethods
{
}

Let's add the first extension method to the class called ToInt(). What this extension method does is take a string value and try to parse it to an integer value. I am too lazy to type Convert.ToInt32(stringVariable) whenever I need to convert a string to an integer. It is for this reason that I use an extension method.

  1. Add the following static method to the ExtensionMethods class:
public static int ToInt(this string value, int defaultInteger = 0)
{
try
{
if (int.TryParse(value, out int validInteger))
{
// Out variables
return validInteger;
}
else
{
return defaultInteger;
}
}
catch
{
return defaultInteger;
}
}

The ToInt() extension method acts only on strings. This is defined by this string value in the method signature, where value is the variable name that will contain the string you are trying to convert to an integer. It also has a default parameter called defaultInteger, which is set to 0. Unless the developer calling the extension method wants to return a default integer value of 0, they can pass a different integer to this extension method (-1, for example).

The other methods of the ExtensionMethods class are used to provide the following logic:

  • Read and write to the data source
  • Check whether a storage space exists
  • Convert bytes to megabytes
  • Convert a string to an integer (as discussed previously)

The ToMegabytes method is quite easy. To avoid having to write this calculation all over the place, defining it inside an extension method makes sense:

public static double ToMegabytes(this long bytes) => 
(bytes > 0) ? (bytes / 1024f) / 1024f : bytes;

We also need a way to check whether a particular storage space already exists.


Be sure to add a project reference to eBookManager.Engine from the eBookManager.Helper project.

What this extension method also does is return the next storage space ID to the calling code. If the storage space does not exist, the returned ID will be the next ID that can be used when creating a new storage space:

public static bool StorageSpaceExists(this List<StorageSpace> space, string nameValueToCheck, out int storageSpaceId)
{
bool exists = false;
storageSpaceId = 0;
if (space.Count() != 0)
{
int count = (from r in space
where r.Name.Equals(nameValueToCheck)
select r)
.Count();
if (count > 0) exists = true;
storageSpaceId = (from r in space
select r.ID).Max() + 1;
}
return exists;
}
If you're pasting this code in, remember the Ctrl + . tip from earlier. Wherever you see code that is not recognized, simply place the cursor there and press Ctrl + ., or click the lightbulb, and it should bring in the necessary references.

We also need to create a method that will write the data we have to a file after converting it to JSON:

public async static Task WriteToDataStore(this List<StorageSpace> value,
string storagePath, bool appendToExistingFile = false)
{
using (FileStream fs = File.Create(storagePath))
await JsonSerializer.SerializeAsync(fs, value);
}

Essentially, all we're doing here is creating a stream and serializing the StorageSpace list into that stream.


Note that we're using the new syntactical sugar here from C# 8, allowing us to add a using statement with an implicit scope (that is, until the end of the method).

You'll need to install System.Text.Json from the package manager console:

Install-Package System.Text.Json -ProjectName eBookManager.Helper

This allows you to use the new .NET Core 3 JSON serializer. Apart from being more succinct than its predecessor, or even third-party tools such as Json.NET, Microsoft claims that you'll see a speed improvement, as it makes use of the performance improvements introduced in .NET Core 2.x.

Lastly, we need to be able to read the data back again into a List<StorageSpace> object and return that to the calling code:

public async static Task<List<StorageSpace>> ReadFromDataStore(this List<StorageSpace> value, string storagePath)
{
if (!File.Exists(storagePath))
{
var newFile = File.Create(storagePath);
newFile.Close();
}

using FileStream fs = File.OpenRead(storagePath);
if (fs.Length == 0) return new List<StorageSpace>();

var storageList = await JsonSerializer.DeserializeAsync<List<StorageSpace>>(fs);

return storageList;
}

The method will return an empty list, that is, a <StorageSpace> object, and nothing is contained in the file. The ExtensionMethods class can contain many more extension methods that you might use often. It is a great way to separate often-used code.

As with any other class, you should consider whether your extension method class is getting too large, or becoming a dumping ground for unrelated functionality, or functionality that may be better extracted into a self-contained class.

The DocumentEngine class

The purpose of this class is merely to provide supporting code to a document. In the eBookManager application, I am going to use a single method called GetFileProperties() that will (you guessed it) return the properties of a selected file. This class also only contains this single method. As the application is modified for your specific purposes, you can modify this class and add additional methods that are specific to documents.

Inside the DocumentEngine class, add the following code:

public (DateTime dateCreated, DateTime dateLastAccessed, string fileName, string fileExtension, long fileLength, bool error) GetFileProperties(string filePath)
{
var returnTuple = (created: DateTime.MinValue,
lastDateAccessed: DateTime.MinValue, name: "", ext: "",
fileSize: 0L, error: false);
try
{
FileInfo fi = new FileInfo(filePath);
fi.Refresh();
returnTuple = (fi.CreationTime, fi.LastAccessTime, fi.Name,
fi.Extension, fi.Length, false);
}
catch
{
returnTuple.error = true;
}
return returnTuple;
}

The GetFileProperties() method returns a tuple as (DateTime dateCreated, DateTime dateLastAccessed, string fileName, string fileExtension, long fileLength, bool error) and allows us to inspect the values returned from the calling code easily.

Before getting the properties of the specific file, the tuple is initialized by doing the following:

var returnTuple = (created: DateTime.MinValue, lastDateAccessed: DateTime.MinValue, name: "", ext: "", fileSize: 0L, error: false);

If there is an exception, I can return default values. Reading the file properties is simple enough using the FileInfo class. I can then assign the file properties to the tuple by doing this:

returnTuple = (fi.CreationTime, fi.LastAccessTime, fi.Name, fi.Extension, fi.Length, false);

The tuple is then returned to the calling code, where it will be used as required. We will have a look at the calling code next.

The ImportBooks form

The ImportBooks form does exactly what the name suggests. It allows us to create virtual storage spaces and to import books into those spaces. The form design is as follows:

TreeView controls are prefixed with tv, buttons with btn, combo boxes with dl, textboxes with txt, and date time pickers with dt.

Although this kind of prefixing isn't widely used today, this used to be a common practice for WinForms developers. The reason behind it is that WinForms never really lent itself very well to a separation of business and presentation layers (there have been attempts to rectify this, notably with the MVP pattern), meaning that referencing controls directly from code-behind was a common practice and, as such, it made sense to indicate the type of control you were dealing with.

When this form loads, if any storage spaces have been defined then they will be listed in the dlVirtualStorageSpaces combo box. Clicking on the Select source folder button will allow us to select a source folder in which to look for eBooks.

If a storage space does not exist, we can add a new virtual storage space by clicking the btnAddNewStorageSpace button. This will allow us to add a name and description for the new storage space and click on the btnSaveNewStorageSpace button. Selecting an eBook from the tvFoundBooks TreeView will populate the File details group of controls to the right of the form. You can then add additional Book details and click on the btnAddeBookToStorageSpace button to add the book to our space.

You can access the code-behind of a Windows Form by simply pressing F7, or right-clicking in Solution Explorer and selecting View Code.

The following steps describe changes to be made to the ImportBooks code-behind:

  1. You need to ensure that the following namespaces are added to your class (these should replace any existing namespaces there):
using eBookManager.Engine;
using System;
using System.Collections.Generic;
using System.IO;
using System.Linq;
using System.Windows.Forms;
using static eBookManager.Helper.ExtensionMethods;
using static System.Math;
  1. Next, let's start at the most logical place: the ImportBooks() constructor and the class-level variables. Add the following declarations above the constructor:
private string _jsonPath;
private List<StorageSpace> _spaces;
private enum _storageSpaceSelection { New = -9999, NoSelection = -1 }

The usefulness of the enumerator will become evident later on in the code. The _jsonPath variable will contain the path to the file used to store our eBook information.

Some people, including myself, like to prefix private class-level variables with an underscore (as in this example). This is a personal preference; however, there are settings in Visual Studio that will aid in the auto-generation of such variables if you tell it what your preference is.
  1. Modify the constructor as follows:
public ImportBooks()
{
InitializeComponent();
_jsonPath = Path.Combine(Application.StartupPath, "bookData.txt");
}

_jsonPath is initialized in the executing folder for the application and the file is hardcoded to bookData.txt. You could provide a settings screen to configure these settings if you chose to improve this project.

  1. Because we want to load some data when the form loads, we'll attach the Form_Load event. An easy way to create an event handler in WinForms is to select the event in the form designer and simply double-click next to the event that you wish to handle:

The new event should load the following code from the data store asynchronously:

private async void ImportBooks_Load(object sender, EventArgs e)
{
_spaces = await _spaces.ReadFromDataStore(_jsonPath);
}
  1. Next, we need to add another two enumerators that define the file extensions that we will be able to save in our application:
private HashSet<string> AllowedExtensions => new HashSet<string>(StringComparer.InvariantCultureIgnoreCase) 
{ ".doc", ".docx", ".pdf", ".epub", ".lit" };

private enum Extension { doc = 0, docx = 1, pdf = 2, epub = 3, lit = 4 }

We can see the implementation of the AllowedExtensions property when we look at the PopulateBookList() method.

Populating the TreeView control

All that the PopulateBookList() method does is populate the TreeView control with files and folders found at the selected source location. Consider the following code in the ImportBooks code-behind:

public void PopulateBookList(string paramDir, TreeNode paramNode)
{
DirectoryInfo dir = new DirectoryInfo(paramDir);
foreach (DirectoryInfo dirInfo in dir.GetDirectories())
{
TreeNode node = new TreeNode(dirInfo.Name);
node.ImageIndex = 4;
node.SelectedImageIndex = 5;
if (paramNode != null)
paramNode.Nodes.Add(node);
else
tvFoundBooks.Nodes.Add(node);
PopulateBookList(dirInfo.FullName, node);
}
foreach (FileInfo fleInfo in dir.GetFiles()
.Where(x => AllowedExtensions.Contains(x.Extension)).ToList())
{
TreeNode node = new TreeNode(fleInfo.Name);
node.Tag = fleInfo.FullName;
int iconIndex = Enum.Parse(typeof(Extension),
fleInfo.Extension.TrimStart('.'), true).GetHashCode();
node.ImageIndex = iconIndex;
node.SelectedImageIndex = iconIndex;
if (paramNode != null)
paramNode.Nodes.Add(node);
else
tvFoundBooks.Nodes.Add(node);
}
}

The first place we need to call this method is obviously from within itself, as this is a recursive method. The second place we need to call it is from the btnSelectSourceFolder button click event (again, as before, select the click property and double-click):

private void btnSelectSourceFolder_Click(object sender, EventArgs e)
{
try
{
FolderBrowserDialog fbd = new FolderBrowserDialog();
fbd.Description = "Select the location of your eBooks and documents";
DialogResult dlgResult = fbd.ShowDialog();
if (dlgResult == DialogResult.OK)
{
tvFoundBooks.Nodes.Clear();
string path = fbd.SelectedPath;
DirectoryInfo di = new DirectoryInfo(path);
TreeNode root = new TreeNode(di.Name);
root.ImageIndex = 4;
root.SelectedImageIndex = 5;
tvFoundBooks.Nodes.Add(root);
PopulateBookList(di.FullName, root);
tvFoundBooks.Sort();
root.Expand();
}
}
catch (Exception ex)
{
MessageBox.Show(ex.Message);
}
}

This is all quite straightforward code. Select the folder to recurse and populate the TreeView control with all the files found that match the file extension contained in our AllowedExtensions property. We also need to look at the code when someone selects a book in the tvFoundBooks TreeView control. When a book is selected, we need to read the properties of the selected file and return those properties to the file details section:

private void tvFoundBooks_AfterSelect(object sender, TreeViewEventArgs e)
{
DocumentEngine engine = new DocumentEngine();
string path = e.Node.Tag?.ToString() ?? "";
if (File.Exists(path))
{
var (dateCreated, dateLastAccessed, fileName, fileExtention, fileLength, hasError) = engine.GetFileProperties(e.Node.Tag.ToString());
if (!hasError)
{
txtFileName.Text = fileName;
txtExtension.Text = fileExtention;
dtCreated.Value = dateCreated;
dtLastAccessed.Value = dateLastAccessed;
txtFilePath.Text = e.Node.Tag.ToString();
txtFileSize.Text = $"{Round(fileLength.ToMegabytes(), 2).ToString()} MB";
}
}
}

You will notice that it is here that we are calling the GetFileProperties() method on the DocumentEngine class that returns the tuple.

Populating the storage space list

The next stage is to populate our list of storage spaces:

private void PopulateStorageSpacesList()
{
List<KeyValuePair<int, string>> lstSpaces =
new List<KeyValuePair<int, string>>();
BindStorageSpaceList((int)_storageSpaceSelection.NoSelection, "Select Storage Space");

void BindStorageSpaceList(int key, string value) =>
lstSpaces.Add(new KeyValuePair<int, string>(key, value));

if (_spaces is null || _spaces.Count() == 0) // Pattern matching
{
BindStorageSpaceList((int)_storageSpaceSelection.New, " <create new> ");
}
else
{
foreach (var space in _spaces)
{
BindStorageSpaceList(space.ID, space.Name);
}
}
dlVirtualStorageSpaces.DataSource = new
BindingSource(lstSpaces, null);
dlVirtualStorageSpaces.DisplayMember = "Value";
dlVirtualStorageSpaces.ValueMember = "Key";
}
The PopulateStorageSpacesList() method is using a local function, essentially allowing us to declare a piece of functionality that is accessible only from within its parent.

Let's add the call to this new method to the ImportBooks_Load method:

private async void ImportBooks_Load(object sender, EventArgs e)
{
_spaces = await _spaces.ReadFromDataStore(_jsonPath);
PopulateStorageSpacesList();
if (dlVirtualStorageSpaces.Items.Count == 0)
{
dlVirtualStorageSpaces.Items.Add("<create new storage space > ");
}
lblEbookCount.Text = "";
}

We now need to add the logic for changing the selected storage space. The SelectedIndexChanged() event of the dlVirtualStorageSpaces control is modified as follows:

private void dlVirtualStorageSpaces_SelectedIndexChanged(object sender, EventArgs e)
{
int selectedValue = dlVirtualStorageSpaces.SelectedValue.ToString().ToInt();
if (selectedValue == (int)_storageSpaceSelection.New) // -9999
{
txtNewStorageSpaceName.Visible = true;
lblStorageSpaceDescription.Visible = true;
txtStorageSpaceDescription.ReadOnly = false;
btnSaveNewStorageSpace.Visible = true;
btnCancelNewStorageSpaceSave.Visible = true;
dlVirtualStorageSpaces.Enabled = false;
btnAddNewStorageSpace.Enabled = false;
lblEbookCount.Text = "";
}
else if (selectedValue != (int)_storageSpaceSelection.NoSelection)
{
// Find the contents of the selected storage space
int contentCount = (from c in _spaces
where c.ID == selectedValue
select c).Count();
if (contentCount > 0)
{
StorageSpace selectedSpace = (from c in _spaces
where c.ID == selectedValue
select c).First();
txtStorageSpaceDescription.Text = selectedSpace.Description;
List<Document> eBooks = (selectedSpace.BookList == null)
? new List<Document> { }
: selectedSpace.BookList;
lblEbookCount.Text = $"Storage Space contains { eBooks.Count()} {(eBooks.Count() == 1 ? "eBook" : "eBooks")}";
}
}
else
{
lblEbookCount.Text = "";
}
}

I will not go into a detailed explanation of the code here as it is relatively obvious what it is doing.

We also need to add code to save a new storage space. Add the following code to the Click event of the btnSaveNewStorageSpace button:

private void btnSaveNewStorageSpace_Click(object sender, EventArgs e)
{
try
{
if (txtNewStorageSpaceName.Text.Length != 0)
{
string newName = txtNewStorageSpaceName.Text;
bool spaceExists =
(!_spaces.StorageSpaceExists(newName, out int nextID))
? false
: throw new Exception("The storage space you are trying to add already exists.");
if (!spaceExists)
{
StorageSpace newSpace = new StorageSpace();
newSpace.Name = newName;
newSpace.ID = nextID;
newSpace.Description =
txtStorageSpaceDescription.Text;
_spaces.Add(newSpace);

PopulateStorageSpacesList();
// Save new Storage Space Name
txtNewStorageSpaceName.Clear();
txtNewStorageSpaceName.Visible = false;
lblStorageSpaceDescription.Visible = false;
txtStorageSpaceDescription.ReadOnly = true;
txtStorageSpaceDescription.Clear();
btnSaveNewStorageSpace.Visible = false;
btnCancelNewStorageSpaceSave.Visible = false;
dlVirtualStorageSpaces.Enabled = true;
btnAddNewStorageSpace.Enabled = true;
}
}
}
catch (Exception ex)
{
txtNewStorageSpaceName.SelectAll();
MessageBox.Show(ex.Message);
}
}

The last few methods deal with saving eBooks in the selected virtual storage space. Modify the Click event of the btnAddBookToStorageSpace button. This code also contains a throw expression. If you haven't selected a storage space from the combo box, a new exception is thrown:

private async void btnAddeBookToStorageSpace_Click(object sender, EventArgs e)
{
try
{
int selectedStorageSpaceID =
dlVirtualStorageSpaces.SelectedValue.ToString().ToInt();
if ((selectedStorageSpaceID != (int)_storageSpaceSelection.NoSelection)
&& (selectedStorageSpaceID != (int)_storageSpaceSelection.New))
{
await UpdateStorageSpaceBooks(selectedStorageSpaceID);
}
else throw new Exception("Please select a Storage Space to add your eBook to"); // throw expressions
}
catch (Exception ex)
{
MessageBox.Show(ex.Message);
}
}

If you enter this code, you'll notice that the UpdateStorageSpaceBooks method does not yet exist; let's rectify that.

Saving a selected book to a storage space

The following code basically updates the book list in the selected storage space if it already contains the specific book (after confirming this with the user). Otherwise, it will add the book to the book list as a new book:

private async Task UpdateStorageSpaceBooks(int storageSpaceId)
{
try
{
int iCount = (from s in _spaces
where s.ID == storageSpaceId
select s).Count();
if (iCount > 0) // The space will always exist
{
// Update
StorageSpace existingSpace = (from s in _spaces
where s.ID == storageSpaceId
select s).First();
List<Document> ebooks = existingSpace.BookList;
int iBooksExist = (ebooks != null)
? (from b in ebooks
where $"{b.FileName}".Equals($"{txtFileName.Text.Trim()}")
select b).Count()
: 0;
if (iBooksExist > 0)
{
DialogResult dlgResult = MessageBox.Show($"A book with the same name has been found in Storage Space {existingSpace.Name}. Do you want to replace the existing book entry with this one ?", "Duplicate Title",
MessageBoxButtons.YesNo,
MessageBoxIcon.Warning,
MessageBoxDefaultButton.Button2);
if (dlgResult == DialogResult.Yes)
{
Document existingBook = (from b in ebooks
where $"{ b.FileName}".Equals($"{txtFileName.Text.Trim()}")
select b).First();
SetBookFields(existingBook);
}
}
else
{
// Insert new book
Document newBook = new Document();
SetBookFields(newBook);

if (ebooks == null)
ebooks = new List<Document>();
ebooks.Add(newBook);
existingSpace.BookList = ebooks;
}
}
await _spaces.WriteToDataStore(_jsonPath);
PopulateStorageSpacesList();
MessageBox.Show("Book added");
}
catch (Exception ex)
{
MessageBox.Show(ex.Message);
}
}

We call a helper method in the preceding method, called SetBookFields:

private void SetBookFields(Document book)
{
book.FileName = txtFileName.Text;
book.Extension = txtExtension.Text;
book.LastAccessed = dtLastAccessed.Value;
book.Created = dtCreated.Value;
book.FilePath = txtFilePath.Text;
book.FileSize = txtFileSize.Text;
book.Title = txtTitle.Text;
book.Author = txtAuthor.Text;
book.Publisher = txtPublisher.Text;
book.Price = txtPrice.Text;
book.ISBN = txtISBN.Text;
book.PublishDate = dtDatePublished.Value;
book.Category = txtCategory.Text;
}

Lastly, as a matter of housekeeping, the ImportBooks form contains the following code for displaying and enabling controls based on the button click events of the btnCancelNewStorageSpace and btnAddNewStorageSpace buttons:

private void btnCancelNewStorageSpaceSave_Click(object sender, EventArgs e)
{
txtNewStorageSpaceName.Clear();
txtNewStorageSpaceName.Visible = false;
lblStorageSpaceDescription.Visible = false;
txtStorageSpaceDescription.ReadOnly = true;
txtStorageSpaceDescription.Clear();
btnSaveNewStorageSpace.Visible = false;
btnCancelNewStorageSpaceSave.Visible = false;
dlVirtualStorageSpaces.Enabled = true;
btnAddNewStorageSpace.Enabled = true;
}

private void btnAddNewStorageSpace_Click(object sender, EventArgs e)
{
txtNewStorageSpaceName.Visible = true;
lblStorageSpaceDescription.Visible = true;
txtStorageSpaceDescription.ReadOnly = false;
btnSaveNewStorageSpace.Visible = true;
btnCancelNewStorageSpaceSave.Visible = true;
dlVirtualStorageSpaces.Enabled = false;
btnAddNewStorageSpace.Enabled = false;
}

All that remains now is for us to complete the code in the Form1.cs form, which is the startup form.

Creating the main eBookManager form

Start off by renaming Form1.cs to eBookManager.cs. This is the startup form for the application, and it will list all existing storage spaces that were previously saved:

Design your eBookManager form as follows:

  • A ListView control for existing storage spaces
  • A ListView for eBooks contained in the selected storage space
  • A button that opens the file location of the eBook
  • A menu control to navigate to the ImportBooks.cs form
  • Various read-only fields to display the selected eBook information:
Again, due to the nature of the WinForms designer, you may choose to simply copy and paste the designer code from the repository.

The following using statements will be needed in this section:

using eBookManager.Engine;
using eBookManager.Helper;
using System;
using System.Collections.Generic;
using System.IO;
using System.Windows.Forms;
using System.Linq;
using System.Diagnostics;
As demonstrated earlier, you may choose to omit this and then press Ctrl + . each time a particular method or namespace isn't recognized.

Bear in mind that you won't be able to use this to include libraries with extension methods, so you'll need to include eBookManager.Helper manually.

Let's now start designing our eBookManager form with the help of the following steps:

  1. The constructor and load methods are quite similar to those in the ImportBooks.cs form. They read any available storage spaces and populate the storage spaces list view control with the previously saved storage spaces:
private string _jsonPath;
private List<StorageSpace> _spaces;

public eBookManager()
{
InitializeComponent();
_jsonPath = Path.Combine(Application.StartupPath,
"bookData.txt");
}

private async void eBookManager_Load(object sender, EventArgs e)
{
_spaces = await _spaces.ReadFromDataStore(_jsonPath);

// imageList1
this.imageList1.Images.Add("storage_space_cloud.png", Image.FromFile("img/storage_space_cloud.png"));
this.imageList1.Images.Add("eBook.png", Image.FromFile("img/eBook.png"));
this.imageList1.Images.Add("no_eBook.png", Image.FromFile("img/no_eBook.png"));
this.imageList1.TransparentColor = System.Drawing.Color.Transparent;

// btnReadEbook
this.btnReadEbook.Image = Image.FromFile("img/ReadEbook.png");
this.btnReadEbook.Location = new System.Drawing.Point(103, 227);
this.btnReadEbook.Name = "btnReadEbook";
this.btnReadEbook.Size = new System.Drawing.Size(36, 40);
this.btnReadEbook.TabIndex = 32;
this.toolTip1.SetToolTip(this.btnReadEbook, "Click here to open the eBook file location");
this.btnReadEbook.UseVisualStyleBackColor = true;
this.btnReadEbook.Click += new System.EventHandler(this.btnReadEbook_Click);

// eBookManager Icon
this.Icon = new System.Drawing.Icon("ico/mainForm.ico");

PopulateStorageSpaceList();
}

private void PopulateStorageSpaceList()
{
lstStorageSpaces.Clear();
if (!(_spaces == null))
{
foreach (StorageSpace space in _spaces)
{
ListViewItem lvItem = new ListViewItem(space.Name, 0);
lvItem.Tag = space.BookList;
lvItem.Name = space.ID.ToString();
lstStorageSpaces.Items.Add(lvItem);
}
}
}
  1. If the user clicks on a storage space, we need to be able to read the books contained in that selected space:
private void lstStorageSpaces_MouseClick(object sender, MouseEventArgs e)
{
ListViewItem selectedStorageSpace =
lstStorageSpaces.SelectedItems[0];
int spaceID = selectedStorageSpace.Name.ToInt();
txtStorageSpaceDescription.Text = (from d in _spaces
where d.ID == spaceID
select d.Description).First();
List<Document> ebookList =
(List<Document>)selectedStorageSpace.Tag;
PopulateContainedEbooks(ebookList);
}
  1. We now need to create the method that will populate the lstBooks list view with the books contained in the selected storage space:
private void PopulateContainedEbooks(List<Document> ebookList)
{
lstBooks.Clear();
ClearSelectedBook();
if (ebookList != null)
{
foreach (Document eBook in ebookList)
{
ListViewItem book = new ListViewItem(eBook.Title, 1);
book.Tag = eBook;
lstBooks.Items.Add(book);
}
}
else
{
ListViewItem book = new ListViewItem("This storage space contains no eBooks", 2);
book.Tag = "";
lstBooks.Items.Add(book);
}
}
  1. We also need to clear the selected book's details when the selected storage space is changed. I have created two group controls around the file and book details. This code just loops through all the child controls; if the child control is a textbox, it clears it:
private void ClearSelectedBook()
{
foreach (Control ctrl in gbBookDetails.Controls)
{
if (ctrl is TextBox)
ctrl.Text = "";
}
foreach (Control ctrl in gbFileDetails.Controls)
{
if (ctrl is TextBox)
ctrl.Text = "";
}
dtLastAccessed.Value = DateTime.Now;
dtCreated.Value = DateTime.Now;
dtDatePublished.Value = DateTime.Now;
}
  1. The MenuStrip that was added to the form has a click event on the ImportEbooks menu item. It simply opens up the ImportBooks form:
private async void mnuImportEbooks_Click(object sender, EventArgs e)
{
ImportBooks import = new ImportBooks();
import.ShowDialog();
_spaces = await _spaces.ReadFromDataStore(_jsonPath);
PopulateStorageSpaceList();
}
  1. The following method wraps up the logic to select a specific eBook and populate the file and eBook details on the eBookManager form:
private void lstBooks_MouseClick(object sender, MouseEventArgs e)
{
ListViewItem selectedBook = lstBooks.SelectedItems[0];
if (!String.IsNullOrEmpty(selectedBook.Tag.ToString()))
{
Document ebook = (Document)selectedBook.Tag;
txtFileName.Text = ebook.FileName;
txtExtension.Text = ebook.Extension;
dtLastAccessed.Value = ebook.LastAccessed;
dtCreated.Value = ebook.Created;
txtFilePath.Text = ebook.FilePath;
txtFileSize.Text = ebook.FileSize;
txtTitle.Text = ebook.Title;
txtAuthor.Text = ebook.Author;
txtPublisher.Text = ebook.Publisher;
txtPrice.Text = ebook.Price;
txtISBN.Text = ebook.ISBN;
dtDatePublished.Value = ebook.PublishDate;
txtCategory.Text = ebook.Category;
}
}
  1. Lastly, when the book selected is the one you wish to read, click on the Read eBook button to open the file location of the selected eBook:
private void btnReadEbook_Click(object sender, EventArgs e)
{
string filePath = txtFilePath.Text;
FileInfo fi = new FileInfo(filePath);
if (fi.Exists)
{
Process.Start("explorer.exe", Path.GetDirectoryName(filePath));
}
}

This completes the code logic contained in the eBookManager application.

You can further modify the code to open the required application for the selected eBook instead of just the file location. In other words, if you click on a PDF document, the application can launch a PDF reader with the document loaded. Lastly, note that classification has not been implemented in this version of the application.

It is time to fire up the application and test it out.

Running the eBookManager application

To run the application, please perform the following steps:

  1. When the application starts for the first time, there will be no virtual storage spaces available. To create one, we will need to import some books. Click on the Import eBooks menu item:
  1. The Import eBooks screen opens. You can add a new storage space and select the source folder for eBooks:
  1. Once you have selected an eBook, add the information about the book and save it to the storage space. After you have added all the storage spaces and eBooks, you will see a list of virtual storage spaces. As you click on a storage space, the books it contains will be listed:
  1. Selecting an eBook and clicking on the Read eBook button will open up the file location containing the selected eBook.
  2. Lastly, let's have a look at the JSON file generated for the Ebook Manager application. Initially, this will be stored in the output location of the project:

In the following, I've used VS Code to nicely format the JSON:


The keyboard shortcut to format JSON in VS Code is Shift + Alt + F.

As you can see, the JSON file is quite nicely laid out, and it is easily readable.

Now let's see how to upgrade an existing WinForms app to .NET Core 3.