

Project structure overview
As we already mentioned, React is very flexible when it comes to project structure.
Some of the benefits of having a good project structure are as follows:
- Separation of concerns
- Easier refactors
- Better reasoning about the code base
- Easier for larger teams to work on the code base simultaneously
Let’s see what the feature-based project structure looks like.
Note
We will focus on the src folder only since, from now on, most of the code base lives there.
Here is the structure of our src folder:
- components // (1)
- config // (2)
- features // (3)
- layouts // (4)
- lib // (5)
- pages // (6)
- providers // (7)
- stores // (8)
- testing // (9)
- types // (10)
- utils // (11)
Let’s analyze each of the folders, one by one:
components: Contains all shared components that are used across the entire application.config: Contains the application configuration files.features: Contains all the feature-based modules. We will analyze this one in more detail in the following section.layouts: Contains different layouts for the pages.lib: Contains configurations for different libraries that are used in our application.pages: Contains the pages of our application. This is where Next.js will look for pages in the filesystem-based routing.providers: Contains all application providers. For example, if our application uses many different providers for styling, state, and so on, we can combine them here and export a single application provider with which we can wrap our_app.tsxto make all the providers available on all the pages.stores: Contains all global state stores that are used in the application.testing: Contains test-related mocks, helpers, utilities, and configurations.types: Contains base TypeScript type definitions that are used across the application.utils: Contains all shared utility functions.
There is nothing wrong with grouping files in folders based on their types. However, once the application starts to grow, it becomes more difficult to reason about and maintain the code base because there are too many files of a single type.
Features
To scale the application in the easiest and most maintainable way, we want to keep most of the application code inside the features folder, which should contain different feature-based things. Every feature folder should contain domain-specific code for a given feature. This will allow us to keep functionalities scoped to a feature and not mix its declarations with the shared things. This is much easier to maintain than a flat folder structure with many files.
Let’s look at one of our feature folders, which has the following structure:
- api // (1)
- components // (2)
- types // (3)
- index.ts // (4)
api: Contains the API request declarations and API hooks related to a specific feature. This makes our API layer and the UI layer separate and reusable.components: Contains all components that are scoped to a specific feature.types: This contains the TypeScript type definitions for a specific feature.index.ts: This is the entry point of every feature. It behaves as the public API of the feature, and it should only export things that should be public for other parts of the application.
Note
A feature might have other folders, such as hooks, utils, and others, depending on the needs of the feature. The only required file is the index.ts file, which acts as the public API of a feature.
Let’s try to visualize the project structure with the following diagram:
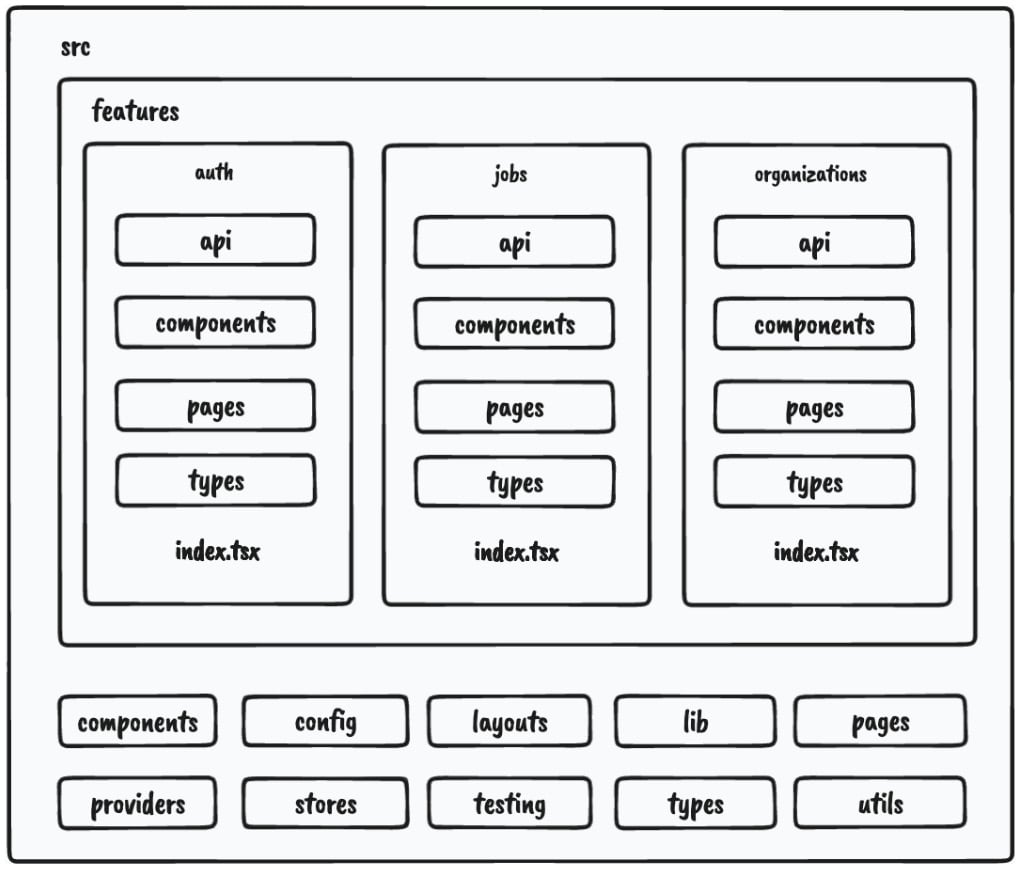
Figure 2.2 – Project structure
As we can see, most of our application code will live within features.
One more thing we can configure is enforcing developers to import features code via the index.ts file, like so:
import {JobsList} from '@/features/jobs'
We shouldn’t do this:
import {JobsList} from '@/features/jobs/components/jobs-
  list'
This will give us a better picture of which dependency is used where and where it comes from. Also, if the feature gets refactored, it doesn’t have to impact any external parts of the application where that component is used.
We can constrain our code by having the following ESLint rule in the .eslintrc.js file:
rules: {
    'no-restricted-imports': [
      'error',
      {
        patterns: ['@/features/*/*'],
      },
    ],
    'import/no-cycle': 'error',
      … rest of the eslint rules
}
The no-restricted-imports rule will add constraints to imports from other features by erroring if any violations in the preceding pattern are detected.
Things from a feature can only be consumed if they’re exported from the index.ts file of that feature. This will force us to explicitly make something in a feature publicly available.
If we decide to use features this way, we should also include the import/no-cycle rule to prevent cyclic dependencies where Feature A imports things from Feature B and vice versa. If this happens, that means something with the application design is wrong and it needs to be restructured.
In this section, we learned what our application structure will look like. Then, we focused on splitting the application by feature, which will allow our code base to scale well if we decide to add more features.