SharePoint 2010 requires the Windows Server 2008 R2 operating system in order to run. In this recipe, we will configure the components of Windows Server 2008 necessary in order to get ready to install SQL Server 2008 and SharePoint 2010.
Download Windows Server 2008 R2 from your MSDN subscription, or type in windows server 2008 R2 trial download into your favorite search engine to download the 180-day trial from the Microsoft site.
This book does not cover actually installing the base operating system. The specific instructions to do so will be dependent upon the virtualization software selected as per the Selecting your virtual environment recipe. Generally, it will be provided as an ISO image (the file extension will be .iso). ISO means a compressed disk image, and all virtualization software that I am aware of will let you mount (attach) an ISO image to the virtual machine as a CD Drive. This means that when you elect to create a new virtual machine, you will normally be prompted for the ISO image, and the installation of the operating system should proceed in a familiar and relatively automated fashion.
So for this recipe, ready means that you have your virtualization software up and running, the Windows Server 2008 R2 base operating system is installed, and you are able to log in as the Administrator (and that you are effectively logging in for the first time).
Log in as the Administrator. You will be prompted to change the password the first time—I suggest choosing a very commonly used Microsoft password—Password1 . However, feel free to select a password of your choice, but use it consistently throughout this chapter.
The Initial configuration tasks screen will come up automatically. On this screen:
Activate windows using your 180 day trial key or using your MSDN key.
Select Provide computer name and domain. Change the computer name to a simpler one of your choice. In my case, I named the machine OPENHIGHWAY. Leave the Member of option as Workgroup. The computer will require a reboot.
In the Update this server section, choose Download and install updates. Click on the Change settings link and select the option Never check for updates and click OK. Click the Check for updates link. The important updates will be selected. Click on Install Updates. Now is a good time for a coffee break! You will need to reboot the server when the updates complete.
In the Customize this server section, click on Add Features. Select the Desktop Experience, Windows, PowerShell, Integrated, Scripting, and Environment options. Choose Add Required Features when prompted to do so. Reboot the server when prompted to do so.
If the Initial configuration tasks screen appears now, or in the future, you may now select the checkbox for Do not show this window at logon. We will continue configuration from the Server Manager, which should be displayed on your screen. If not, launch the Server Manager using the icon on the taskbar.
We return to Server Manager to continue the configuration:
Tip
OPTIONAL: Click on Configure Remote Desktop if you have a preference for accessing your virtual machine using Remote Desktop (RDP) instead of using the virtual machine's console software.
In the Security Information section, click Go to Windows Firewall. Click on the Windows Firewall Properties link. From the dialog, go to each of the tabs, namely, Domain Profile, Private Profile, and Public Profile and set the Firewall State to Off on each tab and click OK.
Click on the Server Manager node, and from the main screen, click on the Configure IE ESC link. Set both options to Off and click OK.
From the Server Manager, expand the Configuration node and then expand Local Users and Groups node, and then click on the
Usersfolder. Right-click on the Administrator account and select Properties. Select the option for Password never expires and click OK.From the Server Manager , click the Roles node. Click the Add Roles link. Now, click on the Introductory screen and select the checkbox for Active Directory Domain Services. Click Next, again click on Next, and then click Install. After completion, click the Close this wizard and launch the Active Directory Domain Services Installation Wizard (dcpromo.exe) link. Now, carry out the following steps:
From the new wizard that pops up, from the welcome screen, select the checkbox Use advanced mode installation, click Next, and again click on Next on the Operating System Compatibility screen.
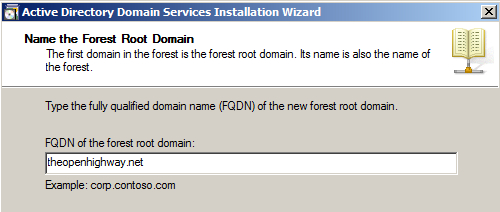
Select the option Create a new domain in a new forest and click Next.
Choose your domain (FQDN)! This is completely internal to your development server and does not have to be real. For book purposes, I am using theopenhighway.net, as shown in the following screenshot. Then click Next:
From the Set Forest Functional Level drop-down, choose Windows Server 2008 R2 and click Next.
Click Next on the Additional Domain Controller Option screen. Select Yes on the Static IP assignment screen. Click Yes on the Dns Delegation Warning screen.
Click Next on the Location for Database, Log Files, and SYSVOL screen.
On the Directory Services Restore Mode Administrator Password screen, enter the same password that you used for the Administrator account, in my case, Password1. Click Next.
Click Next on the Summary screen.
Click on the Reboot On Completion screen. Otherwise reboot the server after the installation completes.
You will now configure a user account that will run the application pools for the SharePoint web applications in IIS. From the Server Manager, expand the Roles node. Keep expanding the Active Directory Domain Services until you see the
Usersfolder. Click on theUsersfolder. Now carry out the following:Right-click on the
Usersfolder and select New | User
Enter SP_AppPool in the full name field and also enter SP_AppPool in the user logon field and click Next.
Enter the password as Password1 (or the same as you had selected for the Administrator account). Deselect the option for User must change password at next logon and select the option for Password never expires. Click Next and then click Finish.
A loopback check is a security feature to mitigate against reflection attacks, introduced in Windows Server 2003 SP1. You will likely encounter connection issues with your local websites and it is therefore universally recommended that you disable the loopback check on a development server. This is done from the registry editor:
Click the Start menu button, choose Run…, enter Regedit, and click OK to bring up the registry editor.
Navigate to HKEY_LOCAL_MACHINE | SYSTEM | CurrentControlSet | Control | Lsa
Right-click the Lsa node and select New | DWORD (32-bit) Value
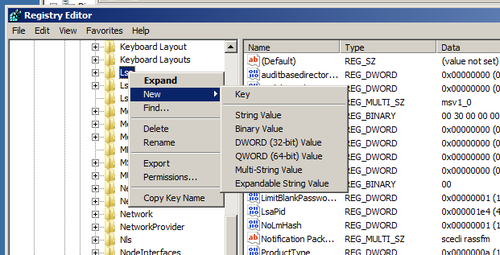
In the place of New Value #1 type DisableLoopbackCheck.

Right-click DisableLoopbackCheck, select Modify, change the value to 1, and click OK
Congratulations! You have successfully configured Windows Server 2008 R2 and are ready for our next recipe Installing and configuring SQL Server 2008 R2
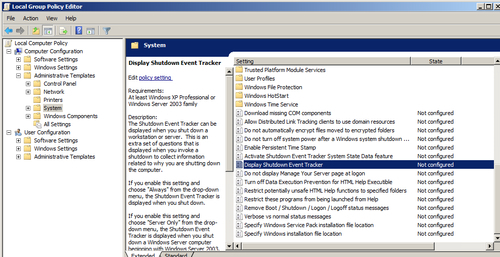
The Windows Shutdown Event Tracker is simply annoying on a development machine. To turn this feature off, click the Start button, select Run…, enter gpedit.msc, and click OK. Scroll down, right-click on Display Shutdown Event Tracker, and select Edit. Select the Disabled option and click OK, as shown in the following screenshot: