

Now that we have installed Xcode, we can start using it to write our own Mac OS X App. Let's get started:
To create a new Xcode project, launch the Xcode App and click the button titled Create a new Xcode project on the Welcome to Xcode window as shown in the following screenshot:

When Xcode asks us to select a template, select Application under Mac OS X and Cocoa Application as the template. Then, click on the Next button.
When we click the Next button, Xcode will ask us to select options for our new project. The options that we need to select are as follows:
Option
Value
Description
SimpleCalc
The product name will be the name of your App program file that shows up in the Mac OS X Finder.
com.yourdomain
com.yourdomain The company identifier needs to be unique and typically uses the reverse domain notation. It can be anything but you should use a company identifier that will not conflict with an existing company. If you don't have an Internet domain name you can acquire one new or you can use com.yourlastname.first name.
Your Initials
(For consistency, throughout this book we will use BTS but when you develop your own code you should use your own initials)
The class prefix is used to make sure any program classes that you create do not have the same name as any program classes that someone else may create.
Finally, there are some checkboxes at the bottom of the options screen. The only one that needs to be checked is the option titled Use Automatic Reference Counting. This setting permits Xcode to automatically manage the memory that our program uses and helps keep programing simple because we do not need to think about destroying objects that our program creates. This checkbox, along with the rest of our settings, is shown in the following screenshot:

Click on the Next button and Xcode will ask us where we want to save the new project that we are creating. While we can save projects anywhere that we like, a good place may be a new folder called
projectsin ourDocumentsfolder. Whatever we decide, when we have navigated to that folder, we need to click on the Create button as shown in the following screenshot: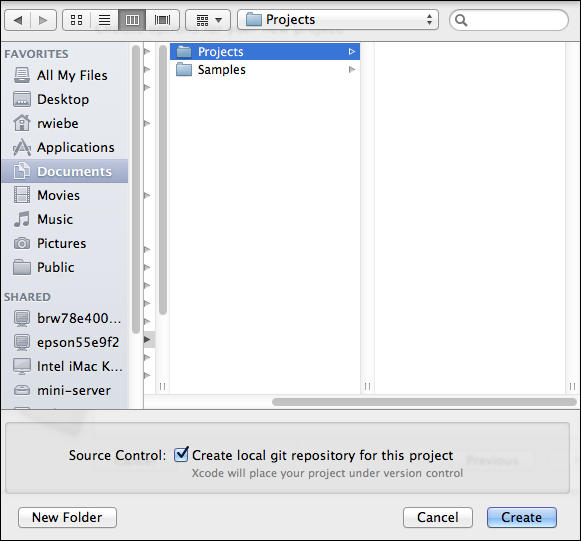
When we clicked on the Create button, Xcode created the new project from the template that we chose and displayed its main interface window.
Tip
Don't Panic
The main Xcode window can be quite overwhelming. The following screenshot shows the entire interface simply to give us an idea of its scope. We don't need to understand all of the sections or be intimidated by Xcode's main window. As we get deeper into programming, we will learn more about each part of the window.

As we progress in our App development and become more familiar with Xcode, we will become comfortable with the contents of this interface. Xcode's interface is very similar to iTunes. It contains the following:
A control area along the top where we can build and run ("play") or stop our App
A navigation area on the left where we can select different components of our project to inspect
An editing area in the center where we can modify different components that were selected in the navigation area
A utilities area on the right where we can inspect and change attributes of selected items
It is a good idea to take some time now to become familiar with the meaning of each of the little icons for the navigator section of the Xcode view, which appear across the top of the navigation area on the left-hand side of the window. The following table gives descriptions of these icons:
|
Icon |
Description |
|---|---|

|
Shows the project navigator, which lists all of the files in this project |

|
Shows the symbol navigator, which lists all of the symbols (method names, property names, and so on) in this project |

|
Shows the search navigator, which lists all of the search results for anything that we want to search for in the project |

|
Shows the issue navigator, which lists all of the issues (typically error or warning) |

|
Shows the debug navigator, which lists all of the App threads and symbols if a debug session is active |

|
Shows the breakpoint navigator, which lists all of the places we want the App to stop at so that we can inspect its state during an active debug session |

|
Shows the log navigator, which lists a log of the different activities that we have performed |
Xcode will sometimes change the selected navigator based on actions that we perform or events that occur. It is useful to know that we can always switch back to the navigator that we want to see by clicking on the appropriate icon.