Book Image

Appcelerator Titanium Smartphone App Development Cookbook Second Edition

Book Image

Appcelerator Titanium Smartphone App Development Cookbook Second Edition

Overview of this book

This book will take you through the process of building cross-platform, native UI applications for the mobile from scratch. You will learn how to develop apps, how to use GPS, cameras and photos and how to build socially connected apps. You will also learn how to package them for submission to the App Store and Google Play. This cookbook takes a pragmatic approach to creating applications in JavaScript from putting together basic UIs, to handling events and implementation of third party services such as Twitter, Facebook and Push notifications. The book shows you how to integrate datasources and server APIs, and how to use local databases. The topics covered will guide you to use Appcelerator Studio tools for all the mobile features such as Geolocation, Accelerometer, animation and more. You’ll also learn about Alloy, the Appcelerator MVC framework for rapid app development, and how to transfer data between applications using URLSchemes, enabling other developers to access and launch specific parts of your app. Finally, you will learn how to register developer accounts and publish your very own applications on the App Store and Google Play.
Table of Contents (21 chapters)
Appcelerator Titanium Smartphone App Development Cookbook Second Edition
Credits
About the Author
About the Reviewers
www.PacktPub.com
Preface
Index

Building and submitting your app to the Google Play Store


In this recipe, we will continue the process started in the previous two recipes and build our application for distribution on the Google Play Store.

How to do it…

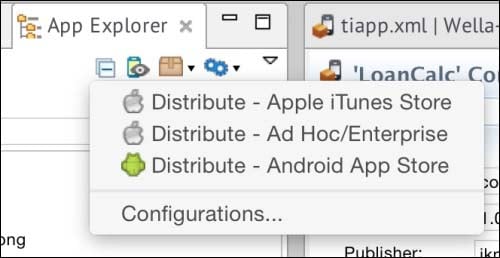
Open your project in Studio; we are using the LoanCalc app from Chapter 1, Building Apps Using Native UI Components, as an example. However, as usual, you can use any project you like. Make sure that your project is selected in the Project Explorer page, and then select the same distribute icon that you selected for iOS, but select Distribute - Android App Store this time, as shown here:

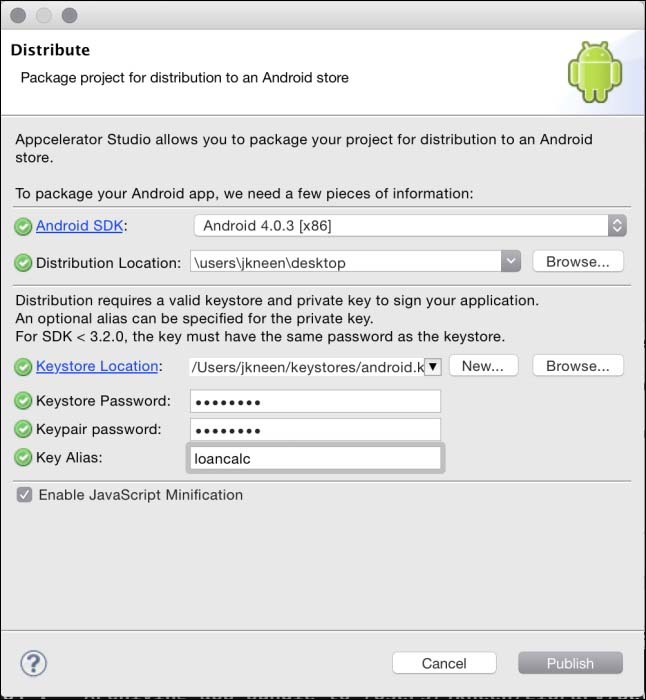
You will need to enter the distribution location (where you want the packaged APK file to be saved) and the location of the keystore file you created in the previous recipe, along with the password and alias you provided earlier.

After you have entered this information, you should see something like what is shown in the following screenshot:

If all of the information is correct, click on Publish...