

Since SQL Developer is our SQL tool of choice, its important that we get a good feel for it right from the beginning. In this section, we learn about configuring and running SQL Developer.
Let's get started with SQL Developer. If you have Oracle installed, you can launch SQL Developer in Windows XP from the Start menu, as shown next:
Start | All Programs | Oracle<program group> | Application Development | SQL Developer
SQL Developer runs as a Java application, so it may take a little while to load. The first time you start the application, you may get a message box, such as the one shown in the following screenshot:
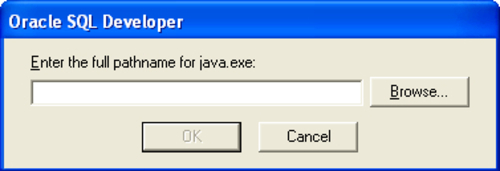
If this happens, click on Browse and navigate to the java.exe file. You do not need a separate installation of Java to run SQL Developer; one is included in the Oracle installation. If you don't know where the java.exe is located, simply go to the Oracle installation directory and do a search for java.exe. Then, navigate to that path and select it.
Once startup has completed, you will see a Tip of the Day screen. Close it and you will be presented with the following screen. It's worth noting that this screen will look the same, irrespective of whether you're running SQL Developer under Windows, Linux, or the Mac OS, due to its cross-platform, Java-based nature.
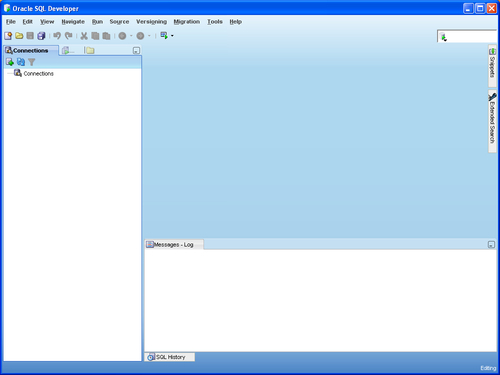
On the left side, you see a list of connections to databases. At this point, there will be no connections, since we have not created any yet. SQL Developer allows you to maintain multiple connections to various databases. Each one can use any variation of different login names, servers, or database names.
Tip
SQL in the real world
In the real world, DBAs and developers run SQL Developer from their desktops and use it to connect to remote databases. Thus, their working environments can run locally, but the databases they connect to can be anywhere in the world!
Before we can use SQL, we need to connect to a database. To do that, we need to create a database connection. Any connection to an Oracle database consists of three pieces of information:
The hostname or IP address of the machine to which we're connecting.
The port number on which Oracle operates.
The name of the database to which we connect.
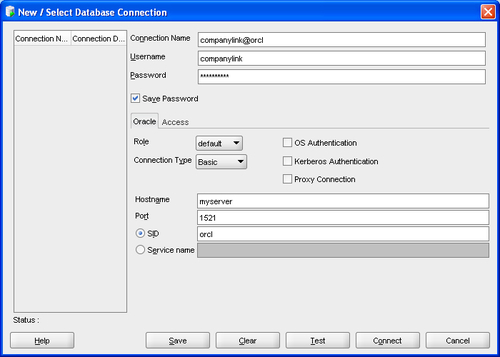
To set up our connection, we need to click on the New Connection button at the top of the left-hand connection frame. This action brings up the New / Select Database Connection window. We fill in the information, as listed in the following screenshot. This example connection assumes that you have set up an Oracle database using the standard installation procedure with common defaults. If you're connecting to an existing database, the information you enter will be different
The pieces of information that are relevant to us are as follows:
Connection name: This can be whatever we choose, but it is usually a good idea to make it descriptive of the connection itself. In our example, we choose
companylink@orclbecause it denotes that we are connecting to theorcldatabase as thecompanylinkuser.Password: The password for the user. The password for our user is companylink (non-case sensitive)
Save Password: Select this checkbox to ensure that you don't have to re-enter the password each time you initiate the connection.
Hostname: This will be either the hostname or the IP address of the server that hosts our target database. The example used,
myserver, will most likely not be the name of your server. Change this to the name relevant to your situation.Port: This will be the port number that Oracle is running from. Most Oracle databases run from port 1521, although some DBAs change this for security reasons. If you installed Oracle using the default settings, your port number will be 1521.
SID : The SID is the System Identifier for your database, which is the name of the database. In a typical installation of Oracle, the default SID used is
orcl.
Once the relevant information has been entered, it is always a good idea to click on the Test button at the bottom of the window to ensure a connection can be made. If all the information is correct, you should see Status: Success on the lower left-hand side of the window. Once we have verified that we can successfully connect, we click on the Connect button. Our connection is saved in the Connections frame, on the left side of the window, and our connection is established.
Now that we're connected, let's take a look at what SQL Developer has to offer. Click on the plus sign (+) next to your new connection:
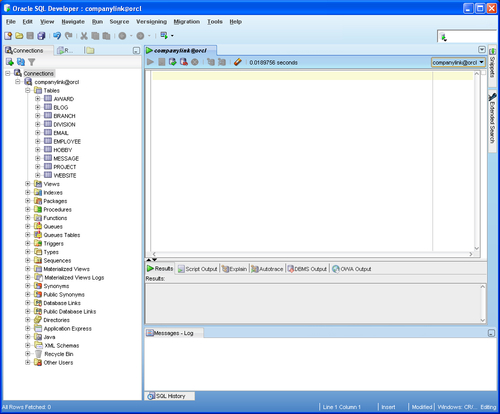
On the left side, indented under our connection, is a list of database objects, including Tables, Views, and Indexes. Discussion about some of the other sets of objects is outside the scope of this book, but all are accessible by simply expanding the object group using the plus sign next to it. Click on the + next to Tables and your list of tables will be expanded. Your window should now look something similar to what is shown here. These are the tables created, and therefore owned, by the user with whose profile we logged in; in this case, companylink. They were created by running companylink.bat, earlier in the chapter. The following screenshot shows a list of our Companylink tables:
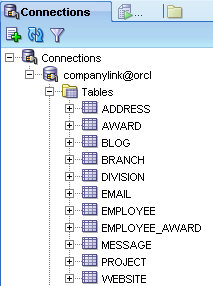
These tables can be expanded to view their characteristics, such as column names and datatypes, but most of this book will focus on how to view and modify tables using only the SQL language instead of GUI tools.
The large portion of the window in the upper right is our SQL working area. This frame will be the area in which we write SQL code. To write SQL in the working area, simply click in the area and begin typing your SQL statements. When you are finished, click on the green arrow in the working area toolbar to execute the statement. Alternatively, you can press F9 on your keyboard.
Directly below the working area is the Results frame. This is the area where we will see the results of our SQL queries. The results will display in columnar format, and the columns can be resized by clicking-and-dragging. The Results frame also has several tabs across the top for various other functions, but, for now, we will not concern ourselves with them. Let's try a query and view the output. In the working area, type the SQL query you see in the following screenshot, select * from employee, and click on the green execute arrow:
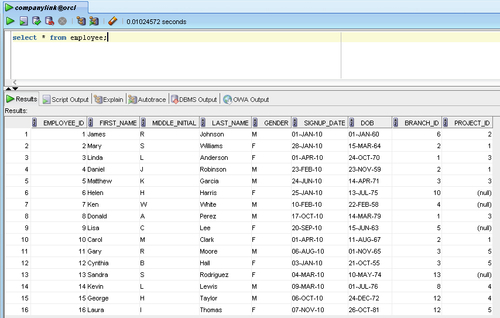
As we will learn in the next chapter, the SQL query we've placed in the working area uses a wildcard character, '*', to display all the columns and rows from the table called employee. As you can see, this data displays in the Results frame, which is listed in columnar format. You have just made your first use of the Structured Query Language.
Below the Results frame is the Messages (Log) frame. It is used to display the output of certain operations and is not relevant to our concerns. To maximize the areas for the working area and Results frame, you can click-and-hold the bar above the Messages frame and drag it downward to make it invisible. Similarly, you can click-and-drag the bar between the working area and Results frames to change the ratio of space between the two. Many users like to make as much of the Results frame visible as possible so as to see more of the resultant data.
The last area we need to point out is the SQL History tab just below the Messages frame. This tab, when clicked, displays a pop-up of the most recent SQL statements. This can be very useful when trying to remember previous statements. Simply click on the tab, then double-click the statement you want to run, and it will be pasted in the working area. You can then select it and click on Execute to run it.
SQL Developer offers a tremendous number of other features that are beyond the scope of this book. If you're interested in more information on SQL Developer, visit http://www.oracle.com/technology and view the documentation for it.