Book Image

Building Dashboards with Microsoft Dynamics GP 2016 - Second Edition

By : Mark Polino
Book Image

Building Dashboards with Microsoft Dynamics GP 2016 - Second Edition

By: Mark Polino

Overview of this book

Microsoft Dynamics GP is a complete ERP solution that is extremely beneficial for small to midsize organizations in helping them grow exponentially. The book shows you in detail how to build great-looking dashboards with Microsoft Dynamics GP that enhance a company’s decision-making processes. This guide will take you from the basics of setting up and deploying to creating secure, refreshable Excel reports. Using a whole host of tools available within Microsoft Dynamics GP and Excel, this tutorial will show you how to visualize your data using simple conditional formatting techniques and easy-to-read charts, and allow you to make your data interactive with slicers. We will also cover core topics such as Business Analyzer, Microsoft SQL Reporting services reports, BI360, and more. You will find out to use Power BI, share and refresh data and dashboards in Power BI, and use Power BI Query Editor. By the end of this book, you will have all the information required to build interactive dashboards using Dynamics GP.
Table of Contents (22 chapters)
Building Dashboards with Microsoft Dynamics GP 2016 Second Edition
Credits
About the Authors
About the Reviewer
www.PacktPub.com
Customer Feedback
Preface
Index

Publishing to the service


Up to this point, we were able to create reports without setting up a Microsoft Power BI account. To use the Power BI service, a Power BI account must be set up.

Tip

You can sign up for a free account using the following URL: https://powerbi.microsoft.com/en-us/get-started/

We'll start populating the Power BI service using the easy-to-use feature called Publish. Consider the following steps:

  1. Open the Power BI Desktop file we created called VendorInfo.pbix.

  2. Sign into Power BI by clicking on Sign in at the top-right corner of your window. If your name appears instead of Sign in, you are already signed in. Skip ahead to step 5:

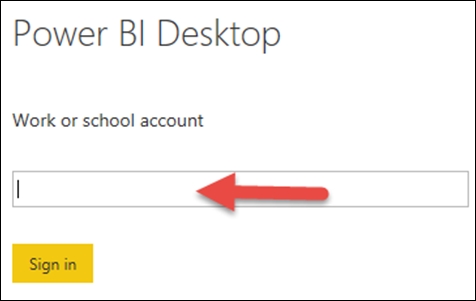
  3. Enter your Power BI account e-mail in the Power BI Desktop window, as follows:

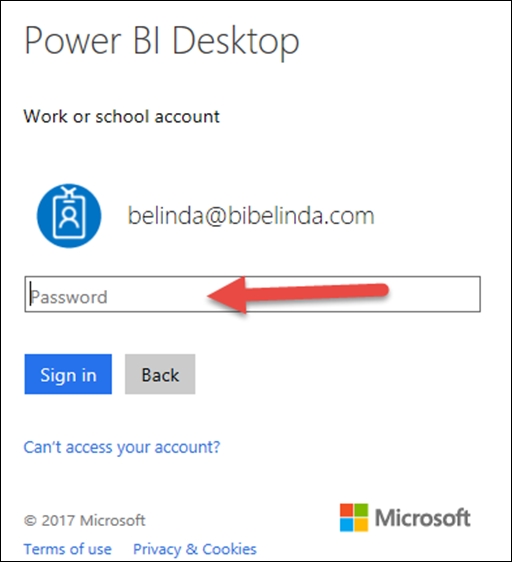
  4. Enter your Power BI password in the window and click on Sign in:

    You should now see your Power BI username in the top-right corner of your Power BI Desktop application. Take a look at the following screenshot:

  5. Click on Publish from the Share area of the Home ribbon:

    If you...