Book Image

Docker and Kubernetes for Java Developers

By : Jarosław Krochmalski
Book Image

Docker and Kubernetes for Java Developers

By: Jarosław Krochmalski

Overview of this book

Imagine creating and testing Java EE applications on Apache Tomcat Server or Wildfly Application server in minutes along with deploying and managing Java applications swiftly. Sounds too good to be true? But you have a reason to cheer as such scenarios are only possible by leveraging Docker and Kubernetes. This book will start by introducing Docker and delve deep into its networking and persistent storage concepts. You will then proceed to learn how to refactor monolith application into separate services by building an application and then packaging it into Docker containers. Next, you will create an image containing Java Enterprise Application and later run it using Docker. Moving on, the book will focus on Kubernetes and its features and you will learn to deploy a Java application to Kubernetes using Maven and monitor a Java application in production. By the end of the book, you will get hands-on with some more advanced topics to further extend your knowledge about Docker and Kubernetes.
Table of Contents (12 chapters)
11
More Resources

Docker concepts - images and containers

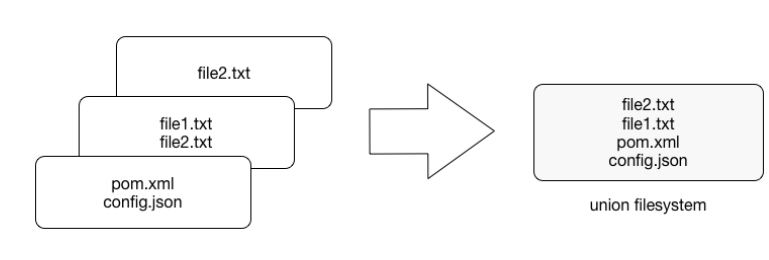
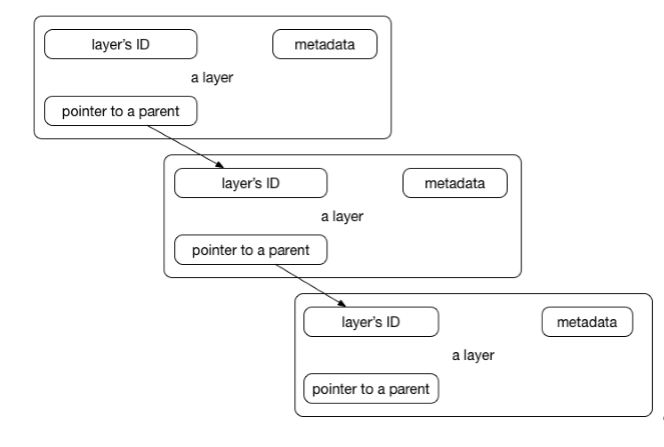
When dealing with Kubernetes, we will be working with Docker containers; it is an open source container cluster manager. To run our own Java application, we will need to create an image first. Let's begin with the concept of Docker images.

Images

Think of an image as a read-only template which is a base foundation to create a container from. It's same as a recipe containing the definition of everything your application needs to operate. It can be Linux with an application server (such as Tomcat or Wildfly, for example) and your Java application itself. Every image starts from a base image; for example, Ubuntu; a Linux image. Although you can begin with a simple image and build your application stack on top of it, you can also pick an already prepared image from the hundreds available on the Internet. There are a lot of images especially useful for Java developers: openjdk, tomcat, wildfly, and many others. We will use them later as a foundation for our own images. It's a lot easier to have, let's say, Wildfly installed and configured properly as a starting point for your own image. You can then just focus on your Java application. If you're a novice in building images, downloading a specialized base image is a great way to get a serious speed boost in comparison to developing one by yourself.

Images are created using a series of commands, called instructions. Instructions are placed in the Dockerfile. The Dockerfile is just a plain text file, containing an ordered collection of root filesystem changes (the same as running a command that starts an application server, adding a file or directory, creating environmental variables, and so on.) and the corresponding execution parameters for use within a container runtime later on. Docker will read the Dockerfile when you start the process of building an image and execute the instructions one by one. The result will be the final image. Each instruction creates a new layer in the image. That image layer then becomes the parent for the layer created by the next instruction. Docker images are highly portable across hosts and operating systems; an image can be run in a Docker container on any host that runs Docker. Docker is natively supported in Linux, but has to be run in a VM on Windows and macOS. It's important to know that Docker uses images to run your code, not the Dockerfile. The Dockerfile is used to create the image when you run the docker build command. Also, if you publish your image to the Docker Hub, you publish a resulting image with its layers, not a source Dockerfile itself.

We have said before that every instruction in a Dockerfile creates a new layer. Layers are the internal nature of an image; Docker images are composed from them. Let's explain now what they are and what their characteristics are.

Layers

Each image consists of a series of layers which are stacked, one on top of the another. In fact, every layer is an intermediate image. By using the union filesystem, Docker combines all these layers into a single image entity. The union filesystem allows transparent overlaying files and directories of separate filesystems, giving a single, consistent filesystem as a result, as you can see the following diagram:

Contents and structure of directories which have the same path within these separate filesystems will be seen together in a single merged directory, within the new, virtual-like filesystem. In other words, the filesystem structure of the top layer will merge with the structure of the layer beneath. Files and directories which have the same path as in the previous layer will cover those beneath. Removing the upper layer will again reveal and expose the previous directory content. As we have mentioned earlier, layers are placed in a stack, one on the top of another. To maintain the order of layers, Docker utilizes the concept of layer IDs and pointers. Each layer contains the ID and a pointer to its parent layer. A layer without a pointer referencing the parent is the first layer in the stack, a base. You can see the relation in the following diagram:

Layers have some interesting features. First, they are reusable and cacheable. The pointer to a parent layer you can see in the previous diagram is important. As Docker is processing your Dockerfile it's looking at two things: the Dockerfile instruction being executed and the parent image. Docker will scan all of the children of the parent layer and look for one whose command matches the current instruction. If a match is found, Docker skips to the next Dockerfile instruction and repeats the process. If a matching layer is not found in the cache, a new one is created. For the instructions that add files to your image (we will get to know them later in detail), Docker creates a checksum for each file contents. During the building process, this checksum is compared against the checksum of the existing images to check if the layer can be reused from the cache. If two different images have a common part, let's say a Linux shell or Java runtime for example, Docker, which tracks all of the pulled layers, will reuse the shell layer in both of the images. It's a safe operation; as you already know, layers are read-only. When downloading another image, the layer will be reused and only the difference will be pulled from the Docker Hub. This saves time, bandwidth, and disk space of course, but it has another great advantage. If you modify your Docker image, for example by modifying your containerized Java application, only the application layer gets modified. After you've successfully built an image from your Dockerfile, you will notice that subsequent builds of the same Dockerfile finish a lot faster. Once Docker caches an image layer for an instruction, it doesn't need to be rebuilt. Later on, instead of distributing the whole image, you push just the updated part. It makes the process simpler and faster. This is especially useful if you use Docker in your continuous deployment flow: pushing a Git branch will trigger building an image and then publishing the application for users. Due to the layer-reuse feature, the whole process is a lot faster.

The concept of reusable layers is also a reason why Docker is so lightweight in comparison to full virtual machines, which don't share anything. It is thanks to layers that when you pull an image, you eventually don't have to download all of its filesystem. If you already have another image that has some of the layers of the image you pull, only the missing layers are actually downloaded. There is a word of warning though, related to another feature of layers: apart from being reusable, layers are also additive. If you create a large file in the container, then make a commit (we will get to that in a while), then delete the file, and do another commit; this file will still be present in the layer history. Imagine this scenario: you pull the base Ubuntu image, and install the Wildfly application server. Then you change your mind, uninstall the Wildfly and install Tomcat instead. All those files removed from the Wildfly installation will still be present in the image, although they have been deleted. Image size will grow in no time. Understanding of Docker's layered filesystem can make a big difference in the size of your images. Size can become a problem when you publish your images to a registry; it takes more requests and is longer to transfer.

Large images become an issue when thousands of containers need to be deployed across a cluster, for example. You should always be aware of the additivity of layers and try to optimize the image at every step of your Dockerfile, the same as using the command chaining, for example. We will be using the command chaining technique later on, when creating our Java application images.

Because layers are additive, they provide a full history of how a specific image was built. This gives you another great feature: the possibility to make a rollback to a certain point in the image's history. Since every image contains all of its building steps, we can easily go back to a previous step if we want to. This can be done by tagging a certain layer. We will cover image tagging later in our book.

Layers and images are closely related to each other. As we have said before, Docker images are stored as a series of read-only layers. This means that once the container image has been created, it does not change. But having all the filesystem read-only would not make a lot of sense. What about modifying an image? Or adding your software to a base web server image? Well, when we start a container, Docker actually takes the read-only image (with all its read-only layers) and adds a writable layer on top of the layers stack. Let's focus on the containers now.

Containers

A running instance of an image is called a container. Docker launches them using the Docker images as read-only templates. If you start an image, you have a running container of this image. Naturally, you can have many running containers of the same image. In fact, we will do it very often a little bit later, using Kubernetes.

To run a container, we use the docker run command:

docker run [OPTIONS] IMAGE [COMMAND] [ARG...]  

There are a lot of run command options and switches that can be used; we will get to know them later on. Some of the options include the network configuration, for example (we will explain Docker's networking concepts in Chapter 2, Networking and Persistent Storage). Others, the same as the -it (from interactive), tell the Docker engine to behave differently; in this case, to make the container interactive and to attach a terminal to its output and input. Let's just focus on the idea of the container to better understand the whole picture. We are going to use the docker run command in a short while to test our setup.

So, what happens under the hood when we run the docker run command? Docker will check if the image that you would like to run is available on your local machine. If not, it will be pulled down from the remote repository. The Docker engine takes the image and adds a writable layer on top of the image's layers stack. Next, it initializes the image's name, ID, and resource limits, such as CPU and memory. In this phase, Docker will also set up a container's IP address by finding and attaching an available IP address from a pool. The last step of the execution will be the actual command, passed as the last parameter of the docker run command. If the it option has been used, Docker will capture and provide the container output, it will be displayed in the console. You can now do things you would normally do when preparing an operating system to run your applications. This can be installing packages (via apt-get, for example), pulling source code with Git, building your Java application using Maven, and so on. All of these actions will modify the filesystem in the top, writable layer. If you then execute the commit command, a new image containing all of your changes will be created, kind of frozen, and ready to be run later. To stop a container, use the docker stop command:

docker stop  

A container when stopped will retain all settings and filesystem changes (in the top layer that is writeable). All processes running in the container will be stopped and you will lose everything in memory. This is what differentiates a stopped container from a Docker image.

To list all containers you have on your system, either running or stopped, execute the docker ps command:

docker ps -a

As a result, the Docker client will list a table containing container IDs (a unique identifier you can use to refer to the container in other commands), creation date, the command used to start a container, status, exposed ports, and a name, either assigned by you or the funny name Docker has picked for you. To remove a container, you can just use the docker rm command. If you want to remove a couple of them at once, you can use the list of containers (given by the docker ps command) and a filter:

docker rm $(docker ps -a -q -f status=exited)

We have said that a Docker image is always read-only and immutable. If it did not have the possibility to change the image, it would not be very useful. So how's the image modification possible except by, of course, altering a Dockerfile and doing a rebuild? When the container is started, the writable layer on top of the layers stack is for our disposal. We can actually make changes to a running container; this can be adding or modifying files, the same as installing a software package, configuring the operating system, and so on. If you modify a file in the running container, the file will be taken out of the underlying (parent) read-only layer and placed in the top, writable layer. Our changes are only possible in the top layer. The union filesystem will then cover the underlying file. The original, underlying file will not be modified; it still exists safely in the underlying, read-only layer. By issuing the docker commit command, you create a new read-only image from a running container (and all it changes in the writable layer):

docker commit <container-id> <image-name>  

The docker commit command saves changes you have made to the container in the writable layer. To avoid data corruption or inconsistency, Docker will pause a container you are committing changes into. The result of the docker commit command is a brand new, read-only image, which you can create new containers from:

In response to a successful commit, Docker will output the full ID of a newly generated image. If you remove the container without issuing a commit first and then relaunch the same image again, Docker will start a fresh container without any of the changes made in the previously running container. In either case, with or without a commit, your changes to the filesystem will never affect the base image. Creating images by altering the top writable layer in the container is useful when debugging and experimenting, but it's usually better to use a Dockerfile to manage your images in a documented and maintainable way.

We have now learned about the build (Dockerfile and the image) and runtime (container) pieces of our containerization world. We are still missing the last element, the distribution component. The distribution component of Docker consists of the Docker registry, index, and repository. Let's focus on them now to have a complete picture.

Docker registry, repository, and index

The first component in Docker's distribution system is the registry. Docker utilizes a hierarchical system for storing images, shown in the following screenshot:

Images which you build can be stored in a remote registry for others to use. The Docker registry is a service (an application, in fact) that is storing your Docker images. The Docker Hub is an example of the publicly available registry; it's free and serves a huge, constantly growing collection of existing images. The repository, on the other hand, is a collection (namespace) of related images, usually providing different versions of the same application or service. It's a collection of different Docker images with the same name and different tags.

If your app is named hello-world-java and your username (or namespace) for the Registry is dockerJavaDeveloper then your image will be placed in the dockerJavaDeveloper/hello-world-java repository. You can tag an image and store multiple versions of that image with different IDs in a single named repository and access different tagged versions of an image with a special syntax such as username/image_name:tag. The Docker repository is quite similar to a Git repository. For example, Git, a Docker repository is identified by a URI and can either be public or private. The URI looks the same as the following:

{registryAddress}/{namespace}/{repositoryName}:{tag}  

The Docker Hub is the default registry and Docker will pull images from the Docker Hub if you do not specify a registry address. To search an image in the registry, execute the docker search command; for example:

$ docker search hello-java-world  

Without specifying the remote registry, Docker will conduct a search on the Docker Hub and output the list of images matching your search criteria:

The difference between the registry and repository can be confusing at the beginning, so let's describe what will happen if you execute the following command:

$ docker pull ubuntu:16.04  

The command downloads the image tagged 16.04 within the ubuntu repository from the Docker Hub registry. The official ubuntu repository doesn't use a username, so the namespace part is omitted in this example.

Although the Docker Hub is public, you get one private repository for free with your Docker Hub user account. Last, but not least, the component you should be aware of is an index. An index manages searching and tagging and also user accounts and permissions. In fact, the registry delegates authentication to the index. When executing remote commands, such as push or pull, the index first will look at the name of the image and then check to see if it has a corresponding repository. If so, the index verifies if you are allowed to access or modify the image. If you are, the operation is approved and the registry takes or sends the image.

Let's summarize what we have learned so far:

  • The Dockerfile is the recipe to build an image. It's a text file containing ordered instructions. Each Dockerfile has a base image you build upon
  • An image is a specific state of a filesystem: a read-only, frozen immutable snapshot of a live container
  • An image is composed of layers representing changes in the filesystem at various points in time; layers are a bit same as the commit history of a Git repository. Docker uses the layers cache
  • Containers are runtime instances of an image. They can be running or stopped. You can have multiple containers of the same image running
  • You can make changes to the filesystem on a container and commit them to make them persisted. Commit always creates a new image
  • Only the filesystem changes can be committed, memory changes will be lost
  • A registry holds a collection of named repositories, which themselves are a collection of images tracked by their IDs. The registry is same as a Git repository: you can push and pull images

You should now have an understanding of the nature of images with their layers and containers. But Docker is not just a Dockerfile processor and the runtime engine. Let's look at what else is available.