Book Image

Azure Serverless Computing Cookbook

By : Praveen Kumar Sreeram
Book Image

Azure Serverless Computing Cookbook

By: Praveen Kumar Sreeram

Overview of this book

Microsoft provides a solution to easily run small segment of code in the Cloud with Azure Functions. Azure Functions provides solutions for processing data, integrating systems, and building simple APIs and microservices. The book starts with intermediate-level recipes on serverless computing along with some use cases on benefits and key features of Azure Functions. Then, we’ll deep dive into the core aspects of Azure Functions such as the services it provides, how you can develop and write Azure functions, and how to monitor and troubleshoot them. Moving on, you’ll get practical recipes on integrating DevOps with Azure functions, and providing continuous integration and continous deployment with Visual Studio Team Services. It also provides hands-on steps and tutorials based on real-world serverless use cases, to guide you through configuring and setting up your serverless environments with ease. Finally, you’ll see how to manage Azure functions, providing enterprise-level security and compliance to your serverless code architecture. By the end of this book, you will have all the skills required to work with serverless code architecture, providing continuous delivery to your users.
Table of Contents (11 chapters)

Building a backend Web API using HTTP triggers

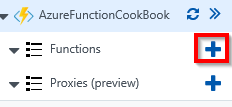
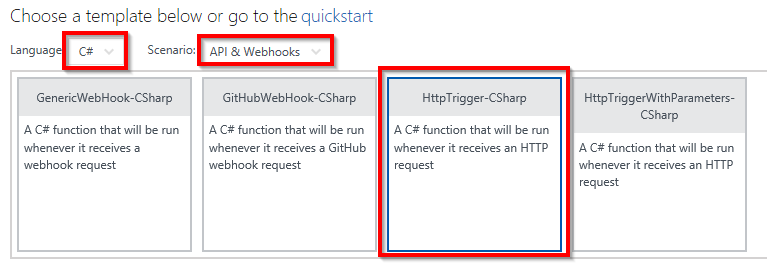
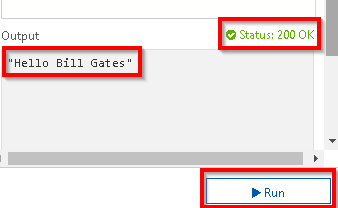
We will use Azure serverless architecture for building a Web API using HTTP triggers. These HTTP triggers could be consumed by any frontend application that is capable of making HTTP calls.

Getting ready

Let's start our journey of understanding Azure serverless computing using Azure Functions by creating a basic backend Web API that responds to HTTP requests:

We will be using C# as the programming language throughout the book.

How to do it…

  1. Navigate to the Function App listing page. Choose the function app in which you would like to add a new function.
  2. Create a new function by clicking on the + icon as shown in the following screenshot:
  1. If you have created a brand new function, then clicking on the + icon in the preceding step, you would see the Get started quickly with a premade function page. Please click on the create your own custom functions link to navigate to the page where you can see all the built-in templates for creating your Azure Functions.
  2. In the Choose a template below or go to the quickstart section, choose HTTPTrigger-CSharp as shown in the following screenshot to create a new HTTP trigger function:
  1. Provide a meaningful name. For this example, I have used RegisterUser as the name of the Azure Function.
  2. In the Authorization level drop-down, choose the Anonymous option as shown in the following screenshot. We will learn more about the all the authorization levels in Chapter 9, Implement Best Practices for Azure Functions:
  1. Once you provide the name and choose the Authorization level, click on Create button to create the HTTP trigger function.
  2. As soon as you create the function, all the required code and configuration files will be created automatically and the run.csx file will be opened for you to edit the code. Remove the default code and replace it with the following code:
        using System.Net;
public static async Task<HttpResponseMessage>
Run(HttpRequestMessage req, TraceWriter log)
{
string firstname=null,lastname = null;
dynamic data = await req.Content.ReadAsAsync<object>();
firstname = firstname ?? data?.firstname;
lastname = data?.lastname;
return (lastname + firstname) == null ?
req.CreateResponse(HttpStatusCode.BadRequest,
"Please pass a name on the query string or in the
request body")
:
req.CreateResponse(HttpStatusCode.OK, "Hello " +
firstname + " " + lastname);
}
  1. Save the changes by clicking on the Save button available just above the code editor.
  2. Let's try to test the RegisterUser function using the Test console. Click on the tab named Test as shown in the following screenshot to open the Test console:
  1. Enter the values for firstname and lastname, in the Request body section as shown in the following screenshot:

Please make sure you select POST in the HTTP method drop-down.

  1. Once you have reviewed the input parameters, click on the Run button available at the bottom of the Test console as shown in the following screenshot:
  1. If the input request workload is passed correctly with all the required parameters, you will see a Status 200 OK, and the output in the Output window will be as shown in the preceding screenshot.

How it works…

We have created the first basic Azure Function using HTTP triggers and made a few modifications to the default code. The code just accepts firstname and lastname parameters and prints the name of the end user with a Hello {firstname} {lastname} message as a response. We have also learnt how to test the HTTP trigger function right from the Azure Management portal.

For the sake of simplicity, I didn't perform validations of the input parameter. Please make sure that you validate all the input parameters in your applications running on your production environment.

See also

  • The Enabling authorization for function apps recipe in Chapter 9, Implement Best Practices for Azure Functions