
Step 3 – enabling administrator access
Up to this point, we’ve been working in Cloud Identity and Google Cloud using the emergency-only initial user, your equivalent to my Cloud Identity/Google Workspace super admin – [email protected]. Remember how I said that this account should be reserved for emergency recovery and the like? It’s now time to practice what I preached.
I’m a big fan of naming conventions. You come up with a convention that works, document it, and get everyone to use it. It helps with consistency and being able to identify what’s what. If I were you, I’d create a Google or Word document somewhere that’s accessible and sharable. Name it something like Google Cloud Naming Conventions and put a two-column table in it. Give the first column the heading Resource, and the second Naming Convention.
Next, add a row for the Cloud Identity super admins – Cloud Identity super admin has a nice ring. Next to it, come up with a naming convention such as superadmin-first.last@<your domain>. While you’re there and naming things, add a second entry for your GCP organization administrators – how about gcp-orgadmin-first.last@<yourdomain>?
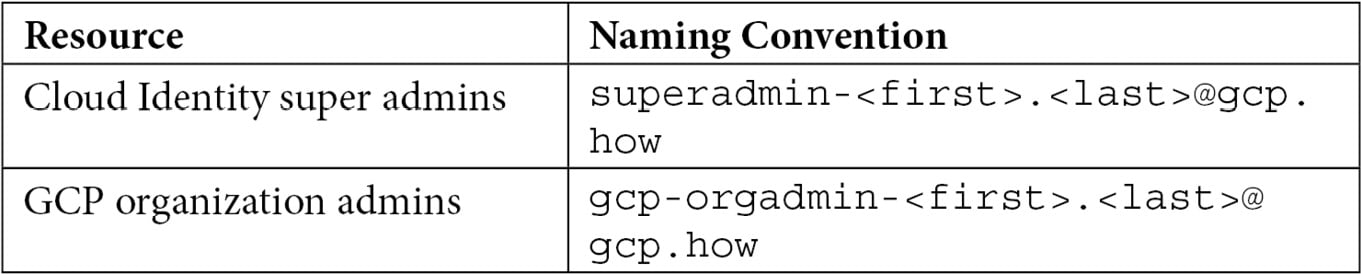
Table 2.1 – GCP naming conventions
While we’re moving through this book, I’m going to come back to our naming conventions document with a few other ideas about non-user-related resources.
Since a Cloud Identity super admin has more power than a GCP organization admin, I just followed my naming convention and created a pair of accounts for myself – [email protected] and [email protected]. As, once again, these are high-security accounts, I enabled 2SV on both. As they are my personal accounts, instead of using a physical key, I configured my phone as a key. Modern phones, using Android and iOS (with the Google app installed), can act as keys (https://support.google.com/accounts/answer/185839). Be careful though – if you use the device as a key and the Google Authenticator app on the device as your backup, losing the device can lose both 2SVs at once. Make sure you get some recovery codes that you store securely. I use a password manager that can also store encrypted notes, and I store my recovery codes there. That way they are both encrypted and replicated across multiple devices.
Setting up the organization admin is something we’ll do over in Google Cloud in a moment, but setting up the new super admin account is accomplished in Cloud Identity (https://admin.google.com/). In the left-hand menu, head down to Account | Admin roles | Super Admin | Admins. You should get a list displaying your current super admins with your emergency account listed. Click Assign users, type the prefix for the super admin user you created for yourself (superadmin if you’re following my naming convention), and click Assign Role. Repeat the process if needed.
With the two new admin accounts created and with your new personal super admin up and running, log out from your emergency-use gcp-superadmin account and log back in under your personal super admin account (superadmin-<first>.<last>@<domain>).
Great! Your new Cloud Identity super admin is good to go, and you are ready to head to Google Cloud and get the corresponding organization administrator set up. Make sure that you are logged in as a Cloud Identity super admin and then head over to Google Cloud Console: https://console.cloud.google.com/. If you get a message about activating a trial account, dismiss it.
Now that we have our non-emergency accounts created and working, the enabling administrator access step of the Google Cloud foundational plan has three major things that you need to accomplish:
- Verify that your organization was created correctly in Google Cloud.
- Add your new organization admin account to the
gcp-organization-admins@<your-domain>group that you created back in the last section and configure the permissions on the group correctly. - Grant other permissions that will be used in future foundation-laying steps.
Let’s move through the list.
Verifying initial Google Cloud organization creation
Finishing the creation of your organization in Google Cloud is easy:
- Verify that you are logged into Google Cloud Console (https://console.cloud.google.com/) and that you are using your new personal super admin account. If you are looking at Google Cloud Console, you can mouse over the circular avatar picture in the upper-right corner at any time to see which account you are currently using.
- Navigate to Navigation menu | IAM & Admin | Identity & Organization and follow the instructions you find there.
Note
If you have just created this organization in Cloud Identity or Google Workspace, it may take a few minutes before it’s picked up by Google Cloud.
- In the project selector at the top of the page, verify that you can locate and select your organization, as shown in the following screenshot:

Figure 2.11 – Organization selected
With the creation of the organization verified, let’s set up our top-level organization administrator group.
Configuring organization administrator group access
In an earlier part of this chapter, we created a collection of starter groups, including one for our organization admins named gcp-organization-admins. Currently though, the group has no permissions associated with it. We will change that now.
Google recommends that your GCP organization administrators be granted a group of security roles. As we mentioned previously, a Google Cloud IAM role is essentially a set of individual permissions needed for a particular job, as it relates to a particular part of Google Cloud. Google recommends that organizational administrators are assigned the following IAM roles:
- Resource Manager - Organization Administrator
- Resource Manager - Folder Admin
- Resource Manager - Project Creator
- Billing - Billing Account User
- Roles - Organization Role Administrator
- Organization Policy - Organization Policy Administrator
- Security Center - Security Center Admin
- Support - Support Account Administrator
Make sure you have Google Cloud Console open, are logged in using your super admin account, and have your organization selected, as shown in Figure 2.11. Then, follow these steps:
- Navigate to Navigation menu | IAM & Admin | IAM | Add.
- Verify that the resulting dialog states that you are adding a permission to your organization and not to an individual project. Mine currently reads
Add principals to ‘gcp.how’. - When you created your groups, each one had an email address, and if you were following my advice, then that address takes the form of
<group-name>@<domain-name>, so for my organizational administrator’s group (gcp-organization-admins), the email address would be[email protected]. Enter the email address for your organization admin group into the New principals textbox. - Use Select a role to grant the Resource Manager | Organization Administrator role. You can scroll to the Resource Manager category and then select the Organization Administrator role, or you can just enter
Organization Administratorin the search box. However, if you use the search box, be very careful when selecting the role, as many are named very similarly. - Click Add Another Role and grant the Resource Manager | Folder Admin role.
- Using the same process, also grant these roles:
- Resource Manager | Project Creator
- Billing | Billing Account User
- Roles | Organization Role Administrator
- Organization Policy | Organization Policy Administrator
- Security Center | Security Center Admin
- Support | Support Account Administrator
- Verify that your permissions assignment dialog resembles the following figure:
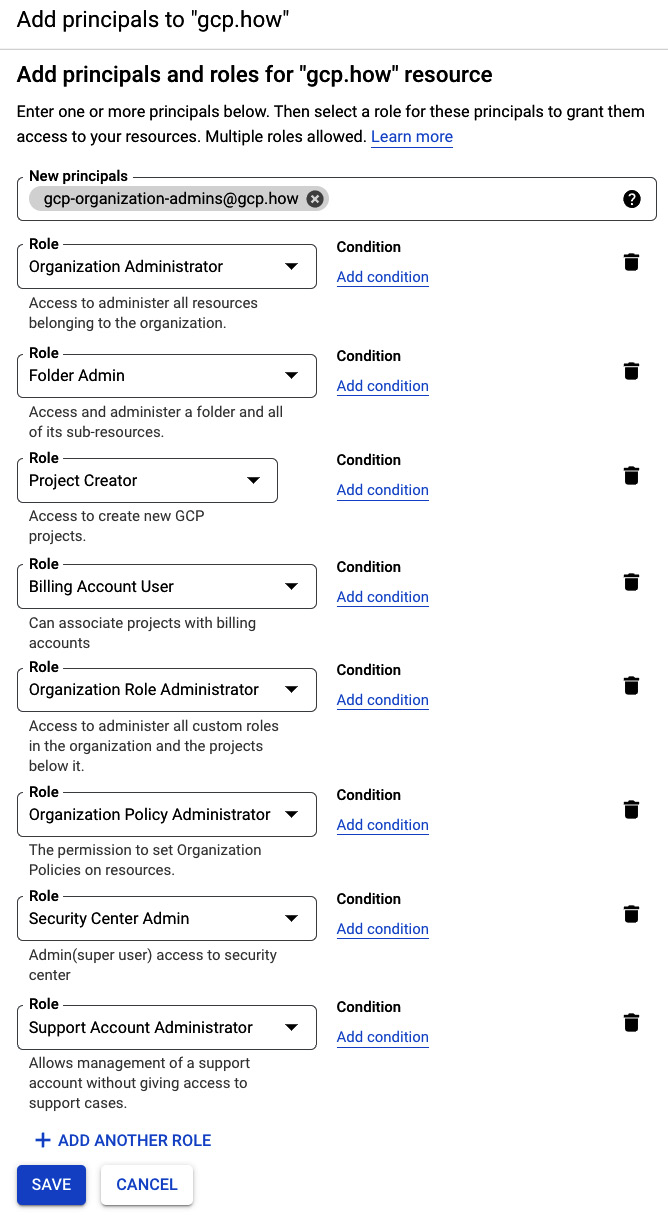
Figure 2.12 – New role assignments
- Save the new settings. Google Cloud Console will take you back to your main IAM page where again, you can see that the security roles have been assigned to the group:
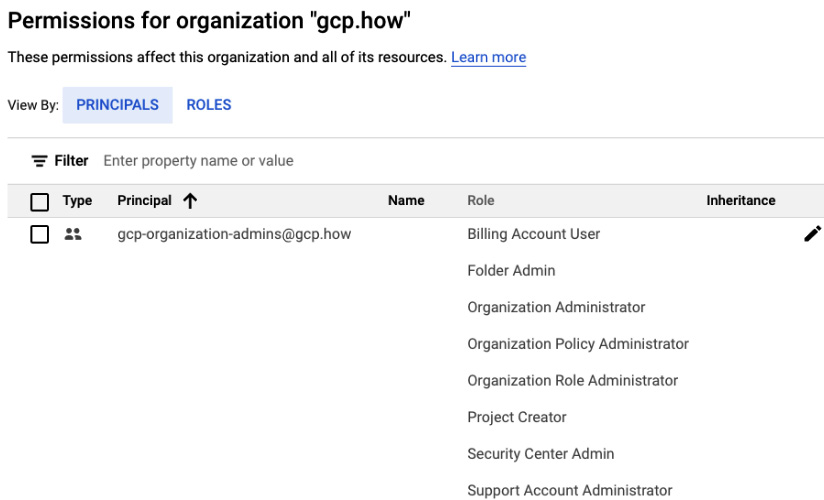
Figure 2.13 – The newly assigned security roles
Now that our gcp-organization-admins group is properly configured, let’s add our personal organization admin account as a member. Make sure that you have your personal organization admin account email address handy. If you’re following my naming scheme, it should be named in the (where is that naming convention document?… ah, here it is) gcp-orgadmin-<first>.<last>@<domain> format. So, I’m [email protected]. To add the account to the group, follow these steps:
- Go to Navigation menu | IAM & Admin | Groups | gcp-organization-admins | Add Members.
- Enter the new organization admin email address and click Add.
- Repeat if there are any other organization admins that you’d like to assign.
Woo-hoo! Nice job. On Google’s 10-step checklist, you can check the top 3 off. If you’re using Google’s wizard, then you’ll see a way to mark each item as complete at the top of that step’s page. You aren’t done yet, but you’re making good progress. Keep reading because there are more steps to do!