
Creating a single-node cluster with Minikube
In this section, we will create a local single-node cluster using Minikube. Local clusters are most useful for developers that want quick edit-test-deploy-debug cycles on their machine before committing their changes. Local clusters are also very useful for DevOps and operators that want to play with Kubernetes locally without concerns about breaking a shared environment or creating expensive resources in the cloud and forgetting to clean them up. While Kubernetes is typically deployed on Linux in production, many developers work on Windows PCs or Macs. That said, there aren’t too many differences if you do want to install Minikube on Linux.

Figure 2.4: minikube
Quick introduction to Minikube
Minikube is the most mature local Kubernetes cluster. It runs the latest stable Kubernetes release. It supports Windows, macOS, and Linux. Minikube provides a lot of advanced options and capabilities:
- LoadBalancer service type - via minikube tunnel
- NodePort service type - via minikube service
- Multiple clusters
- Filesystem mounts
- GPU support - for machine learning
- RBAC
- Persistent Volumes
- Ingress
- Dashboard - via minikube dashboard
- Custom container runtimes - via the
start --container-runtimeflag - Configuring API server and kubelet options via command-line flags
- Addons
Installing Minikube
The ultimate guide is here: https://minikube.sigs.k8s.io/docs/start/
But, to save you a trip, here are the latest instructions at the time of writing.
Installing Minikube on Windows
On Windows, I prefer to install software via the Chocolatey package manager. If you don’t have it yet, you can get it here: https://chocolatey.org/
If you don’t want to use Chocolatey, check the ultimate guide above for alternative methods.
With Chocolatey installed, the installation is pretty simple:
PS C:\Windows\system32> choco install minikube -y
Chocolatey v0.12.1
Installing the following packages:
minikube
By installing, you accept licenses for the packages.
Progress: Downloading Minikube 1.25.2... 100%
kubernetes-cli v1.24.0 [Approved]
kubernetes-cli package files install completed. Performing other installation steps.
Extracting 64-bit C:\ProgramData\chocolatey\lib\kubernetes-cli\tools\kubernetes-client-windows-amd64.tar.gz to C:\ProgramData\chocolatey\lib\kubernetes-cli\tools...
C:\ProgramData\chocolatey\lib\kubernetes-cli\tools
Extracting 64-bit C:\ProgramData\chocolatey\lib\kubernetes-cli\tools\kubernetes-client-windows-amd64.tar to C:\ProgramData\chocolatey\lib\kubernetes-cli\tools...
C:\ProgramData\chocolatey\lib\kubernetes-cli\tools
 ShimGen has successfully created a shim for kubectl-convert.exe
 ShimGen has successfully created a shim for kubectl.exe
 The install of kubernetes-cli was successful.
  Software installed to 'C:\ProgramData\chocolatey\lib\kubernetes-cli\tools'
Minikube v1.25.2 [Approved]
minikube package files install completed. Performing other installation steps.
 ShimGen has successfully created a shim for minikube.exe
 The install of minikube was successful.
  Software installed to 'C:\ProgramData\chocolatey\lib\Minikube'
Chocolatey installed 2/2 packages.
 See the log for details (C:\ProgramData\chocolatey\logs\chocolatey.log).
On Windows, you can work in different command-line environments. The most common ones are PowerShell and WSL (Windows System for Linux). Either one works. You may need to run them in Administrator mode for certain operations.
As far as console windows go, I recommend the official Windows Terminal these days. You can install it with one command:
choco install microsoft-windows-terminal --pre
If you prefer other console windows such as ConEMU or Cmdr, this is totally fine.
I’ll use shortcuts to make life easy. If you want to follow along and copy the aliases into your profile, you can use the following for PowerShell and WSL.
For PowerShell, add the following to your $profile:
function k { kubectl.exe $args } function mk { minikube.exe $args }
For WSL, add the following to .bashrc:
alias k='kubectl.exe'
alias mk=minikube.exe'
Let’s verify that minikube was installed correctly:
$ mk version
minikube version: v1.25.2
commit: 362d5fdc0a3dbee389b3d3f1034e8023e72bd3a7
Let’s create a cluster with mk start:
$ mk start
 minikube v1.25.2 on Microsoft Windows 10 Pro 10.0.19044 Build 19044
 Automatically selected the docker driver. Other choices: hyperv, ssh
 Starting control plane node minikube in cluster minikube
 Pulling base image ...
 Downloading Kubernetes v1.23.3 preload ...
> preloaded-images-k8s-v17-v1...: 505.68 MiB / 505.68 MiB 100.00% 3.58 MiB
> gcr.io/k8s-minikube/kicbase: 379.06 MiB / 379.06 MiB 100.00% 2.61 MiB p/
Downloading Kubernetes v1.23.3 preload ...
> preloaded-images-k8s-v17-v1...: 505.68 MiB / 505.68 MiB 100.00% 3.58 MiB
> gcr.io/k8s-minikube/kicbase: 379.06 MiB / 379.06 MiB 100.00% 2.61 MiB p/
 Creating docker container (CPUs=2, Memory=8100MB) ...
 docker "minikube" container is missing, will recreate.
Creating docker container (CPUs=2, Memory=8100MB) ...
docker "minikube" container is missing, will recreate.
Creating docker container (CPUs=2, Memory=8100MB) ...
 Downloading VM boot image ...
> minikube-v1.25.2.iso.sha256: 65 B / 65 B [-------------] 100.00% ? p/s 0s
> minikube-v1.25.2.iso: 237.06 MiB / 237.06 MiB [ 100.00% 12.51 MiB p/s 19s
Starting control plane node minikube in cluster minikube
Creating hyperv VM (CPUs=2, Memory=6000MB, Disk=20000MB) ...
Downloading VM boot image ...
> minikube-v1.25.2.iso.sha256: 65 B / 65 B [-------------] 100.00% ? p/s 0s
> minikube-v1.25.2.iso: 237.06 MiB / 237.06 MiB [ 100.00% 12.51 MiB p/s 19s
Starting control plane node minikube in cluster minikube
Creating hyperv VM (CPUs=2, Memory=6000MB, Disk=20000MB) ...
 This VM is having trouble accessing https://k8s.gcr.io
 To pull new external images, you may need to configure a proxy: https://minikube.sigs.k8s.io/docs/reference/networki
ng/proxy/
To pull new external images, you may need to configure a proxy: https://minikube.sigs.k8s.io/docs/reference/networki
ng/proxy/
 Preparing Kubernetes v1.23.3 on Docker 20.10.12 ...
▪ kubelet.housekeeping-interval=5m
▪ Generating certificates and keys ...
▪ Booting up control plane ...
▪ Configuring RBAC rules ...
Preparing Kubernetes v1.23.3 on Docker 20.10.12 ...
▪ kubelet.housekeeping-interval=5m
▪ Generating certificates and keys ...
▪ Booting up control plane ...
▪ Configuring RBAC rules ...
 Verifying Kubernetes components...
▪ Using image gcr.io/k8s-minikube/storage-provisioner:v5
Verifying Kubernetes components...
▪ Using image gcr.io/k8s-minikube/storage-provisioner:v5
 Enabled addons: storage-provisioner, default-storageclass
 Done! kubectl is now configured to use "minikube" cluster and "default" namespace by default
As you can see, the process is pretty complicated even for the default setup, and required multiple retries (automatically). You can customize the cluster creation process with a multitude of command-line flags. Type mk start -h to see what’s available.
Let’s check the status of our cluster:
$ mk status
minikube
type: Control Plane
host: Running
kubelet: Running
apiserver: Running
kubeconfig: Configured
All is well!
Now let’s stop the cluster and later restart it:
$ mk stop
 Stopping node "minikube" ...
 Powering off "minikube" via SSH ...
 1 node stopped.
Powering off "minikube" via SSH ...
1 node stopped.
Restarting with the time command to measure how long it takes:
$ time mk start
minikube v1.25.2 on Microsoft Windows 10 Pro 10.0.19044 Build 19044
Using the hyperv driver based on existing profile
Starting control plane node minikube in cluster minikube
 Restarting existing hyperv VM for "minikube" ...
 This VM is having trouble accessing https://k8s.gcr.io
 To pull new external images, you may need to configure a proxy: https://minikube.sigs.k8s.io/docs/reference/networki
ng/proxy/
Preparing Kubernetes v1.23.3 on Docker 20.10.12 ...
▪ kubelet.housekeeping-interval=5m
Verifying Kubernetes components...
▪ Using image gcr.io/k8s-minikube/storage-provisioner:v5
Enabled addons: storage-provisioner, default-storageclass
To pull new external images, you may need to configure a proxy: https://minikube.sigs.k8s.io/docs/reference/networki
ng/proxy/
Preparing Kubernetes v1.23.3 on Docker 20.10.12 ...
▪ kubelet.housekeeping-interval=5m
Verifying Kubernetes components...
▪ Using image gcr.io/k8s-minikube/storage-provisioner:v5
Enabled addons: storage-provisioner, default-storageclass
 Done! kubectl is now configured to use "minikube" cluster and "default" namespace by default
real 1m8.666s
user 0m0.004s
sys 0m0.000s
Done! kubectl is now configured to use "minikube" cluster and "default" namespace by default
real 1m8.666s
user 0m0.004s
sys 0m0.000s
It took a little over a minute.
Let’s review what Minikube did behind the curtains for you. You’ll need to do a lot of it when creating a cluster from scratch:
- Started a Hyper-V VM
- Created certificates for the local machine and the VM
- Downloaded images
- Set up networking between the local machine and the VM
- Ran the local Kubernetes cluster on the VM
- Configured the cluster
- Started all the Kubernetes control plane components
- Configured the kubelet
- Enabled addons (for storage)
- Configured kubectl to talk to the cluster
Installing Minikube on macOS
On Mac, I recommend installing minikube using Homebrew:
$ brew install minikube
Running `brew update --preinstall`...
==> Auto-updated Homebrew!
Updated 2 taps (homebrew/core and homebrew/cask).
==> Updated Formulae
Updated 39 formulae.
==> New Casks
contour                                                        hdfview                         rancher-desktop | kube-system
==> Updated Casks
Updated 17 casks.
==> Downloading https://ghcr.io/v2/homebrew/core/kubernetes-cli/manifests/1.24.0
######################################################################## 100.0%
==> Downloading https://ghcr.io/v2/homebrew/core/kubernetes-cli/blobs/sha256:e57f8f7ea19d22748d1bcae5cd02b91e71816147712e6dcd
==> Downloading from https://pkg-containers.githubusercontent.com/ghcr1/blobs/sha256:e57f8f7ea19d22748d1bcae5cd02b91e71816147
######################################################################## 100.0%
==> Downloading https://ghcr.io/v2/homebrew/core/minikube/manifests/1.25.2
Already downloaded: /Users/gigi.sayfan/Library/Caches/Homebrew/downloads/fa0034afe1330adad087a8b3dc9ac4917982d248b08a4df4cbc52ce01d5eabff--minikube-1.25.2.bottle_manifest.json
==> Downloading https://ghcr.io/v2/homebrew/core/minikube/blobs/sha256:6dee5f22e08636346258f4a6daa646e9102e384ceb63f33981745d
Already downloaded: /Users/gigi.sayfan/Library/Caches/Homebrew/downloads/ceeab562206fd08fd3b6523a85b246d48d804b2cd678d76cbae4968d97b5df1f--minikube--1.25.2.arm64_monterey.bottle.tar.gz
==> Installing dependencies for minikube: kubernetes-cli
==> Installing minikube dependency: kubernetes-cli
==> Pouring kubernetes-cli--1.24.0.arm64_monterey.bottle.tar.gz
  /opt/homebrew/Cellar/kubernetes-cli/1.24.0: 228 files, 55.3MB
==> Installing minikube
==> Pouring minikube--1.25.2.arm64_monterey.bottle.tar.gz
==> Caveats
zsh completions have been installed to:
  /opt/homebrew/share/zsh/site-functions
==> Summary
  /opt/homebrew/Cellar/minikube/1.25.2: 9 files, 70.3MB
==> Running `brew cleanup minikube`...
Disable this behaviour by setting HOMEBREW_NO_INSTALL_CLEANUP.
Hide these hints with HOMEBREW_NO_ENV_HINTS (see `man brew`).
==> Caveats
==> minikube
zsh completions have been installed to:
  /opt/homebrew/share/zsh/site-functions
/opt/homebrew/Cellar/kubernetes-cli/1.24.0: 228 files, 55.3MB
==> Installing minikube
==> Pouring minikube--1.25.2.arm64_monterey.bottle.tar.gz
==> Caveats
zsh completions have been installed to:
/opt/homebrew/share/zsh/site-functions
==> Summary
/opt/homebrew/Cellar/minikube/1.25.2: 9 files, 70.3MB
==> Running `brew cleanup minikube`...
Disable this behaviour by setting HOMEBREW_NO_INSTALL_CLEANUP.
Hide these hints with HOMEBREW_NO_ENV_HINTS (see `man brew`).
==> Caveats
==> minikube
zsh completions have been installed to:
/opt/homebrew/share/zsh/site-functions
You can add aliases to your .bashrc file (similar to the WSL aliases on Windows):
alias k='kubectl'
alias mk='$(brew --prefix)/bin/minikube'
Now you can use k and mk and type less.
Type mk version to verify Minikube is correctly installed and functioning:
$ mk version
minikube version: v1.25.2
commit: 362d5fdc0a3dbee389b3d3f1034e8023e72bd3a7
Type k version to verify kubectl is correctly installed and functioning:
$ k version
I0522 15:41:13.663004   68055 versioner.go:58] invalid configuration: no configuration has been provided
Client Version: version.Info{Major:"1", Minor:"23", GitVersion:"v1.23.4", GitCommit:"e6c093d87ea4cbb530a7b2ae91e54c0842d8308a", GitTreeState:"clean", BuildDate:"2022-02-16T12:38:05Z", GoVersion:"go1.17.7", Compiler:"gc", Platform:"darwin/amd64"}
The connection to the server localhost:8080 was refused - did you specify the right host or port?
Note that the client version is 1.23. Don’t worry about the error message. There is no cluster running, so kubectl can’t connect to anything. That’s expected. The error message will disappear when we create the cluster.
You can explore the available commands and flags for both Minikube and kubectl by just typing the commands with no arguments.
To create the cluster on macOS, just run mk start.
Troubleshooting the Minikube installation
If something goes wrong during the process, try to follow the error messages. You can add the --alsologtostderr flag to get detailed error info to the console. Everything minikube does is organized neatly under ~/.minikube. Here is the directory structure:
$ tree ~/.minikube\ -L 2
C:\Users\the_g\.minikube\
|-- addons
|-- ca.crt
|-- ca.key
|-- ca.pem
|-- cache
|   |-- iso
|   |-- kic
|   `-- preloaded-tarball
|-- cert.pem
|-- certs
|   |-- ca-key.pem
|   |-- ca.pem
|   |-- cert.pem
|   `-- key.pem
|-- config
|-- files
|-- key.pem
|-- logs
|   |-- audit.json
|   `-- lastStart.txt
|-- machine_client.lock
|-- machines
|   |-- minikube
|   |-- server-key.pem
|   `-- server.pem
|-- profiles
|   `-- minikube
|-- proxy-client-ca.crt
`-- proxy-client-ca.key
13 directories, 16 files
If you don’t have the tree utility, you can install it.
On Windows: $ choco install -y tree
On Mac: brew install tree
Checking out the cluster
Now that we have a cluster up and running, let’s peek inside.
First, let’s ssh into the VM:
$ mk ssh
                         _             _
            _         _ ( )           ( )
  ___ ___  (_)  ___  (_)| |/')  _   _ | |_      __
/' _ ` _ `\| |/' _ `\| || , <  ( ) ( )| '_`\  /'__`\
| ( ) ( ) || || ( ) || || |\`\ | (_) || |_) )(  ___/
(_) (_) (_)(_)(_) (_)(_)(_) (_)`\___/'(_,__/'`\____)
$ uname -a
Linux minikube 4.19.202 #1 SMP Tue Feb 8 19:13:02 UTC 2022 x86_64 GNU/Linux
$
Great! That works. The weird symbols are ASCII art for “minikube.” Now, let’s start using kubectl because it is the Swiss Army knife of Kubernetes and will be useful for all clusters.
Disconnect from the VM via ctrl+D or by typing:
$ logout
We will cover many of the kubectl commands in our journey. First, let’s check the cluster status using cluster-info:
$ k cluster-info
Kubernetes control plane is running at https://172.26.246.89:8443
CoreDNS is running at https://172.26.246.89:8443/api/v1/namespaces/kube-system/services/kube-dns:dns/proxy
To further debug and diagnose cluster problems, use 'kubectl cluster-info dump'.
You can see that the control plane is running properly. To see a much more detailed view of all the objects in the cluster as JSON, type: k cluster-info dump. The output can be a little daunting let’s use more specific commands to explore the cluster.
Let’s check out the nodes in the cluster using get nodes:
$ k get nodes
NAME       STATUS   ROLES                  AGE   VERSION
minikube   Ready    control-plane,master   62m   v1.23.3
So, we have one node called minikube. To get a lot more information about it, type:
k describe node minikube
The output is verbose; I’ll let you try it yourself.
Before we start putting our cluster to work, let’s check the addons minikube installed by default:
 mk addons list
|-----------------------------|----------|--------------|--------------------------------|
|         ADDON NAME          | PROFILE  |    STATUS    |           MAINTAINER           |
|-----------------------------|----------|--------------|--------------------------------|
| ambassador                  | minikube | disabled     | third-party (ambassador)       |
| auto-pause                  | minikube | disabled     | google                         |
| csi-hostpath-driver         | minikube | disabled     | kubernetes                     |
| dashboard                   | minikube | disabled     | kubernetes                     |
| default-storageclass        | minikube | enabled   | kubernetes                     |
| efk                         | minikube | disabled     | third-party (elastic)          |
| freshpod                    | minikube | disabled     | google                         |
| gcp-auth                    | minikube | disabled     | google                         |
| gvisor                      | minikube | disabled     | google                         |
| helm-tiller                 | minikube | disabled     | third-party (helm)             |
| ingress                     | minikube | disabled     | unknown (third-party)          |
| ingress-dns                 | minikube | disabled     | google                         |
| istio                       | minikube | disabled     | third-party (istio)            |
| istio-provisioner           | minikube | disabled     | third-party (istio)            |
| kong                        | minikube | disabled     | third-party (Kong HQ)          |
| kubevirt                    | minikube | disabled     | third-party (kubevirt)         |
| logviewer                   | minikube | disabled     | unknown (third-party)          |
| metallb                     | minikube | disabled     | third-party (metallb)          |
| metrics-server              | minikube | disabled     | kubernetes                     |
| nvidia-driver-installer     | minikube | disabled     | google                         |
| nvidia-gpu-device-plugin    | minikube | disabled     | third-party (nvidia)           |
| olm                         | minikube | disabled     | third-party (operator          |
|                             |          |              | framework)                     |
| pod-security-policy         | minikube | disabled     | unknown (third-party)          |
| portainer                   | minikube | disabled     | portainer.io                   |
| registry                    | minikube | disabled     | google                         |
| registry-aliases            | minikube | disabled     | unknown (third-party)          |
| registry-creds              | minikube | disabled     | third-party (upmc enterprises) |
| storage-provisioner         | minikube | enabled   | google                         |
| storage-provisioner-gluster | minikube | disabled     | unknown (third-party)          |
| volumesnapshots             | minikube | disabled     | kubernetes                     |
|-----------------------------|----------|--------------|--------------------------------|
| kubernetes |
| efk | minikube | disabled | third-party (elastic) |
| freshpod | minikube | disabled | google |
| gcp-auth | minikube | disabled | google |
| gvisor | minikube | disabled | google |
| helm-tiller | minikube | disabled | third-party (helm) |
| ingress | minikube | disabled | unknown (third-party) |
| ingress-dns | minikube | disabled | google |
| istio | minikube | disabled | third-party (istio) |
| istio-provisioner | minikube | disabled | third-party (istio) |
| kong | minikube | disabled | third-party (Kong HQ) |
| kubevirt | minikube | disabled | third-party (kubevirt) |
| logviewer | minikube | disabled | unknown (third-party) |
| metallb | minikube | disabled | third-party (metallb) |
| metrics-server | minikube | disabled | kubernetes |
| nvidia-driver-installer | minikube | disabled | google |
| nvidia-gpu-device-plugin | minikube | disabled | third-party (nvidia) |
| olm | minikube | disabled | third-party (operator |
| | | | framework) |
| pod-security-policy | minikube | disabled | unknown (third-party) |
| portainer | minikube | disabled | portainer.io |
| registry | minikube | disabled | google |
| registry-aliases | minikube | disabled | unknown (third-party) |
| registry-creds | minikube | disabled | third-party (upmc enterprises) |
| storage-provisioner | minikube | enabled | google |
| storage-provisioner-gluster | minikube | disabled | unknown (third-party) |
| volumesnapshots | minikube | disabled | kubernetes |
|-----------------------------|----------|--------------|--------------------------------|
As you can see, minikube comes loaded with a lot of addons, but only enables a couple of storage addons out of the box.
Doing work
Before we start, if you have a VPN running, you may need to shut it down when pulling images.
We have a nice empty cluster up and running (well, not completely empty, as the DNS service and dashboard run as pods in the kube-system namespace). It’s time to deploy some pods:
$ k create deployment echo --image=k8s.gcr.io/e2e-test-images/echoserver:2.5
deployment.apps/echo created
Let’s check out the pod that was created. The -w flag means watch. Whenever the status changes, a new line will be displayed:
$ k get po -w
NAME                    READY   STATUS              RESTARTS   AGE
echo-7fd7648898-6hh48   0/1     ContainerCreating   0          5s
echo-7fd7648898-6hh48   1/1     Running             0          6s
To expose our pod as a service, type the following:
$ k expose deployment echo --type=NodePort --port=8080
service/echo exposed
Exposing the service as type NodePort means that it is exposed to the host on some port. But it is not the 8080 port we ran the pod on. Ports get mapped in the cluster. To access the service, we need the cluster IP and exposed port:
$ mk ip
172.26.246.89
$  k get service echo -o jsonpath='{.spec.ports[0].nodePort}'
32649
Now we can access the echo service, which returns a lot of information:
n$ curl http://172.26.246.89:32649/hi
Hostname: echo-7fd7648898-6hh48
Pod Information:
        -no pod information available-
Server values:
        server_version=nginx: 1.14.2 - lua: 10015
Request Information:
        client_address=172.17.0.1
        method=GET
        real path=/hi
        query=
        request_version=1.1
        request_scheme=http
        request_uri=http://172.26.246.89:8080/hi
Request Headers:
        accept=*/*
        host=172.26.246.89:32649
        user-agent=curl/7.79.1
Request Body:
        -no body in request-
Congratulations! You just created a local Kubernetes cluster, deployed a service, and exposed it to the world.
Examining the cluster with the dashboard
Kubernetes has a very nice web interface, which is deployed, of course, as a service in a pod. The dashboard is well designed and provides a high-level overview of your cluster as well as drilling down into individual resources, viewing logs, editing resource files, and more. It is the perfect weapon when you want to check out your cluster manually and don’t have local tools like KUI or Lens. Minikube provides it as an addon.
Let’s enable it:
$ mk addons enable dashboard
    ▪ Using image kubernetesui/dashboard:v2.3.1
    ▪ Using image kubernetesui/metrics-scraper:v1.0.7
  Some dashboard features require the metrics-server addon. To enable all features please run:
        minikube addons enable metrics-server
  The 'dashboard' addon is enabled
To launch it, type:
$ mk dashboard
 Verifying dashboard health ...
 Launching proxy ...
Verifying proxy health ...
Launching proxy ...
Verifying proxy health ...
 Opening http://127.0.0.1:63200/api/v1/namespaces/kubernetes-dashboard/services/http:kubernetes-dashboard:/proxy/ in your default browser...
Minikube will open a browser window with the dashboard UI.
Here is the Workloads view, which displays Deployments, Replica Sets, and Pods.
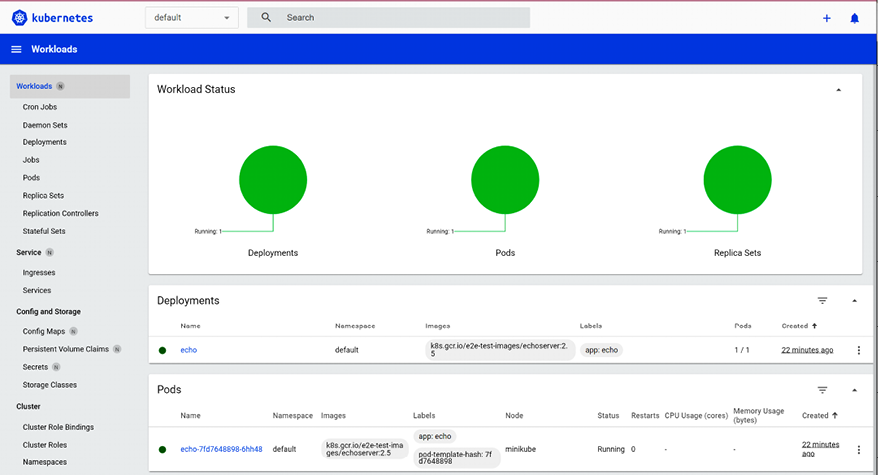
Figure 2.5: Workloads dashboard
It can also display daemon sets, stateful sets, and jobs, but we don’t have any in this cluster.
To delete the cluster we created, type:
$ mk delete
Deleting "minikube" in docker ...
 Deleting container "minikube" ...
Removing /Users/gigi.sayfan/.minikube/machines/minikube ...
Deleting container "minikube" ...
Removing /Users/gigi.sayfan/.minikube/machines/minikube ...
 Removed all traces of the "minikube" cluster.
In this section, we created a local single-node Kubernetes cluster on Windows, explored it a little bit using kubectl, deployed a service, and played with the web UI. In the next section, we’ll move to a multi-node cluster.