
Managing multiple scanning profiles with Zenmap
Scanning profiles are a combination of Nmap options that can be used to save time when launching Nmap scans.
This recipe is about adding, editing, and deleting a scanning profile in Zenmap.
How to do it...
Let's add a new profile for scanning web servers:
- Launch Zenmap.
- Click on Profile on the main toolbar.
- Click on New Profile or press Ctrl + P. Profile Editor will be launched.
- Enter a profile name and a description on the Profile tab.
- Enable Version detection and select TCP connect scan (
-sT) in the Scan tab. - Enable Don't ping before scanning (-
Pn) in the Ping tab. - Enable the following scripts on the Scripting tab:
http-backup-finder
http-config-backup
http-cors
http-cross-domain-policy
http-csrf
http-dombased-xss
http-enum
http-favicon
http-headers
http-methods
http-open-redirect
http-robots.txt
http-server-header
http-svn-info
http-title
- Next, go to the Target tab and click on Ports to scan (
-p) and enter80,443. - Save your changes by clicking on Save Changes:
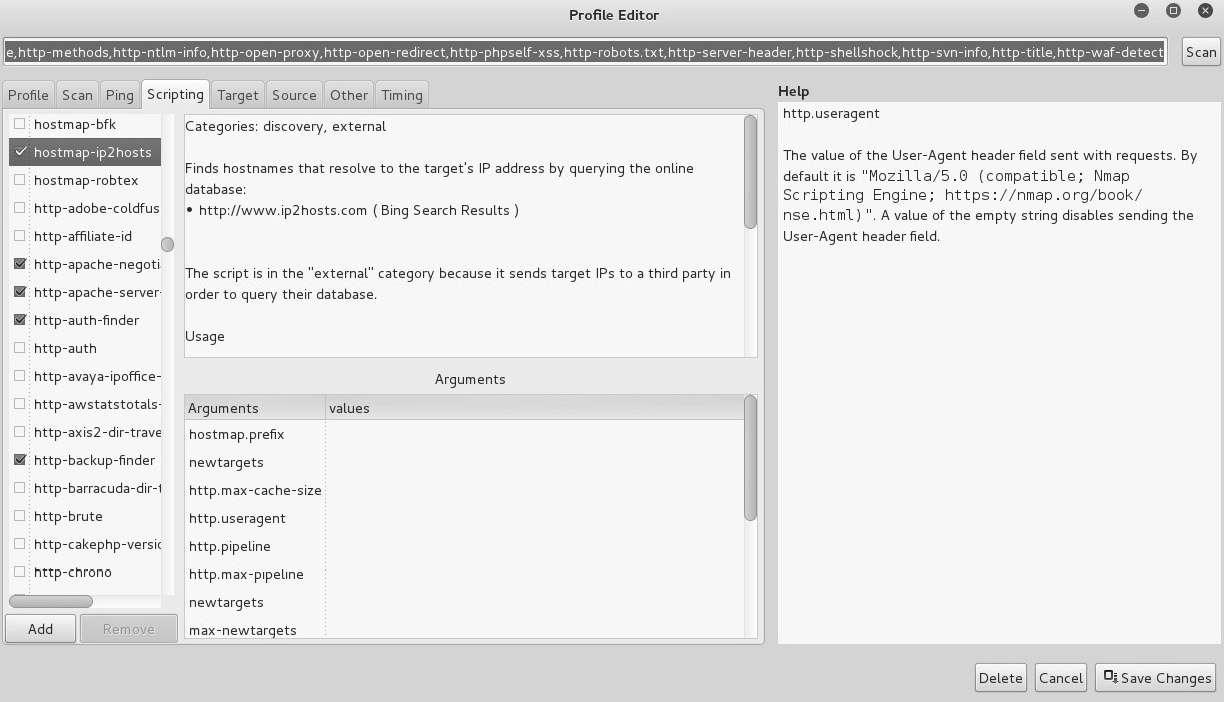
Figure 2.1 – NSE script selection in Zenmap
Your new scanning profile should be available from the Profile drop-down menu. We selected some of the available scripts to give you an idea, but you can adjust the scan according to your needs.
How it works...
After using the editor to create our profile, we are left with the following Nmap command:
$ nmap -sT -sV -p 80,443 -T4 -v -Pn --script http-backup-finder,http-config-backup,http-cors,http-cross-domain-policy,http-csrf,http-dombased-xss,http-enum,http-headers,http-methods,http-open-redirect,http-robots.txt,http-server-header,http-title <target>
Using the Profile wizard, we have enabled service scanning (-sV), set the scanning ports to 80 and 443, disabled host discovery (-Pn), and selected a bunch of HTTP-related scripts to gather as much information as possible from this web server. We now have this command saved and easily accessible for our scanning activities against new targets in the future.
There's more...
Customizing scan profiles can be done through the user interface. Default scanning profiles can be used as templates when creating new ones. Let's review how we work with the scanning profiles.
Zenmap scanning profiles
The predefined Zenmap scanning profiles help newcomers familiarize themselves with Nmap. I recommend that you analyze them to understand the scanning techniques available in Nmap along with some useful combinations of its options:
- Intense scan:
nmap -T4 -A -v - Intense scan plus UDP:
nmap -sS -sU -T4 -A -v - Intense scan, all TCP ports:
nmap -p 1-65535 -T4 -A -v - Intense scan, no ping:
nmap -T4 -A -v -Pn - Ping scan:
nmap -sn - Quick scan:
nmap -T4 -F - Quick scan plus:
nmap -sV -T4 -O -F --version-light - Quick traceroute:
nmap -sn --traceroute - Regular scan:
nmap - Slow comprehensive scan:
nmap -sS -sU -T4 -A -v -PE -PP -PS80,443 - PA3389 -PU40125 -PY -g 53 --script "default or discovery and safe"Important note
You can find other scanning profiles in the database of Rainmap Lite at https://github.com/cldrn/rainmap-lite/wiki/Scanning-profiles.
Editing or deleting a scan profile
To edit or delete a scan profile, you need to select the entry you wish to modify from the Profile drop-down menu. Click on Profile on the main toolbar and select Edit Selected Profile (Ctrl + E).
The editor will be launched, allowing you to edit or delete the selected profile.