Book Image

Qt 5 and OpenCV 4 Computer Vision Projects

By : Zhuo Qingliang
4 (1)
Book Image

Qt 5 and OpenCV 4 Computer Vision Projects

4 (1)
By: Zhuo Qingliang

Overview of this book

OpenCV and Qt have proven to be a winning combination for developing cross-platform computer vision applications. By leveraging their power, you can create robust applications with both an intuitive graphical user interface (GUI) and high-performance capabilities. This book will help you learn through a variety of real-world projects on image processing, face and text recognition, object detection, and high-performance computing. You’ll be able to progressively build on your skills by working on projects of increasing complexity. 
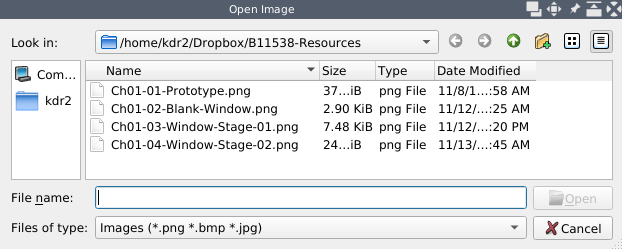
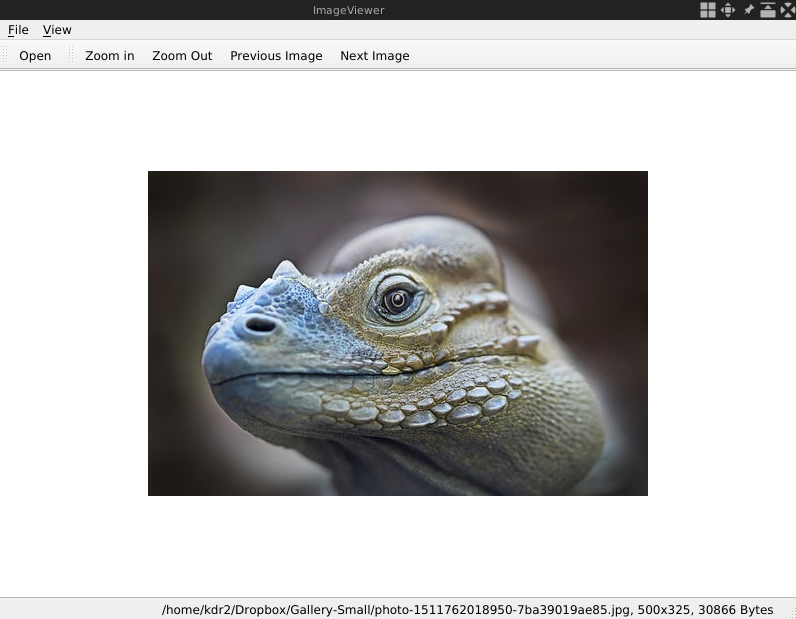
You’ll begin by creating an image viewer application, building a user interface from scratch by adding menus, performing actions based on key-presses, and applying other functions. As you progress, the book will guide you through using OpenCV image processing and modification functions to edit an image with filters and transformation features. In addition to this, you’ll explore the complex motion analysis and facial landmark detection algorithms, which you can use to build security and face detection applications. Finally, you’ll learn to use pretrained deep learning models in OpenCV and GPUs to filter images quickly. By the end of this book, you will have learned how to effectively develop full-fledged computer vision applications with OpenCV and Qt.
Table of Contents (11 chapters)

Implementing the functions for the actions

In the previous section, we added several actions to the menu and toolbar. However, if we click on these actions, nothing happens. That's because we have not written any handler for them yet. Qt uses a signal and slot connection mechanism to establish the relationship between events and their handlers. When users perform an operation on a widget, a signal of that widget will be emitted. Then, Qt will ascertain whether there is any slot connected with that signal. The slot will be called if it is found. In this section, we will create slots for the actions we have created in the preceding sections and make connections between the signals of the actions to these slots respectively. Also, we will set up some hotkeys for frequently used actions.

The Exit action

Take Exit action as an example. If users click it from the File menu, a signal named triggered will be emitted. So, let's connect this signal to a slot of our application instance in the MainWindow class's member function, createActions:

     connect(exitAction, SIGNAL(triggered(bool)), QApplication::instance(), SLOT(quit()));

The connect method takes four parameters: the signal sender, the signal, the receiver, and the slot. Once the connection is made, the slot on the receiver will be called as soon as the signal of the sender is emitted. Here, we connect the triggered signal of the Exit action with the quit slot of the application instance to enable the application to exit when we click on the Exit action.

Now, to compile and run, click the Exit item from the File menu. The application will exit as we expect if everything goes well.

Opening an image

The quit slot of QApplication is provided by Qt, but if we want to open an image when clicking on the open action, which slot should we use? In this scenario, there's no slot built-in for this kind of customized task. We should write a slot on our own.

To write a slot, first we should declare a function in the body of the class, MainWindow, and place it in a slots section. As this function is not used by other classes, we put it in a private slots section, as follows:

     private slots:
void openImage();

Then, we give this slot (also a member function) a simple definition for testing:

     void MainWindow::openImage()
{
qDebug() << "slot openImage is called.";
}

Now, we connect the triggered signal of the open action to the openImage slot of the main window in the body of the createActions method:

     connect(openAction, SIGNAL(triggered(bool)), this, SLOT(openImage()));

Now, let's compile and run it again. Click the Open item from the File menu, or the Open button on the toolbar, and the slot openImage is called. message will be printed in the Terminal.

We now have a testing slot that works well with the open action. Let's change its body, as shown in the following code, to implement the function of opening an image from disk:

         QFileDialog dialog(this);
dialog.setWindowTitle("Open Image");
dialog.setFileMode(QFileDialog::ExistingFile);
dialog.setNameFilter(tr("Images (*.png *.bmp *.jpg)"));
QStringList filePaths;
if (dialog.exec()) {
filePaths = dialog.selectedFiles();
showImage(filePaths.at(0));
}

Let's go through this code block line by line. In the first line, we create an instance of QFileDialog, whose name is dialog. Then, we set many properties of the dialog. This dialog is used to select an image file locally from the disk, so we set its title as Open Image, and set its file mode to QFileDialog::ExistingFile to make sure that it can only select one existing file, rather than many files or a file that doesn't exist. The name filter Images (*.png *.bmp *.jpg) ensures that only files with the extension mentioned (that is, .png, .bmp, and .jpg) can be selected. After these settings, we call the exec method of dialog to open it. This appears as follows:

If the user selects a file and clicks the Open button, a non-zero value will be returned by dialog.exec. Then, we call dialog.selectedFiles to get the path of the files that are selected as an instance of QStringList. Here, only one selection is allowed; hence, there's only one element in the resulting list: the path of the image that we want to open. So, we call the showImage method of our MainWindow class with the only element to display the image. If the user clicks the Cancel button, a zero value will be returned by the exec method, and we can just ignore that branch because that means the user has given up on opening an image.

The showImage method is another private member function we just added to the MainWindow class. It is implemented as follows:

     void MainWindow::showImage(QString path)
{
imageScene->clear();
imageView->resetMatrix();
QPixmap image(path);
imageScene->addPixmap(image);
imageScene->update();
imageView->setSceneRect(image.rect());
QString status = QString("%1, %2x%3, %4 Bytes").arg(path).arg(image.width())
.arg(image.height()).arg(QFile(path).size());
mainStatusLabel->setText(status);
}

In the process of displaying the image, we add the image to imageScene and then update the scene. Afterward, the scene is visualized by imageView. Given the possibility that there is already an image opened by our application when we open and display another one, we should remove the old image, and reset any transformation (for example, scaling or rotating) of the view before showing the new one. This work is done in the first two lines. After this, we construct a new instance of QPixmap with the file path we selected, and then we add it to the scene and update the scene. Next, we call setSceneRect on imageView to tell it the new extent of the scene—it is the same size as the image.

At this point, we have shown the target image in its original size in the center of the main area. The last thing to do is display the information pertaining to the image on the status bar. We construct a string containing its path, dimensions, and size in bytes, and then set it as the text of mainStatusLabel, which had been added to the status bar.

Let's see how this image appears when it's opened:

Not bad! The application now looks like a genuine image viewer, so let's go on to implement all of its intended features.

Zooming in and out

OK. We have successfully displayed the image. Now, let's scale it. Here, we take zooming in as an example. With the experience from the preceding actions, we should have a clear idea as to how to do that. First, we declare a private slot, which is named zoomIn, and give its implementation as shown in the following code:

     void MainWindow::zoomIn()
{
imageView->scale(1.2, 1.2);
}

Easy, right? Just call the scale method of imageView with a scale rate for the width and a scale rate for the height. Then, we connect the triggered signal of zoomInAction to this slot in the createActions method of the MainWindow class:

     connect(zoomInAction, SIGNAL(triggered(bool)), this, SLOT(zoomIn()));

Compile and run the application, open an image with it, and click on the Zoom in button on the toolbar. You will find that the image enlarges to 120% of its current size on each click.

Zooming out just entails scaling the imageView with a rate of less than 1.0. Please try to implement it by yourself. If you find it difficult, you can refer to our code repository on GitHub (https://github.com/PacktPublishing/Qt-5-and-OpenCV-4-Computer-Vision-Projects/tree/master/Chapter-01).

With our application, we can now open an image and scale it for viewing. Next, we will implement the function of the saveAsAction action.

Saving a copy

Let's look back at the showImage method of MainWindow. In that method, we created an instance of QPixmap from the image and then added it to imageScene by calling imageScene->addPixmap. We didn't hold any handler of the image out of that function; hence, now we don't have a convenient way to get the QPixmap instance in the new slot, which we will implement for saveAsAction.

To solve this, we add a new private member field, QGraphicsPixmapItem *currentImage, to MainWindow to hold the return value of imageScene->addPixmap and initialize it with nullptr in the constructor of MainWindow. Then, we find the line of code in the body of MainWindow::showImage:

   imageScene->addPixmap(image);

To save the returned value, we replace this line with the following one:

   currentImage = imageScene->addPixmap(image);

Now, we are ready to create a new slot for saveAsAction. The declaration in the private slot section is straightforward, as follows:

       void saveAs();

The definition is also straightforward:

     void MainWindow::saveAs()
{
if (currentImage == nullptr) {
QMessageBox::information(this, "Information", "Nothing to save.");
return;
}
QFileDialog dialog(this);
dialog.setWindowTitle("Save Image As ...");
dialog.setFileMode(QFileDialog::AnyFile);
dialog.setAcceptMode(QFileDialog::AcceptSave);
dialog.setNameFilter(tr("Images (*.png *.bmp *.jpg)"));
QStringList fileNames;
if (dialog.exec()) {
fileNames = dialog.selectedFiles();
if(QRegExp(".+\\.(png|bmp|jpg)").exactMatch(fileNames.at(0))) {
currentImage->pixmap().save(fileNames.at(0));
} else {
QMessageBox::information(this, "Information", "Save error: bad format or filename.");
}
}
}

First, we check whether currentImage is nullptr. If true, it means we haven't opened any image yet. So, we open a QMessageBox to tell the user there's nothing to save. Otherwise, we create a QFileDialog, set the relevant properties for it, and open it by calling its exec method. If the user gives the dialog a filename and clicks the open button on it, we will get a list of file paths that have only one element in it as our last usage of QFileDialog. Then, we check whether the file path ends with the extensions we support using a regexp matching. If everything goes well, we get the QPixmap instance of the current image from currentImage->pixmap() and save it to the specified path. Once the slot is ready, we connect it to the signal in createActions:

   connect(saveAsAction, SIGNAL(triggered(bool)), this, SLOT(saveAs()));

To test this feature, we can open a PNG image and save it as a JPG image by giving a filename that ends with .jpg in the Save Image As... file dialog. Then, we open the new JPG image we just saved, using another image view application to check whether the image has been correctly saved.

Navigating in the folder

Now that we have completed all of the actions in relation to a single image, let's go further and navigate all the images that reside in the directory in which the current image resides, that is, prevAction and nextAction.

To know what constitutes the previous or next image, we should be aware of two things as follows:

  • Which is the current one
  • The order in which we count them

So, first we add a new member field, QString currentImagePath, to the MainWindow class to save the path of the current image. Then, we save the image's path while showing it in showImage by adding the following line to the method:

     currentImagePath = path;

Then, we decide to count the images in alphabetical order according to their names. With these two pieces of information, we can now determine which is the previous or next image. Let's see how we define the slot for prevAction:

     void MainWindow::prevImage()
{
QFileInfo current(currentImagePath);
QDir dir = current.absoluteDir();
QStringList nameFilters;
nameFilters << "*.png" << "*.bmp" << "*.jpg";
QStringList fileNames = dir.entryList(nameFilters, QDir::Files, QDir::Name);
int idx = fileNames.indexOf(QRegExp(QRegExp::escape(current.fileName())));
if(idx > 0) {
showImage(dir.absoluteFilePath(fileNames.at(idx - 1)));
} else {
QMessageBox::information(this, "Information", "Current image is the first one.");
}
}

First, we get the directory in which the current image resides as an instance of QDir, and then we list the directory with name filters to ensure that only PNG, BMP, and JPG files are returned. While listing the directory, we use QDir::Name as the third argument to make sure the returned list is sorted by filename in alphabetical order. Since the current image we are viewing is also in this directory, its filename must be in the filename list. We find its index by calling indexOf on the list with a regexp, which is generated by QRegExp::escape, so that it can exactly match its filename. If the index is zero, this means the current image is the first one in this directory. A message box pops up to give the user this information. Otherwise, we show the image whose filename is at the position of index - 1 to complete the operation.

Before you test whether prevAction works, don't forget to connect the signal and the slot by adding the following line to the body of the createActions method:

   connect(prevAction, SIGNAL(triggered(bool)), this, SLOT(prevImage()));

Well, it's not too hard, so attempt the work of nextAction yourself or just read the code for it in our code repository on GitHub.

Responding to hotkeys

At this point, almost all of the features are implemented as we intended. Now, let's add some hotkeys for frequently used actions to make our application much easier to use.

You may have noticed that, when we create the actions, we occasionally add a strange & to their text, such as &File and E&xit. Actually, this is a way of setting shortcuts in Qt. In certain Qt widgets, using & in front of a character will automatically create a mnemonic (a shortcut) for that character. Hence, in our application, if you press Alt + F, the File menu will be triggered, and while the File menu is expanded, we can see the Exit action on it. At this time, you press Alt + X, and the Exit action will be triggered to let the application exit.

Now, let's give the most frequently used actions some single key shortcuts to make using them more convenient and faster as follows:

  • Plus (+) or equal (=) for zooming in
  • Minus (-) or underscore (_) for zooming out
  • Up or left for the previous image
  • Down or right for the next image

To achieve this, we add a new private method named setupShortcuts in the MainWindow class and implement it as follows:

     void MainWindow::setupShortcuts()
{
QList<QKeySequence> shortcuts;
shortcuts << Qt::Key_Plus << Qt::Key_Equal;
zoomInAction->setShortcuts(shortcuts);

shortcuts.clear();
shortcuts << Qt::Key_Minus << Qt::Key_Underscore;
zoomOutAction->setShortcuts(shortcuts);

shortcuts.clear();
shortcuts << Qt::Key_Up << Qt::Key_Left;
prevAction->setShortcuts(shortcuts);

shortcuts.clear();
shortcuts << Qt::Key_Down << Qt::Key_Right;
nextAction->setShortcuts(shortcuts);
}

To support multiple shortcuts for one action, for example, + and = for zooming in, for each action we make an empty QList of QKeySequence, and then add each shortcut key sequence to the list. In Qt, QKeySequence encapsulates a key sequence as used by shortcuts. Because QKeySequence has a non-explicit constructor with int arguments, we can add Qt::Key values directly to the list and they will be converted to instances of QKeySequence implicitly. After the list is filled, we call the setShortcuts method on each action with the filled list, and this way setting shortcuts will be easier.

Add the setupShortcuts() method call at the end of the body of the createActions method, then compile and run; now you can test the shortcuts in your application and they should work well.