Book Image

Computer Vision Projects with OpenCV and Python 3

By : Matthew Rever
Book Image

Computer Vision Projects with OpenCV and Python 3

By: Matthew Rever

Overview of this book

Python is the ideal programming language for rapidly prototyping and developing production-grade codes for image processing and Computer Vision with its robust syntax and wealth of powerful libraries. This book will help you design and develop production-grade Computer Vision projects tackling real-world problems. With the help of this book, you will learn how to set up Anaconda and Python for the major OSes with cutting-edge third-party libraries for Computer Vision. You'll learn state-of-the-art techniques for classifying images, finding and identifying human postures, and detecting faces within videos. You will use powerful machine learning tools such as OpenCV, Dlib, and TensorFlow to build exciting projects such as classifying handwritten digits, detecting facial features,and much more. The book also covers some advanced projects, such as reading text from license plates from real-world images using Google’s Tesseract software, and tracking human body poses using DeeperCut within TensorFlow. By the end of this book, you will have the expertise required to build your own Computer Vision projects using Python and its associated libraries.
Table of Contents (9 chapters)

Introducing and installing Python and Anaconda

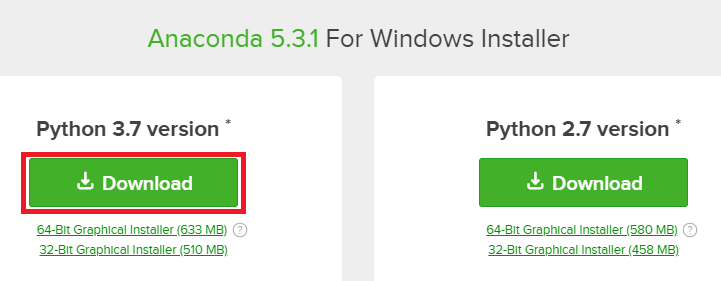
The first thing we need is Python 3. The best way to install this is by downloading Continuum Analytics and the Anaconda distribution.

Anaconda is a fully-featured Python distribution that comes with a lot of packages, including numerical analytics, data science, and computer vision. It's going to make our lives a whole lot easier, because it provides us with libraries that are not present in the base Python distribution.

The best part about Anaconda is that it gives us the conda package manager, along with pip, which makes it very easy to install external packages for our Python distribution.

Let's get started.

Installing Anaconda

We will begin by setting up our Anaconda and Python distribution, using the following steps:

  1. Go to the Anaconda website, using the following link www.anaconda.com/download. You should see a landing page that looks similar to the following screenshot:
  1. Next, select your OS and download the latest version of the Anaconda distribution, which includes Python 3.7. Click the Download button, as shown in the following screenshot:
The installer for Windows is graphical; however, you might need to use a command-line installer for macOS or Linux.

Installing the setup file is pretty straightforward, so we won't go through each step here.

  1. When you have everything properly installed and your path variables defined, go to the Command Prompt and make sure everything is good to go by typing the where python command. This shows us all the directories in which Python is installed. You should see something similar to the following screenshot:

As seen in the preceding screenshot, we see that the first instance of Python is in our Anaconda distribution. This means that we can proceed with our Python programs.

In macOS or Linux, the command would be which python instead of where python.
  1. Now, let's make sure we have our other tools. Our first tool will be IPython, which is essentially a command shell for interactive computing in multiple programming languages. We will check it using the where ipython command, as shown in the following screenshot:
  1. The next package we will check is the pip tool, which is the Python installer package. We do this with the where pip command, as shown in the following screenshot:
  1. The next tool to check is the conda package, which is Anaconda's built-in package manager. This is done using the where conda command, as shown in the following screenshot:

We should be good to go with Python now.

If you run which python on macOS or Linux, and it says something such as user/bin/Python, that means Python is either not installed or it's not the first thing in our path, so we should modify that as per our system.

In the next section, we're going to cover installing additional libraries such as OpenCV, TensorFlow, dlib, and Tesseract, which will be used for the projects in this book.