After creating a new project in Unity, it is a good idea to adjust the global quality settings as shown in the following figure. Most of them affect your game performance. Let's look deeper at QualitySettings, as it is a must before building applications for Android devices:
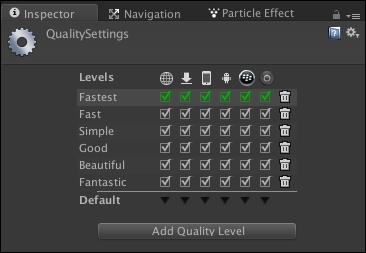
Unity allows you to create a template for your quality settings; you can also select one of the templates available in Unity by default. These settings greatly affect the performance of your application and the quality of your graphics. It is especially important for mobile platforms, where resources are very limited. You will need to play around with the settings on your target platforms to find the best template settings for your quality and performance. To access these settings, you need to navigate to Edit | Project Settings | Quality. You can select different templates separately for each platform supported by Unity. This setup window is divided into two main parts. The upper part, as shown in the preceding figure, is for managing templates, while the lower part, as shown in the following figure, is responsible for the settings themselves.
Each pattern (even Unity built-in templates) can be named as you wish. For all platforms supported by Unity, you can choose several accessible settings templates and also a default one. The default settings template is highlighted in green. Your settings should be as simple as possible, especially for mobile platforms. Unity allows you to create new settings templates and delete them by clicking on the icon with the basket.
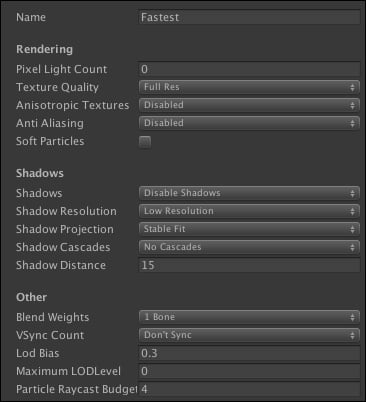
The first part we intend to cover is Rendering as shown in the preceding screenshot. It contains the Pixel Light Count option that affects the upper limit pixel light only within Forward Rendering mode. The Forward Rendering path renders each object in one or more passes, depending on lights that affect the object. Lights themselves are also treated differently by Forward Rendering, depending on their settings and intensity.
The Rendering part contains the Texture Quality property with four existing options: Full Res, Half Res, Quarter Res, and Eighth Res. This lets you choose whether to display textures at maximum resolution or at a fraction of this (lower resolution has less processing overhead). Always remember, in any project you need to find a golden balance between the next two characteristics: quality and performance. The following property is named Anisotropic Textures, and it allows you to select just three values: Disabled, Per Texture, and Forced On. This describes if and how anisotropic textures will be used. On Wikipedia (http://en.wikipedia.org/wiki/Anisotropic_filtering), we can read next about anisotropic filtering: "In 3D computer graphics, anisotropic filtering (abbreviated AF) is a method of enhancing the image quality of textures on surfaces of computer graphics that are at oblique viewing angles with respect to the camera where the projection of the texture (not the polygon or other primitive on which it is rendered) appears to be non-orthogonal (thus the origin of the word: "an" for not, "iso" for same, and "tropic" from tropism, relating to direction; anisotropic filtering does not filter the same in every direction)".
The next property you learn about is anti-aliasing. Anti-aliasing can be turned off by selecting the Disabled option or it can be turned on by selecting 2x, 4x, and 8x Multi Sampling options. The next setting is just to toggle soft blending for particles, and its name is Soft Particles. This was the last option for the Rendering part.
The next part is Shadows, and the name absolutely describes itself and its purpose. We can choose one value from three open values: Hard and Soft Shadows, Hard Shadows Only, and Disable Shadows. A big processing overhead can result if you choose the highest resolution for the Shadow Resolution option. Possible settings are the following: Low, Medium, High, and Very High. There are two separate routines for anticipating shadows from a directional light within the Shadow Projection option. If we choose Close Fit, then it renders higher resolution shadows, which can in some cases wobble marginally if the camera moves. The next option, and the last one for Shadow Projection, is the Stable Fit value, which is the opposite of Close Fit. This means that Stable Fit renders a lower resolution but without any artifacts when the camera moves. Next is the Shadow Cascades setting, which has an effect on processing overhead. A higher cycle of cascades can cope with more processing overhead. Do not forget about the golden balance. Obtainable options for cascades are next: No Cascades, Two Cascades, and Four Cascades.
http://docs.unity3d.com/460/Documentation/Manual/DirectionalShadowDetails.html
Note
On mobile platforms, real-time shadows for directional lights always use one shadow cascade and are hard shadows.
Directional lights are mostly used as a key light—sunlight or moonlight—in an outdoor game. Viewing distances can be huge, especially in first and third person games, and shadows often require some tuning to get the best quality versus performance balance for your situation.
The value of Shadow Distance is responsible for how far we can see shadows. Shadows beyond this length are visible, others are not.
In the following text, we are going to explore what is known as Other part. It contains five options for tuning any project. Let's start with the first option—Blend Weights. We can choose just three values which are very important for performance within this setting. The lower the value, the higher the performance. This setting tells the number of bones that can affect a given vertex during an animation. We can select 1 Bone, 2 Bones, or 4 Bones; not more and not less. The next feature highly affects the performance and is not the first priority question about quality because of its hardly visible artifact. The name of this setting is VSync Count and the name of this artifact is known as tearing. If we want to avoid such artifacts then we need to synchronize rendering with the refresh rate of the display device, but do not forget about your performance. Synchronization can reduce a lot of your performance, so you should be ready for such kind of conditions. There are just three existing options for the VSync Count parameter: the first option is for synchronization with every vertical blank (VBlank), the second value is for synchronization with every second vertical blank, and the third option allows us to disable all synchronizations, thereby speeding up your application. The next setting in our research is LOD Bias. This value does its work only when Unity needs to decide which LOD level to choose. For example, when there is a choice between two LOD levels, LOD Bias comes to help by selecting only one value. This is set in a range from zero to one as a fraction. The closer to zero, the less detailed a level will be chosen and vice versa. There are two remaining options that we will now consider. The first is Maximum LOD Level, and its purpose is to remember the number for the highest LOD level that you can use in your project. The second is Particle RayCast Budget, which needs particle system collisions with Low and Medium qualities, and this number describes the highest value of ray cast for physics approximation.
As for the Maximum LOD level parameter, all models in which the value will be less than this number will not be included in the build; Unity will ignore them, which can significantly reduce the amount of spending memory for your application or your game. The initial default value for this parameter is zero, which means that every model will be included in your build regardless of its level of detail. For each platform, depending on its configuration, Unity will use the smallest possible LOD level.
If the Android SDK installation and Unity setup are successful, you can safely create a build of your project. To do this, you will need to navigate to File | Build Settings, and in the opened window, you can create a build for various supported platforms as shown in the following figure. If you have properly installed the Android SDK and configured Android and have quality and player settings in Unity, you can safely click on the Build button or on the Build And Run button (if your Android device is properly configured and connected via USB) in the lower-right corner of the window.
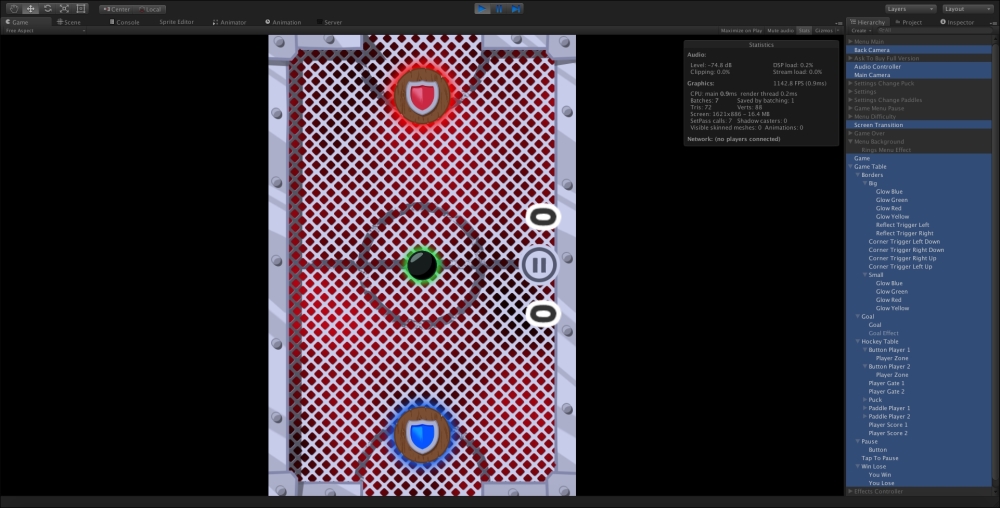
Now, it's time to build Glow Hockey (we will create this game in Unity 5 from scratch in the last chapter in this book). First of all, you should create a new project in the Unity Editor. You can name it as you wish. To create a new project, you should click on the Create Project button in the bottom-right corner of the window.
The Unity Editor will be shown after creating the new project.
Glow Hockey is a very good example for the deployment of the project on the various platforms supported by Unity. In this game, there are many different effects, animations, sound effects, physics, and many other aspects from Unity. After deploying this project on an Android platform, you can test the various functions that are supported by Unity.
After opening the main Glow Hockey scene, you can make any changes or perform experiments as you wish. However, in this chapter, our goal is just to build this game on an Android device. We will not make any changes in the project in this chapter.
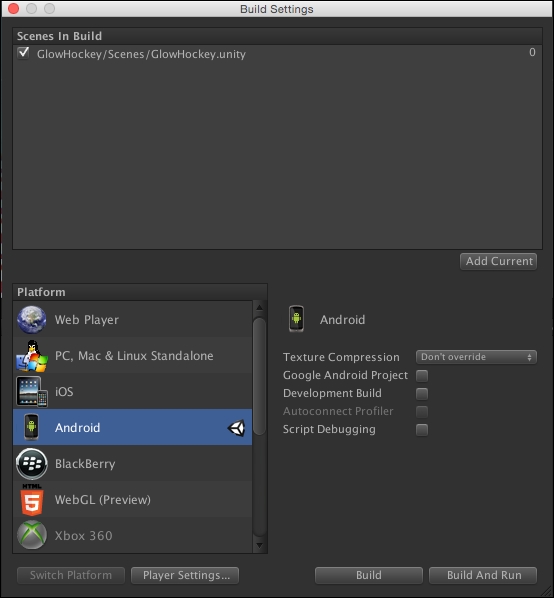
After opening the Build Settings window, you should select the Android platform, following which you can create an .apk file by clicking on the Build button in the bottom-right corner in order to share it with your friends, for example. Also, you can press the Build And Run button to export an .apk file as in the first case and to deploy this project right onto a connected device via the USB cable at the same time.
Now, let's discover more about Unity license comparison in the next section.
