
The target of this book is to explain how to get access to the several peripherals present on our boards and how to quickly write programs to manage their data. In order to do it, we need a good developing system. That's why, in this section, we will install a Debian OS on each board.
One of the main advantages of GNU/Linux-based boards is the fact that we can have the same developing environment regardless of the board we decide to use. In order to practically demonstrate this fact, we will install exactly the same OS on each board (even if a preloaded OS may be already present on some boards). To do this, we just need an SD (or microSD) card to store our developing OS and then follow the instructions in the upcoming sections.
However, before putting our hands on the embedded boards, we need to set up our host machine.
As every good embedded developer knows, a host machine is absolutely necessary. Even if the embedded devices are getting more powerful nowadays, there are some resource-consuming tasks where a host machine can help.
The host machine we decide to use could be a normal PC or a virtualized one. The important thing is that it runs a GNU/Linux-based OS! In this book, we will use an Ubuntu 15.10 based system (since this is currently my laptop's configuration), you can decide to use the same (maybe in a virtual machine) or just to use an Ubuntu Long Term Support (LTS) release, such as 16.04 for instance, without any problem or major changes. However, we can also try to replicate some settings and installation commands that we will use during the course of the book into another Linux distribution with little effort.
If we did a clean installation or we have never used our machine as a developing one, then we have to install some useful developing tools before continuing. As the first step, we will install the aptitude tool, which is quite similar to the most famous apt-get command, but it's smarter (note that this is not required since we may still continue using apt-get without any problems). Here is the installing command:
$ sudo apt-get install aptitude
Then, we can install other useful basic tools using the aptitude command as shown here:
$ sudo aptitude install openssh-server tree git device-tree-compiler
lzma lzop libncurses5-dev:amd64 minicom
After all packages have been installed, we can go further and install the cross-compiler with the relative toolchain.
Every host machine needs a proper cross-compiler for the target board we wish to work on, so we have to install one. As we can see in the upcoming chapters, we mainly need a cross-compiler to build the bootloader and the kernel, since we can directly compile user-space applications on the target itself due the fact we're using Debian. However, we can use it for several other tasks, for instance, to compile specific drivers and/or to compile user-space applications even if, in this last case, we need to be careful to keep the cross toolchain in step with the target (having compatible library versions, header files, and so on). Otherwise, it would case subtle problems from time to time.
Tip
Note that if we use an embedded distribution such as Yocto or OpenWrt (Chapter 5, Setting Up an Embedded OS), we must use the cross-compiler to compile user-space applications too, since we have no native compiler to execute on the boards.
There are several solutions to install a cross-compiler, starting from installing the one supplied by the used distribution to using a pre-built one. Ubuntu has its own cross-compiler, as shown here, using the following command:
$ apt-cache search gcc-[0-9.]*-arm
gcc-5-arm-linux-gnueabihf - GNU C compiler
gcc-5-arm-linux-gnueabihf-base - GCC, the GNU Compiler Collection (bas
e package)
gcc-4.7-arm-linux-gnueabi - GNU C compiler
gcc-4.7-arm-linux-gnueabi-base - GCC, the GNU Compiler Collection (bas
e package)
gcc-4.7-arm-linux-gnueabihf - GNU C compiler
gcc-4.7-arm-linux-gnueabihf-base - GCC, the GNU Compiler Collection (b
ase package)
gcc-4.8-arm-linux-gnueabihf - GNU C compiler
gcc-4.8-arm-linux-gnueabihf-base - GCC, the GNU Compiler Collection (b
ase package)
gcc-4.9-arm-linux-gnueabi - GNU C compiler
gcc-4.9-arm-linux-gnueabi-base - GCC, the GNU Compiler Collection (bas
e package)
gcc-4.9-arm-linux-gnueabihf - GNU C compiler
gcc-4.9-arm-linux-gnueabihf-base - GCC, the GNU Compiler Collection (b
ase package)
gcc-5-arm-linux-gnueabi - GNU C compiler
gcc-5-arm-linux-gnueabi-base - GCC, the GNU Compiler Collection (base
package)
Note
Downloading the example code
Detailed steps to download the code bundle are mentioned in the Preface of this book.
The code bundle for the book is also hosted on GitHub at: https://github.com/PacktPublishing/GNU-Linux-Rapid-Embedded-Programming/.
We also have other code bundles from our rich catalog of books and videos available at: https://github.com/PacktPublishing/. Check them out!
However in order to have a distro-independent installation, we decide to use a pre-built one. Looking at the available ones, we chose the toolchain from the Linaro project ( http://www.linaro.org/ ), which is a de-facto standard. So, let's see how to install it.
First of all, we must download the archive using the following command:
$ wget -c https://releases.linaro.org/components/toolchain/binaries/5.
3-2016.02/arm-linux-gnueabihf/gcc-linaro-5.3-2016.02-x86_64_arm-linux-
gnueabihf.tar.xz
After the download, we need to extract the code using the following command:
$ tar xf gcc-linaro-5.3-2016.02-x86_64_arm-linux-gnueabihf.tar.xz
Note
You can put your new toolchain whenever you wish inside the host's filesystem. We put it in the /opt/linaro directory.
Then, we have to set up our environment in order to be able to execute the cross-compiler and other components:
$ export PATH=/opt/linaro/gcc-linaro-5.3-2016.02-x86_64_arm-linux-gnue
abihf/bin/:$PATH
Now, we should get the following lines of code:
$ arm-linux-gnueabihf-gcc --version
arm-linux-gnueabihf-gcc (Linaro GCC 5.3-2016.02) 5.3.1 20160113
Copyright (C) 2015 Free Software Foundation, Inc.
This is free software; see the source for copying conditions. There is
NO warranty; not even for MERCHANTABILITY or FITNESS FOR A PARTICULAR
PURPOSE.
Note
Each time we log in to our host machine, we have to execute the preceding export command. To avoid it, we can use the following two lines to the .bashrc file (if we use the Bash shell):
# Setup the cross-compiler export PATH=/opt/linaro/gcc-linaro-5.3-2016.02-x86_ 64_arm-linux-gnueabihf/bin/:$PATHOK. Now, we're ready to set up our developer kits!
Let's start by putting our hands on the first developer kit: the BeagleBone Black. As we can see, it comes with a pre-loaded Debian system on the on-board eMMC. However, since we'd like to have the same OS on all developer kits, let's see how to install a fresh OS on a new microSD and then boot from it.
As already stated (and as any real programmer of embedded devices knows), the serial console is a must-have during the low-level development stages! So, let's see how we can get access to it on our BeagleBone Black.
As shown in the following image, the connector J1 is exposed to the serial console pins. So, using a proper adapter, we can connect it to our host PC. However, since the pins have electrical signals at the TTL level, we need an adapter device to do the job, and we have several possibilities.
The first one is a standard RS232-to-TTL converter shown in the following image:
Note
The RS232-to-TTL converter can be purchased at: http://www.cosino.io/product/rs-232-serial-adapter or by surfing the Internet.
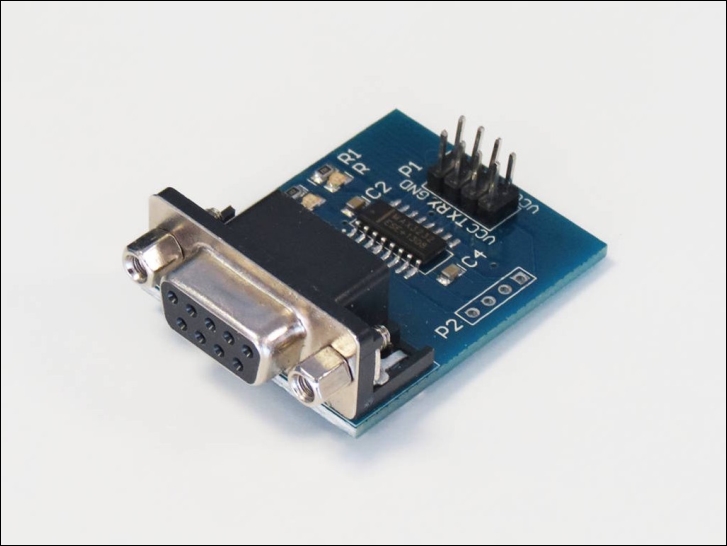
In this case, we need a PC equipped with a standard RS232 port. Nowadays, it is not easy having one, but we can easily find a RS232-to-USB adapter to solve the problem, or as a second possibility, we can use a standard USB-to-TTL cable shown here:
The solution allows us to use a more common USB port to do the job.
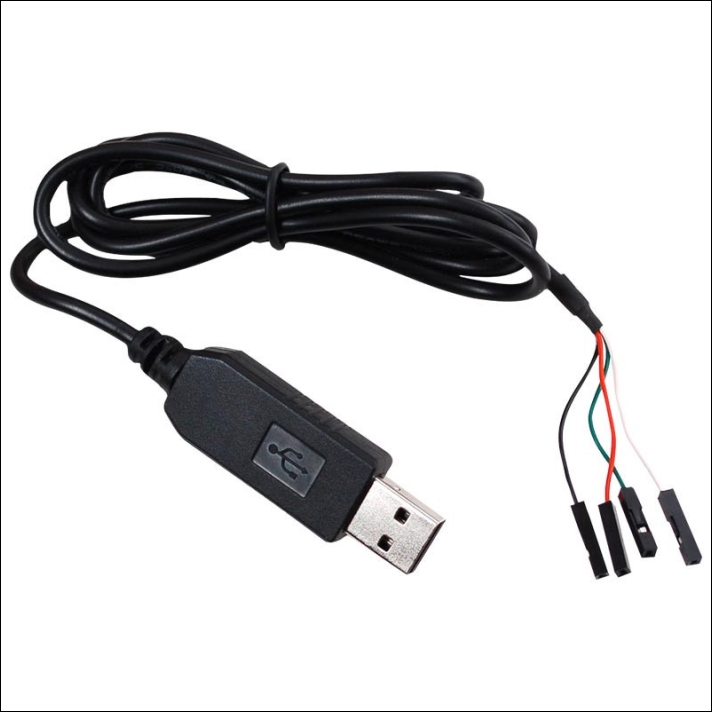
However, a last solution exists, and it consists of still using an USB-to-TTL converter. However, in contrast with the solution mentioned earlier, this time, we have a micro USB port used in every smartphone. The converter is shown in the following image:
Note
The devices can be purchased at: http://www.cosino.io/product/usb-to-serial-converter or by surfing the Internet.
The datasheet of this device is available at: https://www.silabs.com/Support%20Documents/TechnicalDocs/cp2104.pdf.
Whichever solution we decide to use, we have to connect the J1 connector with the selected adapter in order to correctly capture the electrical signal. In particular, the relevant pins are reported in the following table. You have to connect the GND (Ground) signal with the adapter's GND pin and then swap TxD (Transmitter) and RxD (Receiver) to correctly establish the serial connection.
|
Connector J1 |
Function |
|
Pin 1 |
GND |
|
Pin 4 |
TxD |
|
Pin 5 |
RxD |
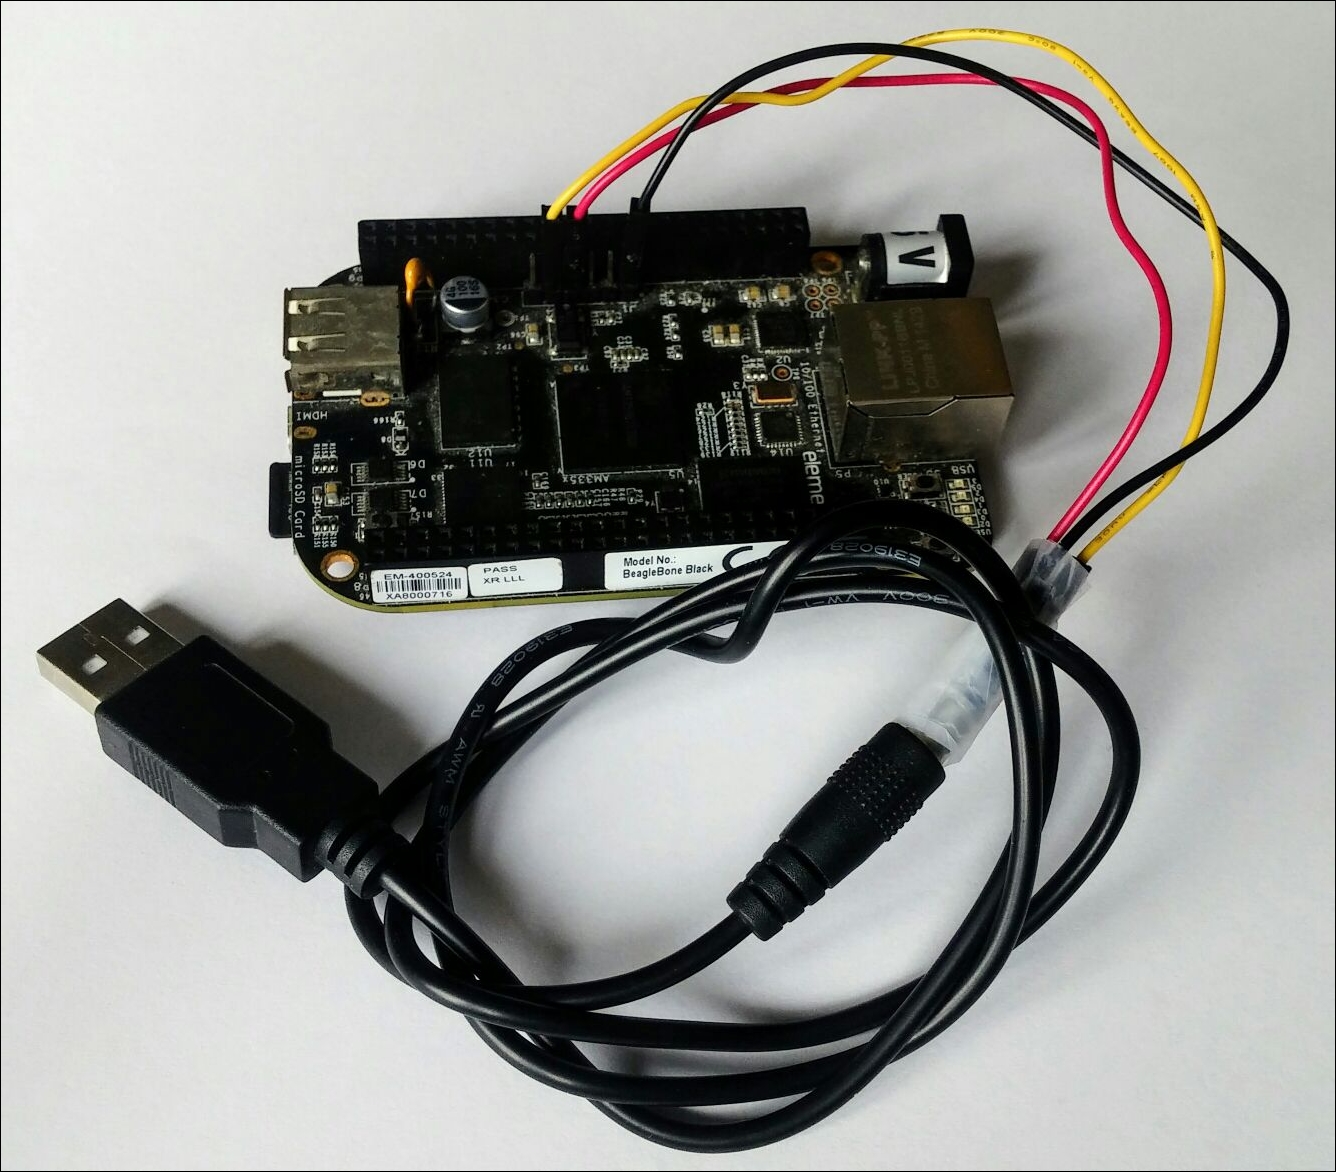
Here is the my setup:
If all connections are OK, we can execute any serial terminal emulator to see the data from the serial console. We will use the minicom tool, and the command to use it is shown here:
$ minicom -o -D /dev/ttyUSB0
You must now verify that the serial port to be used is /dev/ttyUSB0,
and that its setup is 115200,8N1 without hardware and software flow control (in minicom, these settings can be checked using the
CTRL+A-O
key sequence and then selecting the serial port setup menu entry).
Note
To correctly get access to the serial console, we may need proper privileges. In fact, we may try to execute the preceding minicom command, and we don't get an output! This is because the minicom command silently exits if we don't have enough privileges to get access to the port.
We can verify our access to privileges by simply using another command on it as shown here:
$ cat /dev/ttyUSB0
cat: /dev/ttyUSB0: Permission denied
In this case, the cat command perfectly tells us what's wrong. In this case, we can fix this issue using the sudo command or, even better, by properly adding our system's user to the right group as shown here:
$ ls -l /dev/ttyUSB0 crw-rw---- 1 root dialout 188, 0 Jan 12 23:06 /dev /ttyUSB0 $ sudo adduser $LOGNAME dialout
oinThen, log out and log in again, and we can access the serial devices without any problem.
The BeagleBone Black should come with a pre-loaded system, so we should see the booting sequence in the minicom window as soon as we power up the system.
Now, we only need the software to start working with our BeagleBone Black board.
First of all, we have to download the sources and select a proper release to compile. To clone the U-Boot's repository, we can use the following command:
$ git clone https://github.com/u-boot/u-boot
However, instead of using the preceding command, let me suggest that you clone U-Boot's repository into a dedicated directory in the bare form (we use a directory named common) and then clone the BeagleBone Black's files into another subdirectory by referencing the local bare repository to the dedicated one (we use the directory BBB).
To download the bare repository, the commands are as follows:
$ cd common
$ git clone --bare https://github.com/u-boot/u-boot
Then, the new commands to get the BeagleBone Black's sources are as follows:
$ cd BBB
$ git clone --reference ~/Projects/common/u-boot.git
            https://github.com/u-boot/u-boot
In this manner, we can save a lot of disk space since we will use the same sources for all our developer kits.
Now, let's go into the newly created directory and check out a proper U-Boot release:
$ cd u-boot
$ git checkout v2016.03 -b v2016.03
Now, we need some patches to properly support the BeagleBone Black, and we can get and install them using the following commands:
$ wget -c https://rcn-ee.com/repos/git/u-boot-patches/v2016.03/0001-am
335x_evm-uEnv.txt-bootz-n-fixes.patch
$ patch -p1 < 0001-am335x_evm-uEnv.txt-bootz-n-fixes.patch
Now, we're ready to compile. Let's do it with the following commands:
$ make ARCH=arm CROSS_COMPILE=arm-linux-gnueabihf-
       am335x_evm_defconfig
$ make ARCH=arm CROSS_COMPILE=arm-linux-gnueabihf-
Now, it's time to install the bootloader into the microSD, and to do this, we have plug a new microSD into our host PC. Then, we have to erase the current partition table and install a new one.
However, we first have to discover the microSD associated device. There exist several ways to do it. We usually use the dmesg command after we have plugged in the microSD into my host machine so that we see the following kernel messages:
Attached scsi generic sg3 type 0
[sdd] 7774208 512-byte logical blocks: (3.98 GB/3.71 GiB)
[sdd] Write Protect is off
[sdd] Mode Sense: 0b 00 00 08
[sdd] No Caching mode page found
[sdd] Assuming drive cache: write through
 sdd: sdd1
[sdd] Attached SCSI removable disk
In this way, we know that on our system, the microSD is associated with the device /dev/sdd.
Note
Note that our configuration may vary. In fact, you may discover that the right device to use is /dev/sdb, /dev/sdc or /dev/sde or even a device named /dev/mmcblk0! This last case means that the host PC is using an MMC device instead of a USB adapter to manage its SD or microSD slot. In this special situation, the kernel messages look like this:
mmc0: cannot verify signal voltage switch
mmc0: new ultra high speed SDR50 SDHC card at address
0007
mmcblk0: mmc0:0007 SD4GB 3.70 GiB
mmcblk0: p1
However, we can also use the lsblk command that nicely lists all the currently attached block devices into the system as show here:
$ lsblk
NAME   MAJ:MIN RM   SIZE RO TYPE MOUNTPOINT
sda      8:0    0 465.8G  0 disk
+-sda1   8:1    0  21.5G  0 part
+-sda2   8:2    0 116.4G  0 part
+-sda3   8:3    0     1K  0 part
\-sda5   8:5    0 327.9G  0 part /opt
sdb      8:16   0 931.5G  0 disk
\-sdb1   8:17   0 931.5G  0 part /home
sdc      8:32   0 223.6G  0 disk
\-sdc1   8:33   0 223.6G  0 part /
sdd      8:48   1   3.7G  0 disk
\-sdd1   8:49   1   3.7G  0 part
Now, we can clear the current partition table using the following command:
$ sudo dd if=/dev/zero of=/dev/sdX bs=1M count=10
Note
This is a very important step!
The reader should not forget to replace device /dev/sdX with the device associated with the microSD plugged into their system and follow the next steps carefully or they may damage the host system!
Then, we can install the newly compiled bootloaders:
$ sudo dd if=MLO of=/dev/sdX count=1 seek=1 bs=128k
$ sudo dd if=u-boot.img of=/dev/sdX count=2 seek=1 bs=384k
Now, we can prepare the needed partition for the root filesystem, which will be installed in the upcoming sections. Here are the commands:
$ echo '1M,,L,*' | sudo sfdisk /dev/sdX
$ sudo mkfs.ext4 -L rootfs /dev/sdX1
Note
Since in mkfs.ext4 version 1.43, the options metadata_csum and 64bit are enabled by default. However, we need to make sure that they are disabled; otherwise, U-Boot cannot boot from our ext4 partitions. If this is our case, we need to replace the preceding command with the following one:
$ sudo mkfs.ext4 -L rootfs
-O ^metadata_csum,^64bit /dev/sdX1
In order to get the current version of mkfs.ext4, we can use the command with the -V option argument.
Then, mount the newly created partition and copy the bootloaders in it (these will be used soon). Here are the commands:
$ sudo mkdir /media/rootfs
$ sudo mount /dev/sdX1 /media/rootfs/
$ sudo mkdir -p /media/rootfs/opt/backup/uboot/
$ sudo cp MLO /media/rootfs/opt/backup/uboot/
$ sudo cp u-boot.img /media/rootfs/opt/backup/uboot/
Now, we have just to add U-Boot's environment commands to properly load the kernel. We have to put all commands into a file called uEnv.txt in rootfs as follows:
$ sudo mkdir /media/rootfs/boot/
$ sudo cp uEnv.txt /media/rootfs/boot/
The content of the uEnv.txt file is reported here:
loadaddr=0x82000000
fdtaddr=0x88000000
rdaddr=0x88080000

initrd_high=0xffffffff
fdt_high=0xffffffff
mmcroot=/dev/mmcblk0p1

loadximage=load mmc 0:1 ${loadaddr} /boot/vmlinuz-${uname_r}
loadxfdt=load mmc 0:1 ${fdtaddr} /boot/dtbs/${uname_r}/${fdtfile}
loadxrd=load mmc 0:1 ${rdaddr} /boot/initrd.img-${uname_r}; setenv rds
ize ${filesize}
loaduEnvtxt=load mmc 0:1 ${loadaddr} /boot/uEnv.txt ; env import -t ${
loadaddr} ${filesize};
loadall=run loaduEnvtxt; run loadximage; run loadxfdt;
mmcargs=setenv bootargs console=tty0 console=${console} ${optargs} ${c
ape_disable} ${cape_enable} root=${mmcroot} rootfstype=${mmcrootfstype
} ${cmdline}

uenvcmd=run loadall; run mmcargs; bootz ${loadaddr} - ${fdtaddr};
Note
The preceding text can be found in the chapter_01/BBB-uEnv.txt file in the book's example code repository.
Now, it's time to compile the kernel.
The kernel sources can be downloaded from the several repositories, and we decided to use the ones from Robert C. Nelson archives instead of the standard Debian repositories because these repositories are really well done, easy to use, and well supported in terms of custom kernel sources for our embedded kits!
The command is here:
$ git clone https://github.com/RobertCNelson/bb-kernel
Then, we have to enter into the newly created directory and choose which version of the kernel we wish to use. There are several choices, and I decided to use the kernel version 4.4 (no specific reasons for that, it's just the release in the middle and you can choose whatever better fits your needs). So, we used the commands here:
$ cd  bb-kernel
$ git checkout origin/am33x-v4.4 -b am33x-v4.4
Now, before continuing, we can do something similar to what we did for U-Boot and then pre-download a Linux bare repository from the linux-stable tree into the common directory with the following command:
$ cd common
$ git clone --bare
      https://git.kernel.org/pub/scm/linux/kernel/git/stable/
linux-stable.git
Then, we have to do a little trick to transform the just downloaded data in a form suitable for the build_kernel.sh script we've to use here:
$ mkdir linux-stable
$ mv linux-stable.git/ linux-stable/.git
$ cd linux-stable
$ git config --local --bool core.bare false
In this manner, we converted a bare repository into a normal one, but without checking out any file and saving a lot of disk space!
Now, by properly setting the LINUX_GIT variable into the system.sh file, we can reference the just downloaded repository. The system.sh file can be easily obtained from system.sh.sample as follows:
$ cp system.sh.sample system.sh
Then, we need to properly set the LINUX_GIT and the CC variables (to specify the cross-compiler to be used) as reported in the following patch:
--- system.sh.sample  2016-04-15 18:04:18.178681406 +0200
+++ system.sh  2016-04-18 17:40:11.229958465 +0200
@@ -16,12 +16,14 @@
 #CC=<enter full path>/bin/arm-none-eabi-
 #CC=<enter full path>/bin/arm-linux-gnueabi-
 #CC=<enter full path>/bin/arm-linux-gnueabihf-
+CC=arm-linux-gnueabihf-

 ###OPTIONAL:

 ###OPTIONAL: LINUX_GIT: specify location of locally cloned git tree.
 #
 #LINUX_GIT=/home/user/linux-stable/
+LINUX_GIT=~/Projects/common/linux-stable

 ###OPTIONAL: MMC: (REQUIRED FOR RUNNING: tools/install_kernel.sh)
 #Note: This operates on raw disks, NOT PARTITIONS..
Now, we have to set up our identity into the new git repository with the following commands:
$ git config --global user.name "Rodolfo Giometti"
$ git config --global user.email "[email protected]"
Then, we can start the compilation with the following command:
$ ./build_kernel.sh
Note
This step and the subsequent ones are time consuming and require patience, so you should take a cup of your preferred tea or coffee and just wait.
We should see that the correct cross-compiler is set and also the linux-stable repository is correctly referenced. Here is what I gets on my system:
$ ./build_kernel.sh
+ Detected build host [Ubuntu 15.10]
+ host: [x86_64]
+ git HEAD commit: [72cf1bea12eea59be6632c9e9582f59e7f63ab3d]
-----------------------------
scripts/gcc: Using: arm-linux-gnueabihf-gcc (Linaro GCC 5.3-2016.02) 5
.3.1 20160113
Copyright (C) 2015 Free Software Foundation, Inc.
This is free software; see the source for copying conditions. There i
s NO warranty; not even for MERCHANTABILITY or FITNESS FOR A PARTICULA
R PUR
POSE.
-----------------------------
CROSS_COMPILE=arm-linux-gnueabihf-
-----------------------------
scripts/git: Debug: LINUX_GIT is setup as: [/home/giometti/Projects/co
mmon/linux-stable].
scripts/git: [url=https://git.kernel.org/pub/scm/linux/kernel/git/stab
le/linux-stable.git]
From https://git.kernel.org/pub/scm/linux/kernel/git/stable/linux-stab
le
 * branch HEAD -> FETCH_HEAD
-----------------------------
Cloning into '/home/giometti/Projects/BBB/bb-kernel/KERNEL'...
done.
...
After a while, the classic kernel configuration panel should appear. Just confirm the default settings by selecting the < Exit > menu option and then continue.
When finished, we should see several messages as shown here:
...
-----------------------------
'arch/arm/boot/zImage' -> '/home/giometti/Projects/BBB/bb-kernel/deplo
y/4.4.7-bone9.zImage'
'.config' -> '/home/giometti/Projects/BBB/bb-kernel/deploy/config-4.4.
7-bone9'
-rwxrwxr-x 1 giometti giometti 7,1M apr 15 18:54 /home/giometti/Projec
ts/BBB/bb-kernel/deploy/4.4.7-bone9.zImage
-----------------------------
Building modules archive...
Compressing 4.4.7-bone9-modules.tar.gz...
-rw-rw-r-- 1 giometti giometti 58M apr 15 18:55 /home/giometti/Project
s/BBB/bb-kernel/deploy/4.4.7-bone9-modules.tar.gz
-----------------------------
Building firmware archive...
Compressing 4.4.7-bone9-firmware.tar.gz...
-rw-rw-r-- 1 giometti giometti 1,2M apr 15 18:55 /home/giometti/Projec
ts/BBB/bb-kernel/deploy/4.4.7-bone9-firmware.tar.gz
-----------------------------
Building dtbs archive...
Compressing 4.4.7-bone9-dtbs.tar.gz...
-rw-rw-r-- 1 giometti giometti 328K apr 15 18:55 /home/giometti/Projec
ts/BBB/bb-kernel/deploy/4.4.7-bone9-dtbs.tar.gz
-----------------------------
Script Complete
eewiki.net: [user@localhost:~$ export kernel_version=4.4.7-bone9]
-----------------------------
The last line tell us which is the kernel version to be defined into the uEnv.txt file defined earlier when we installed the bootloaders. The command is shown here:
$ sudo sh -c 'echo "uname_r=4.4.7-bone9" >>
             /media/rootfs/boot/uEnv.txt'
Now, we should install the kernel, but before doing it, we need the root filesystem, so let's move to the next subsection.
To install the rootfs directory containing our Debian OS, we can use a pre-built image, and again, we can download it into the common directory to save space. The commands are shown here:
$ cd common
$ wget wget -c https://rcn-ee.com/rootfs/eewiki/minfs/debian-8.4-minim
al-armhf-2016-04-02.tar.xz
Then, we can explore it by using the tar command:
$ tar xf debian-8.4-minimal-armhf-2016-04-02.tar.xz
Note
By the time you read this, new versions could be available or the current one could be missing. Then, we should verify the available versions in the case of errors while downloading the rootfs image used earlier.
When finished, a new directory named debian-8.4-minimal-armhf-2016-04-02 should be available on the current working directory, and to copy it on the microSD, we can use this command:
$ cd debian-8.4-minimal-armhf-2016-04-02/
$ sudo tar xpf armhf-rootfs-debian-jessie.tar
           -C /media/rootfs/
When finished, we can add the kernel image and its related files compiled earlier by switching back to the kernel repository and then using these commands:
$ cd BBB/bb-kernel
$ sudo cp deploy/4.4.7-bone9.zImage
          /media/rootfs/boot/vmlinuz-4.4.7-bone9
$ sudo mkdir -p /media/rootfs/boot/dtbs/4.4.7-bone9/
$ sudo tar xf deploy/4.4.7-bone9-dtbs.tar.gz
           -C /media/rootfs/boot/dtbs/4.4.7-bone9/
$ sudo tar xf deploy/4.4.7-bone9-modules.tar.gz
           -C /media/rootfs/
Now, to finish the job, we must set up the filesystem table using the following command:
$ sudo sh -c "echo '/dev/mmcblk0p1  /  auto  errors=remount-ro  0  1' >
             /media/rootfs/etc/fstab"
Do the networking configuration by executing the following commands:
$ sudo sh -c "echo 'allow-hotplug lo\niface lo inet loopback\n' >
             /media/rootfs/etc/network/interfaces"
$ sudo sh -c "echo 'allow-hotplug eth0\niface eth0 inet dhcp\n' >>
             /media/rootfs/etc/network/interfaces"
Now, we should be ready to boot our new system! Let's unmount the microSD from the host PC and plug it into the BeagleBone Black and power on the board. The umount command line is shown here:
$ sudo umount /media/rootfs/
If everything works well on the serial console, we should see something like this:
U-Boot SPL 2016.03-dirty (Apr 15 2016 - 13:44:25)
Trying to boot from MMC
bad magic
U-Boot 2016.03-dirty (Apr 15 2016 - 13:44:25 +0200)

 Watchdog enabled
I2C: ready
DRAM: 512 MiB
Reset Source: Power-on reset has occurred.
MMC: OMAP SD/MMC: 0, OMAP SD/MMC: 1
Using default environment

Net: <ethaddr> not set. Validating first E-fuse MAC
cpsw, usb_ether
Press SPACE to abort autoboot in 2 seconds
switch to partitions #0, OK
mmc0 is current device
Scanning mmc 0:1...
...
debug: [console=ttyO0,115200n8 root=/dev/mmcblk0p1 ro rootfstype=ext4
rootwait].
debug: [bootz 0x82000000 - 0x88000000] ...
Kernel image @ 0x82000000 [ 0x000000 - 0x710b38 ]
## Flattened Device Tree blob at 88000000
 Booting using the fdt blob at 0x88000000
 Using Device Tree in place at 88000000, end 88010a19

Starting kernel ...

[ 0.000000] Booting Linux on physical CPU 0x0...
[ 5.466604] random: systemd urandom read with 17 bits of entropy av
ailable
[ 5.484996] systemd[1]: systemd 215 running in system mode. (+PAM +
AUDIT +SE)
[ 5.498711] systemd[1]: Detected architecture 'arm'.

Welcome to Debian GNU/Linux 8 (jessie)!

[ 5.535458] systemd[1]: Set hostname to <arm>.
[ 5.861405] systemd[1]: Cannot add dependency job for unit display-
manager.s.
...
[ OK ] Started LSB: Apache2 web server.
[ 12.903747] random: nonblocking pool is initialized

Debian GNU/Linux 8 arm ttyS0

default username:password is [debian:temppwd]

arm login:
Note
In order to work, we may need to completely power the BeagleBone Black and then re-power it while keeping the user button pressed. Otherwise, the board will still continue booting from the on-board eMMC.
Great! Everything is working now. We can log in by entering the string root as both username and password.
Now, it's the turn of the SAMA5D3 Xplained. Even this board may have a pre-loaded distribution into its flash memory, but it is an embedded distribution that is not suitable for our purposes. So, as we did for the BeagleBone Black, we will install a fresh Debian OS on a microSD card (in reality, the SAMA5D3 Xplained comes with an SD slot, but we can still use a microSD plugged in an SD adapter).
As shown in the previous section, we have the J23 connector where the serial console pins are exposed. So, again, using a proper adapter, we can connect our host PC with it.
The relevant pins are reported in the table, and you, exactly as you did earlier, have to connect the GND signal with the adapter's GND pin and then swap the TxD and RxD to correctly establish the serial connection.
|
Connector J1 |
Function |
|
Pin 6 |
GND |
|
Pin 2 |
TxD |
|
Pin 3 |
RxD |
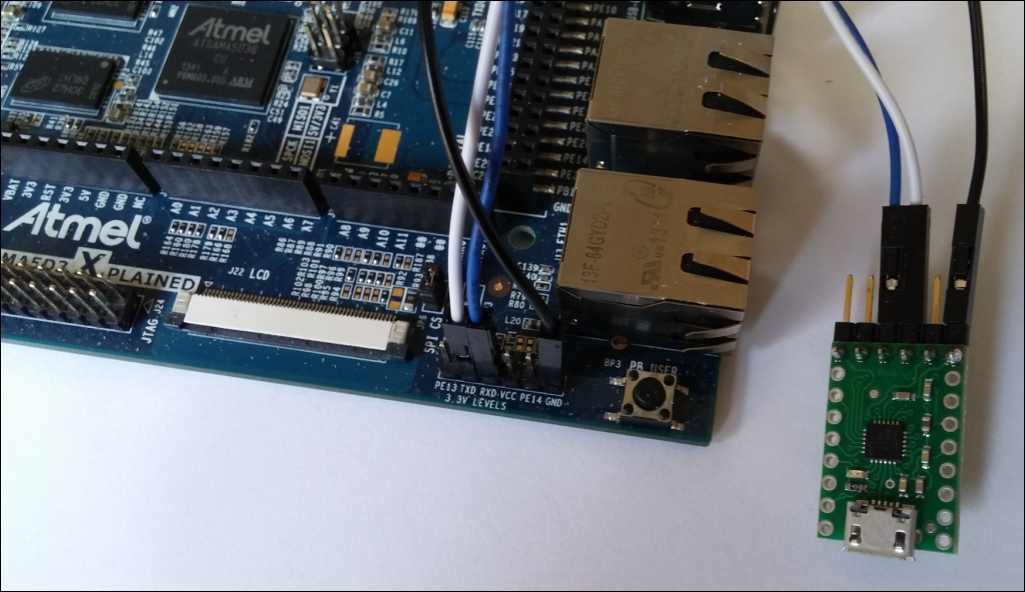
The next image shows my setup:
If all connections are OK, we can execute the minicom tool again to see the data from the serial console.
If our SAMA5D3 Xplained comes with a pre-loaded system, we should see the booting sequence in the serial console window. Otherwise, we should simply see the RomBOOT message. In any case, the serial console should be functional.
Note
You should not forget to verify the serial port to be used. You should also see that its setup is 115200,8N1 without hardware and software flow control. See the BeagleBone Black settings earlier.
Now, let's install the software to start working with our SAMA5D3 Xplained board.
To obtain the bootloader's sources, we can use the same trick used for BeagleBone Black's sources. However, this time, the bare repository is already downloaded, so we just need to clone a new one with the following commands (to work with this board, we created the A5D3 directory):
$ cd A5D3
$ git clone --reference ~/Projects/common/u-boot.git
            https://github.com/u-boot/u-boot
Now, let's go into the newly created directory and check out a proper U-Boot release to use. Here are the commands used:
$ cd u-boot
$ git checkout v2016.03 -b v2016.03
Now, just as before, we need some patches to properly support the SAMA5D3 Xplained. We can get them using the following commands:
$ wget -c https://rcn-ee.com/repos/git/u-boot-patches/v2016.03/0001-sa
ma5d3_xplained-uEnv.txt-bootz-n-fixes.patch
$ patch -p1 < 0001-sama5d3_xplained-uEnv.txt-bootz-n-fixes.patch
Now, we're ready to compile:
$ make ARCH=arm CROSS_COMPILE=arm-linux-gnueabihf-
       sama5d3_xplained_mmc_defconfig
$ make ARCH=arm CROSS_COMPILE=arm-linux-gnueabihf-
Now, let's install the bootloader into the microSD.
Note
As already done earlier, we have to discover the device associated with the microSD (see the the BeagleBone Black subsection).
We can clear the current partition table using the following command:
$ sudo dd if=/dev/zero of=/dev/sdX bs=1M count=50
Note
You should not forget to replace device /dev/sdX with the device associated with the microSD plugged into your system and follow the next steps carefully. Otherwise, it may damage the host system!
Now, we can prepare the needed partitions for the root filesystem, which will be installed in the upcoming sections. Here are the commands:
$ echo -e '1M,48M,0xE,*\n,,,-' | sudo sfdisk /dev/sdX
$ sudo mkfs.vfat -F 16 -n BOOT /dev/sdX1
$ sudo mkfs.ext4 -L rootfs /dev/sdX2
Note
As already stated for the BeagleBone Black, we must notice that since the mkfs.ext4 version 1.43, the metadata_csum and 64bit options are enabled by default. However, we need to make sure that they are disabled. Otherwise, U-Boot cannot boot from our ext4 partitions. If this is our case, we need to replace the preceding command with the following one:
$ sudo mkfs.ext4 -L rootfs
-O ^metadata_csum,^64bit /dev/sdX2
Now, we can mount the newly created boot and rootfs partitions in order to be ready to copy the bootloaders and the distro's file into them. Here are the commands:
$ sudo mkdir /media/boot
$ sudo mkdir /media/rootfs
$ sudo mount /dev/sdX1 /media/boot
$ sudo mount /dev/sdX2 /media/rootfs
Then, we can install the newly compiled bootloaders:
$ sudo cp boot.bin /media/boot/
$ sudo cp u-boot.img /media/boot/
Now, it's time to compile the kernel.
Again, the kernel sources can be downloaded from Robert C. Nelson archives. The command is shown here:
$ git clone https://github.com/RobertCNelson/armv7_devel
Then, we have to enter into the newly created directory and choose which version of the kernel we wish to use. Of course, we choose the same kernel release as we did earlier, and here are the commands:
$ cd armv7_devel/
$ git checkout origin/v4.4.x-sama5-armv7 -b v4.4.x-sama5-armv7
Now, we can redo the previous settings into the system.sh file, and then, we can start the compilation using the following command:
$ ./build_kernel.sh
Note
This step and the subsequent ones are time consuming and require patience, so you should take a cup of your preferred tea or coffee and just wait.
We should see that the correct cross-compiler is set and also see that the linux-stable repository is correctly referenced. Here is what I get on my system:
$ ./build_kernel.sh
+ Detected build host [Ubuntu 15.10]
+ host: [x86_64]
+ git HEAD commit: [cc996bf444c2fb5f3859c431fbc3b29fe9ba6877]
-----------------------------
scripts/gcc: Using: arm-linux-gnueabihf-gcc (Linaro GCC 5.3-2016.02) 5
.3.1 20160113
Copyright (C) 2015 Free Software Foundation, Inc.
This is free software; see the source for copying conditions. There i
s NO
warranty; not even for MERCHANTABILITY or FITNESS FOR A PARTICULA
R PUR
POSE.
-----------------------------
CROSS_COMPILE=arm-linux-gnueabihf-
-----------------------------
scripts/git: Debug: LINUX_GIT is setup as: [/home/giometti/Projects/co
mmon/linux-stable].
scripts/git: [url=https://git.kernel.org/pub/scm/linux/kernel/git/stab
le/linux-stable.git]
From https://git.kernel.org/pub/scm/linux/kernel/git/stable/linux-stab
le
 * branch HEAD -> FETCH_HEAD
-----------------------------
Cloning into '/home/giometti/Projects/A5D3/armv7_devel/KERNEL'...
done.
...
After a while, the classic kernel configuration panel should appear, but this time, we should change the default configuration. In particular, we wish to change the USB Gadget settings as shown in the following screenshot:

Then, save the configuration and continue. When finished, we should see several messages as shown here:
...
-----------------------------
'arch/arm/boot/zImage' -> '/home/giometti/Projects/A5D3/armv7_devel/de
ploy/4.4.6-sama5-armv7-r5.zImage'
'.config' -> '/home/giometti/Projects/A5D3/armv7_devel/deploy/config-4
.4.6-sama5-armv7-r5'
-rwxrwxr-x 1 giometti giometti 3,7M apr 15 20:19 /home/giometti/Projec
ts/A5D3/armv7_devel/deploy/4.4.6-sama5-armv7-r5.zImage
-----------------------------
Building modules archive...
Compressing 4.4.6-sama5-armv7-r5-modules.tar.gz...
-rw-rw-r-- 1 giometti giometti 328K apr 15 20:19 /home/giometti/Projec
ts/A5D3/armv7_devel/deploy/4.4.6-sama5-armv7-r5-modules.tar.gz
-----------------------------
Building firmware archive...
Compressing 4.4.6-sama5-armv7-r5-firmware.tar.gz...
-rw-rw-r-- 1 giometti giometti 1,2M apr 15 20:19 /home/giometti/Projec
ts/A5D3/armv7_devel/deploy/4.4.6-sama5-armv7-r5-firmware.tar.gz
-----------------------------
Building dtbs archive...
Compressing 4.4.6-sama5-armv7-r5-dtbs.tar.gz...
-rw-rw-r-- 1 giometti giometti 64K apr 15 20:19 /home/giometti/Project
s/A5D3/armv7_devel/deploy/4.4.6-sama5-armv7-r5-dtbs.tar.gz
-----------------------------
Script Complete
eewiki.net: [user@localhost:~$ export kernel_version=4.4.6-sama5-armv7
-r5]
-----------------------------
Now, we should install the kernel, but just as we did earlier, we need the root filesystem. So, let's move to the next subsection.
Like rootfs we can use the one already downloaded for the BeagleBone Black, so let's copy it into the microSD:
$ cd common/debian-8.4-minimal-armhf-2016-04-02/
$ sudo tar xpf armhf-rootfs-debian-jessie.tar -C /media/rootfs/
When finished, we can add the kernel image and the related files:
$ cd A5D3/armv7_devel
$ sudo cp deploy/4.4.6-sama5-armv7-r5.zImage /media/boot/zImage
$ sudo mkdir -p /media/boot/dtbs/
$ sudo tar xf deploy/4.4.6-sama5-armv7-r5-dtbs.tar.gz
           -C /media/boot/dtbs/
$ sudo tar xf deploy/4.4.6-sama5-armv7-r5-modules.tar.gz
           -C /media/rootfs/
Now, to finish the job, we must set up the filesystem table using the following commands:
$ sudo sh -c "echo '/dev/mmcblk0p2  /  auto  errors=remount-ro  0  1' >
             /media/rootfs/etc/fstab"
$ sudo sh -c "echo '/dev/mmcblk0p1  /boot/uboot  auto  defaults  0  2' >>
             /media/rootfs/etc/fstab"
Also set up the networking configuration by executing the following commands:
$ sudo sh -c "echo 'allow-hotplug lo\niface lo inet loopback\n' >
             /media/rootfs/etc/network/interfaces"
$ sudo sh -c "echo 'allow-hotplug eth0\niface eth0 inet dhcp\n' >>
             /media/rootfs/etc/network/interfaces"
$ sudo sh -c "echo 'allow-hotplug eth1\niface eth1 inet dhcp' >>
             /media/rootfs/etc/network/interfaces"
Now, we should be ready to boot our new system! Let's unmount the microSD from the host PC, plug it into the SAMA5D3 Xplained, and power on the board. The umount command lines are shown here:
$ sudo umount /media/boot/
$ sudo umount /media/rootfs/
If everything works well on the serial console, we should see something as shown here:
RomBOOT
U-Boot SPL 2016.03-dirty (Apr 15 2016 - 19:51:18)
Trying to boot from MMC
reading u-boot.img
reading u-boot.img
U-Boot 2016.03-dirty (Apr 15 2016 - 19:51:18 +0200)
CPU: SAMA5D36
Crystal frequency: 12 MHz
CPU clock : 528 MHz
Master clock : 132 MHz
DRAM: 256 MiB
NAND: 256 MiB
MMC: mci: 0
...
reading /dtbs/at91-sama5d3_xplained.dtb
34694 bytes read in 10 ms (3.3 MiB/s)
reading zImage
3832792 bytes read in 245 ms (14.9 MiB/s)
Kernel image @ 0x22000000 [ 0x000000 - 0x3a7bd8 ]
## Flattened Device Tree blob at 21000000
 Booting using the fdt blob at 0x21000000
 Loading Device Tree to 2fadc000, end 2fae7785 ... OK
Starting kernel ...
[ 0.000000] Booting Linux on physical CPU 0x0
...
[ 2.170000] random: systemd urandom read with 11 bits of entropy av
ailable
[ 2.180000] systemd[1]: systemd 215 running in system mode. (+PAM +
AUDIT +SEL
INUX +IMA +SYSVINIT +LIBCRYPTSETUP +GCRYPT +ACL +XZ -SECC
OMP -APPARMOR
)
[ 2.190000] systemd[1]: Detected architecture 'arm'.
Welcome to Debian GNU/Linux 8 (jessie)!
[ 2.240000] systemd[1]: Set hostname to <arm>.
[ 2.790000] systemd[1]: Cannot add dependency job for unit display-
manager.se
...
 Starting Update UTMP about System Runlevel Changes...
[ OK ] Started Update UTMP about System Runlevel Changes.
Debian GNU/Linux 8 arm ttyS0
default username:password is [debian:temppwd]
arm login:
Great! Everything is working now. We can log in by entering the root string as both username and password.
This has no pre-loaded distribution. So, as done for the previous boards, we will install a fresh Debian OS on a microSD card.
Like the other boards presented in this book, the Wandboard has the COM1 connector where the serial console pins are exposed. However, in this case, the port is a a standard RS-232 port. So, we don't have the TTL level signal! What we can do now is just connect the COM1 port to our host PC serial port through a null modem cable (a serial cable where the TxD and RxD signals are crossed) or use a USB-to-RS232 adapter and then connect this device to the null modem cable.
The relevant pins are reported in the following table, and just as you did earlier, you have to connect the GND signal with the adapter's GND pin and then swap the TxD and RxD to correctly establish the serial connection.
|
COM1 |
Function |
|
Pin 5 |
GND |
|
Pin 2 |
TXD |
|
Pin 3 |
RXD |
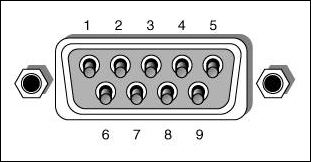
In the next image, the pin out of a standard RS-232 9-pins connector is shown:
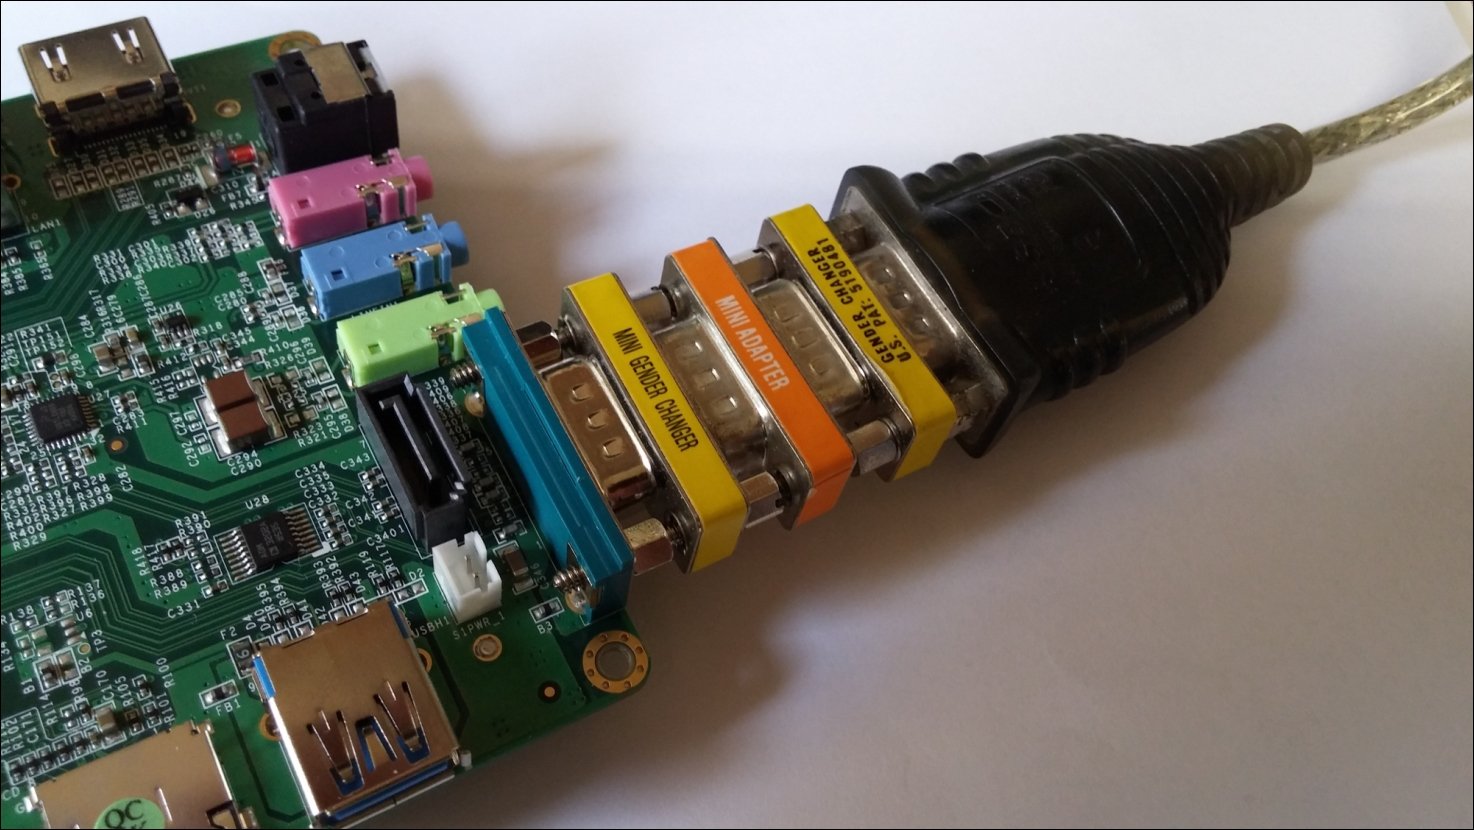
This image is my setup (where we used three adapters: two genders changers and one null modem):
Now, let's install the software to start working with our WindBoard board.
To obtain the bootloader's sources, we can use the same trick used for the other boards, so we just need to clone a new one with the following command:
$ git clone --reference ~/Projects/common/u-boot.git
            https://github.com/u-boot/u-boot
Now, let's go into the newly created directory and check out a proper U-boot release to use. Here are the commands used:
$ cd u-boot


$ git checkout v2016.03 -b v2016.03
Here are the patches for the Wandboard:
$ wget -c https://rcn-ee.com/repos/git/u-boot-patches/v2016.03/0001-wa
ndboard-uEnv.txt-bootz-n-fixes.patch
$ patch -p1 < 0001-wandboard-uEnv.txt-bootz-n-fixes.patch
Now, we're ready to compile. Let's do it using the following commands:
$ make ARCH=arm CROSS_COMPILE=arm-linux-gnueabihf-
       wandboard_defconfig
$ make ARCH=arm CROSS_COMPILE=arm-linux-gnueabihf-
Now, let's install the bootloader into the microSD.
Note
As done earlier, we have to discover the device associated with the microSD (see the BeagleBone Black or SAMA5D3 Xplained subsections). On my system, the device is still /dev/sdd.
In this case, we used a 16 GB microSD since we're going to install a lot of software on this board!
Now, we can clear the current partition table using the following command:
$ sudo dd if=/dev/zero of=/dev/sdX bs=1M count=10
Note
You must not forget to replace device /dev/sdX with the device associated with the microSD plugged into your system and follow the next steps carefully. Otherwise, it may damage the host system!
Then, we can install the newly compiled bootloaders:
$ sudo dd if=SPL of=/dev/sdX seek=1 bs=1k
$ sudo dd if=u-boot.img of=/dev/sdX seek=69 bs=1k
Now, we can prepare the needed partition for the root filesystem, which will be installed in the upcoming sections. The commands are shown here:
$ echo '1M,,L,*' | sudo sfdisk /dev/sdX
$ sudo mkfs.ext4 -L rootfs /dev/sdX1
Tip
As already stated for the other boards, we must notice that since the mkfs.ext4 version 1.43, the metadata_csum and 64bit options are enabled by default. However, we need to make sure that they are disabled. Otherwise, U-Boot cannot boot from our ext4 partitions. If this is our case, we need to replace the preceding command with the following one:
$ sudo mkfs.ext4 -L rootfs
-O ^metadata_csum,^64bit /dev/sdX1
Now, we can mount the newly created boot and rootfs partition as done earlier. Here are the commands:
$ sudo mkdir /media/rootfs
$ sudo mount /dev/sdX1 /media/rootfs
Then, as done for the SAMA5D3 Xplained, we don't define an environment file uEnv.txt right now, but we will define it later since, in contrast to SAMA5D3 Xplained, we need it.
Now, it's time to compile the kernel.
The kernel sources are still the ones from Robert C. Nelson archives. The command is shown here:
$ git clone https://github.com/RobertCNelson/armv7-multiplatform
Then, we have to enter into the newly created directory and choose which version of the kernel we wish to use. Of course, we choose the same kernel release as the one mentioned earlier, and the commands are shown here:
$ cd armv7-multiplatform/
$ git checkout origin/v4.4.x -b v4.4.x
Now, we can redo the previous settings into the system.sh file, and then, we can start the compilation using the following command:
$ ./build_kernel.sh
Note
This step and the subsequent ones are time consuming and require patience, so you should take a cup of your preferred tea or coffee and just wait.
We should see that the correct cross-compiler is set and also see that the linux-stable repository is correctly referenced. Here is what I get on my system:
$ ./build_kernel.sh
+ Detected build host [Ubuntu 15.10]
+ host: [x86_64]
+ git HEAD commit: [44cd32b5f0ff74d2705541225c0d7cbdfb59bf50]
-----------------------------
scripts/gcc: Using: arm-linux-gnueabihf-gcc (Linaro GCC 5.3-2016.02) 5
.3.1 20160113
Copyright (C) 2015 Free Software Foundation, Inc.
This is free software; see the source for copying conditions. There i
s NO
warranty; not even for MERCHANTABILITY or FITNESS FOR A PARTICULA
R PUR
POSE.
-----------------------------
CROSS_COMPILE=arm-linux-gnueabihf-
-----------------------------
scripts/git: Debug: LINUX_GIT is setup as: [/home/giometti/Projects/co
mmon/linux-stable].
scripts/git: [url=https://git.kernel.org/pub/scm/linux/kernel/git/stab
le/linux-stable.git]
From https://git.kernel.org/pub/scm/linux/kernel/git/stable/linux-stab
le
 * branch HEAD -> FETCH_HEAD
-----------------------------
Cloning into '/home/giometti/Projects/WB/armv7-multiplatform/KERNEL'..
.
done.
...
After a while, the classic kernel configuration panel should appear. Just confirm the default settings by selecting the < Exit > menu option and continue.
When finished, we should see several messages as shown here:
...
-----------------------------
'arch/arm/boot/zImage' -> '/home/giometti/Projects/WB/armv7-multiplatf
orm/deploy/4.4.7-armv7-x6.zImage'
'.config' -> '/home/giometti/Projects/WB/armv7-multiplatform/deploy/co
nfig-4.4.7-armv7-x6'
-rwxrwxr-x 1 giometti giometti 5,6M apr 17 18:46 /home/giometti/Projec
ts/WB/armv7-multiplatform/deploy/4.4.7-armv7-x6.zImage
-----------------------------
Building modules archive...
Compressing 4.4.7-armv7-x6-modules.tar.gz...
-rw-rw-r-- 1 giometti giometti 89M apr 17 18:47 /home/giometti/Project
s/WB/armv7-multiplatform/deploy/4.4.7-armv7-x6-modules.tar.gz
-----------------------------
Building firmware archive...
Compressing 4.4.7-armv7-x6-firmware.tar.gz...
-rw-rw-r-- 1 giometti giometti 1,2M apr 17 18:47 /home/giometti/Projec
ts/WB/armv7-multiplatform/deploy/4.4.7-armv7-x6-firmware.tar.gz
-----------------------------
Building dtbs archive...
Compressing 4.4.7-armv7-x6-dtbs.tar.gz...
-rw-rw-r-- 1 giometti giometti 3,1M apr 17 18:47 /home/giometti/Projec
ts/WB/armv7-multiplatform/deploy/4.4.7-armv7-x6-dtbs.tar.gz
-----------------------------
Script Complete
eewiki.net: [user@localhost:~$ export kernel_version=4.4.7-armv7-x6]
-----------------------------
The last line tells us which is the kernel version to be defined in the uEnv.txt file defined earlier when we installed the bootloaders. The command is shown here:
$ sudo sh -c 'echo "uname_r=4.4.7-armv7-x6" >>
             /media/rootfs/boot/uEnv.txt'
Now, we should install the kernel, but first, we need the root filesystem. So, let's move to the next subsection.
Like rootfs we can use the one already downloaded for the BeagleBone Black, so let's copy it into the microSD:
$ cd common/debian-8.4-minimal-armhf-2016-04-02/
$ sudo tar xpf armhf-rootfs-debian-jessie.tar -C /media/rootfs/
When finished, we can add the kernel image and the related files:
$ cd WB/armv7-multiplatform/
$ sudo cp deploy/4.4.7-armv7-x6.zImage
          /media/rootfs/boot/vmlinuz-4.4.7-armv7-x6
$ sudo mkdir -p /media/rootfs/boot/dtbs/4.4.7-armv7-x6/
$ sudo tar xf deploy/4.4.7-armv7-x6-dtbs.tar.gz
           -C /media/rootfs/boot/dtbs/4.4.7-armv7-x6/
$ sudo tar xf deploy/4.4.7-armv7-x6-modules.tar.gz
           -C /media/rootfs/
Now, to finish the job, we must set up the filesystem table using the following command:
$ sudo sh -c "echo '/dev/mmcblk0p1 / auto errors=remount-ro 0 1' >
             /media/rootfs/etc/fstab"
We also need to set up the networking configuration by executing the following commands:
$ sudo sh -c "echo 'allow-hotplug lo\niface lo inet loopback\n' >
             /media/rootfs/etc/network/interfaces"
$ sudo sh -c "echo 'allow-hotplug eth0\niface eth0 inet dhcp' >>
             /media/rootfs/etc/network/interfaces"
Now, we should be ready to boot our new system! Let's unmount the microSD from the host PC, plug it into the Wandboard, and power on the board. The umount command line is shown here:
$ sudo umount /media/rootfs/
If everything works well on the serial console, we should see something like this:
U-Boot SPL 2016.03-dirty (Apr 21 2016 - 10:41:24)
Trying to boot from MMC
U-Boot 2016.03-dirty (Apr 21 2016 - 10:41:24 +0200)
CPU: Freescale i.MX6Q rev1.5 at 792 MHz
Reset cause: POR
Board: Wandboard rev C1
I2C: ready
DRAM: 2 GiB
MMC: FSL_SDHC: 0, FSL_SDHC: 1
*** Warning - bad CRC, using default environment
No panel detected: default to HDMI
Display: HDMI (1024x768)
In: serial
Out: serial
Err: serial
Net: FEC [PRIME]
Press SPACE to abort autoboot in 2 seconds
switch to partitions #0, OK
mmc0 is current device
SD/MMC found on device 0
...
debug: [console=ttymxc0,115200 root=/dev/mmcblk0p1 ro rootfstype=ext4
rootwait] ...
debug: [bootz 0x12000000 - 0x18000000] ...
Kernel image @ 0x12000000 [ 0x000000 - 0x588ba0 ]
## Flattened Device Tree blob at 18000000
 Booting using the fdt blob at 0x18000000
 Using Device Tree in place at 18000000, end 1800f7f8
Starting kernel ...
[ 0.000000] Booting Linux on physical CPU 0x0
...
[ 5.569385] random: systemd urandom read with 10 bits of entropy av
ailable
[ 5.582907] systemd[1]: systemd 215 running in system mode. (+PAM +
AUDIT +SEL
INUX +IMA +SYSVINIT +LIBCRYPTSETUP +GCRYPT +ACL +XZ -SECC
OMP -APPARMOR
)
[ 5.596522] systemd[1]: Detected architecture 'arm'.
Welcome to Debian GNU/Linux 8 (jessie)!
[ 5.637466] systemd[1]: Set hostname to <arm>.
...
[ OK ] Started LSB: Apache2 web server.
Debian GNU/Linux 8 arm ttymxc0
default username:password is [debian:temppwd]
arm login:
Great! Everything is working now. We can log in by entering the root string as both username and password.